If you have been having trouble setting up XML file for Start menu customization following the common advice across the internet, you have come to the right place. This approach would work not just in Citrix, but for RDS, WVD, traditional desktop deployments etc.
Common Advice
The netlogon share is often the place we choose to keep when setting up XML files for the Start menu layout. I’m going tell you that configuring your Start Menu in that approach isn’t ideal because it can give you inconsistent results.
This article from Microsoft says you need to amend your exported XML file and add the below entry so that you can allow users to add their own icons to the Tiles menu.
https://learn.microsoft.com/en-us/windows/configuration/customize-and-export-start-layout
<DefaultLayoutOverride LayoutCustomizationRestrictionType="OnlySpecifiedGroups">
You no longer need to do the above; We will do this differently in a much simpler way.
Better Approach – GPP Method
So how do you do this using group Policy Preferences to get it working consistently. (at least in my case). It consists of two parts
Setting up the XML file
Firstly, we need to arrange the Start Menu the way we like it. You could use an admin account for this task and ensure that you don’t switch the command line / PS context to another account ( or Run as Administrator). Just run it from the normal PS window. Once you like the way Start menu looks, generate the XML file by running the PowerShell cmdlet.
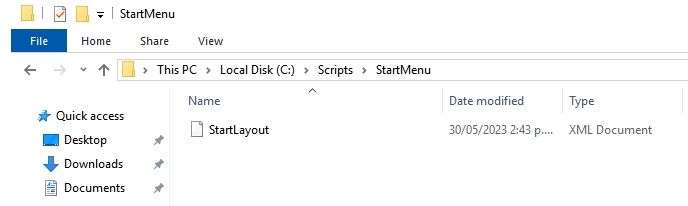
Export-StartLayout -path C:\temp\StartLayout.xml
The above command drops the file onto the desktop of the logged in account running the command.
Once you have the file, we will need to copy the XML file locally onto the server/VM where you need to manage the Start Menu. You can create a Group Policy Preferences policy to create a folder if you are managing multiple VMs and use GPPs again to perform a file copy to copy the XML file locally. Ensure that the GPP is set to run once.
Editing the Registry
Next step is to use GPP again to configure a HKLM key.

Value name = StartLayoutFile
Value type = REG_EXPAND_SZ
Value data = C:\Scripts\StartMenu\StartLayout.xml

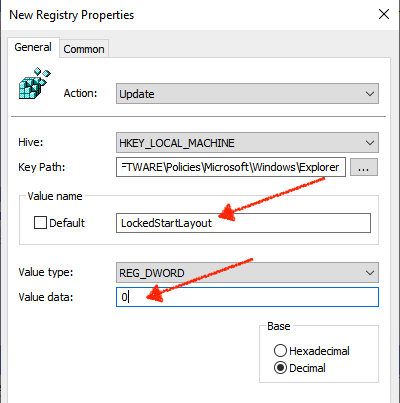
Create a second Registry item which controls if the users can make changes to the Start Menu or not.
Value name = LockedStartLayout
Value type = REG_DWORD
Value data = 0
0 would mean users can make changes to the Start Menu and 1 can mean Start menu is locked and no changes are allowed. I wanted them to make changes so going with a 0.
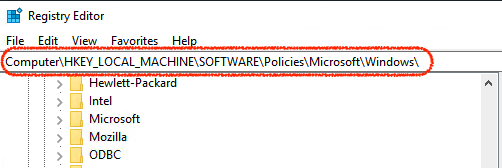
Registry path is
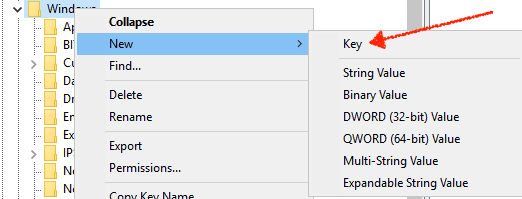
HKEY_LOCAL_MACHINE\SOFTWARE\Policies\Microsoft\Windows\ExplorerIf you are doing this manually, follow the below
You will need to create a key if the Explorer key doesn’t exist under Windows.
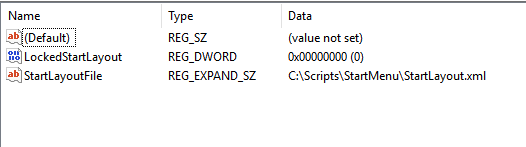
Once you have created both keys, they will look like the below once applied on the servers.
That’s all you need to do if you are deploying this without roaming profiles.
For Citrix deployments using UPM
If you want to roam the Start Menu settings for the users you will need to add the below folders to Folder Mirroring in UPM
Appdata\Local\PackagesAppdata\Local\Microsoft\Windows\Caches
!ctx_localappdata!\TileDataLayer (applicable only to Windows 10 version 1607 and earlier)
Also, add the below to the Files to Synchronize policy in UPM
Appdata\Local\Microsoft\Windows\UsrClass.dat*
This worked beautifully for me on the Citrix servers running Windows Server 2019. Let me know if it worked for you. Cheers for now.

Leave a Reply