Microsoft Windows Virtual Desktops (WVD) has been making a lot of waves in the EUC industry ever since it was announced by Microsoft in September 2018.
Windows Virtual Desktop (WVD) is a desktop and application virtualization solution that runs from Microsoft Azure. Unlike, Microsoft’s previous foray into the application and desktop virtualization markets in the past with Microsoft RemoteApps which didn’t take off quite well, this time I believe they have a compelling product in their hands.
WVD provides an impressive list of things to the companies who want to adopt it. The important benefits are quoted below.
Set up a multi-session Windows 10 deployment that delivers a full Windows 10 with scalability
Virtualize Office 365 ProPlus and optimize it to run in multi-user virtual scenarios
Provide Windows 7 virtual desktops with free Extended Security Updates – This is big for a lot of companies around the world who aren’t ready to migrate to Windows 10 yet.
Bring your existing Remote Desktop Services (RDS) and Windows Server desktops and apps to any computer
Virtualize both desktops and apps
Manage Windows 10, Windows Server, and Windows 7 desktops and apps with a unified management experience
WVD Requirements
Licensing
Below are the licensing requirements for running WVD in Azure.
Infrastructure Requirements
Your infrastructure should meet the following requirements to support Windows Virtual Desktop:
So, what is Citrix doing here and how does Citrix add value to the WVD offering? WVD by itself is a perfect fit for a lot of businesses out there, mostly the start-ups and SMBs. What if we combine WVD with Citrix? That’s a deadly combo right there. Citrix could take Microsoft’s WVD offering to the next level by wrapping a management layer around it, offering flexibility, choice, cost optimization and enhanced security.
The enhancements that Citrix provide to WVD offering is best depicted in the picture below (courtesy of Citrix).
Citrix has developed special optimization packs for Microsoft Teams and Skype for Business which makes a world of difference, if businesses want to run these collaboration tools in a virtualized infrastructure. Without the optimization packs, it’s virtually impossible to deliver good user experience with Teams and Skype for Business when using Audio, Video and Screen Sharing. Running single-session VDI workloads still won’t cut it either.
Hybrid Cloud Model – WVD would only lets you run your multi-session Win 10 workloads in Azure. Citrix could further compliment that approach to run your traditional RDSH workload wherever you would like – on-prem, Azure, AWS, Google Cloud, Oracle Cloud or on HCI solutions such as Nutanix. Customers can combine WVD with RDSH workloads and manage them via a single console.
Use Citrix HDX which is the best of the breed in remoting protocols.
Citrix Machine Creation Services (MCS) lets rapid creation of virtual machines with minimal infrastructure utilizing the hypervisor APIs.
AutoScale – Customers could quickly ramp up and down workloads on-demand. These days, customers have an option of doing vertical load balancing which brokers user load/sessions to a single machine until a desired level is reached after which the connection gets routed to the next workload until it gets fully loaded. This is so much useful in cost optimization and reduces the overall Total Cost of Ownership (TCO) by reducing the numbers of extra servers used.
Advanced Monitoring – Citrix has its own repertoire of monitoring tools on top of Microsoft’s Azure-based monitoring.
App Layering – Citrix App Layering radically reduces the time it takes to manage Windows applications and images. It separates the management of your OS and apps from your infrastructure. You can install each app and OS patch once, update the associated templates, and redeploy your images.
App Protection is an add-on feature that provides enhanced security when using Citrix Virtual Apps and Desktops published resources.
Session Recording allows you to record the on-screen activity of any user session hosted on a VDA for Server OS or Desktop OS, over any type of connection, subject to corporate policy and regulatory compliance. Session Recording records, catalogs, and archives sessions for retrieval and playback.
Citrix Analytics – AI driven performance and security analytics to businesses that deploys Virtual apps and desktops service.
Citrix SD-WAN – Citrix SD-WAN is a next-generation WAN Edge solution that simplifies digital transformation for enterprises. It offers comprehensive security, the best application experience for SaaS, cloud, and virtual apps and desktops.
With Citrix and WVD combo, customers can bring the multi-factor authentication vendor of their choice such as Okta, OAuth-based authentication, RADIUS-based multi-factor auth and so on.
Let’s Bust a Myth
This may come as a surprise for many of you who are working in the EUC space. A lot of the folks in the industry are thinking that in order to use WVD, you will need to buy Citrix Managed Desktops which is new product offering from Citrix and that is the only offering entitled to use WVD. That isn’t true at all.
You could use a plethora of the following services from Citrix and enjoy the full benefits and simplicity that WVD has to offer. In summary, if you are an existing Citrix Cloud customer that utilizes any of the below services from Citrix, you are entitled to WVD as well.
Conclusion
Let’s conclude this. Citrix’s offering isn’t really trying to compete with Microsoft’s WVD, but rather they are complementing each other by providing more choices to the customers who want to run their VDI and RDSH workloads in the cloud. Isn’t it great to have choices in life? 🙂
Citrix Machine Creation Services (MCS) is a compelling technology these days for provisioning virtual machines quickly and easily in Citrix environments. The whole technology is built around simplicity and requires just a supported hypervisor that utilizes snapshots to create additional VMs on the fly. There isn’t much required from a supporting infrastructure point of view as well. If you have a robust hypervisor with enough space in the storage array, MCS will work just fine. All that you would require is a service account with defined permissions for the whole thing to function.
If anyone wants to know what permissions are required for the MCS service account to function correctly, that could be found in the following Citrix official links.
I will even argue that MCS is just as good as another provisioning technology from Citrix, named Citrix Provisioning (formerly Citrix Provisioning Services or PVS) with the recent advancements it has made. There are scenarios when Citrix PVS is the better choice but that is a topic for another blog post.
While we are in the midst of Coronavirus pandemic and everyone is staying at home safe and sound, I have had some pleasant experiences working with MCS spinning up extra virtual machines for my customers here in Auckland, as they needed to ramp up their farm capacity to cater to the extra load. I could literally spin up machines in seconds(I am not exaggerating even a bit…) and just be ready for the incoming wave of Citrix users.
In this blog, let’s discuss how Citrix MCS works in general and what happens under the hood when MCS creates virtual machines. Let’s also discuss and compare Citrix MCS in an On-Prem setup versus MCS in Azure. I also have to say that most of the diagrams that you see below are shameless copies of Citrix’s own diagrams used in one of their webinars. I don’t mind accepting that 🙂 Now, that’s out of the way, let’s dive right in.
Citrix MCS – On Prem
So how does Citrix MCS works with your On-Prem hypervisor?
You create a master template or gold template and make all the changes that you want to it.
Once you are happy with the changes to the VM, go to your hypervisor console and take a snapshot of the VM.
After that you go to the Studio console and either add a new Machine catalog or add machines to an existing catalog. At that time, a full copy of the VM’s base image disk is taken and copied to the first storage repository (Datastore for VMware folks!).
Now it creates a Preparation VM and it is going to get interesting from now on.
To the Preparation VM, an Instruction Disk is attached. This will strip out all the previous identity information from the prep VM. In other words, it de-personalize the VM so that a fresh identity could be assigned to it at a later stage.
Now its time to power ON the Preparation VM.
The Image preparation process begins in step 7.
The Preparation VM now updates the snapshot A’ along with the original snapshot.
The Preparation VM is shutdown after this stage.
The Instruction Disk is deleted.
The OS disk is detached and the preparation VM is also deleted.
The update snapshot A” is now replicated to each storage repository(or Datastores in VMware). The image is now ready to deploy.
MCS now creates copies of that image and in that process creates Identity Disks that differentiates the VM from others. If you create more than one VM in the Machine catalog, more Identity Disks are created and will assigned to each image.
Next step is creating the required number of VMs by attaching the Identity Disks and Differencing Disk. Since all the VMs are sharing a single snapshot, the snapshot is read-only. Any changes, additions or runtime area is added to the Differencing Disk. The on-prem hypervisor is now leveraged to merge the disks to produce the virtual machines.
Identity Disks are 16 MB in size and are read-write capable. This makes them reusable for future VM creation. Delivery Controllers are responsible for creating Identity Disks.
Citrix MCS – Azure
Now let’s look at how MCS works in Azure. It’s mostly the same steps except for a few key differences. In the on-prem version, depending on the hypervisor used, the file formats could vary as in VMDK for VMware vSphere and VHD for Hyper-V or Citrix Hypervisor. With MCS in Azure, the disk file format is VHD as it is based on Azure Hypervisor which is a customized version of Hyper-V.
You create a Master VM to make further copies of it just as in traditional MCS setup.
The Master VHD is created in a Storage Account. This is the master storage account.
We then run the MCS Wizard via the Studio if you use the Citrix Cloud service or from Azure Portal if you are subscribed to Citrix Virtual Apps and Desktops Essentials.
The MCS Wizard checks for the availability of the resources using the Azure API.
We will now create a Resource Group (RG) to host all the additional VMs that MCS will create in Azure. One RG could host upto 240 VMs.
Storage Accounts are created within the Resource Group to host the disks for the virtual machines. One storage account can host up to 40 VMs. Additional storage accounts are created depending on how many VMs we need.
Network security Groups (NSG) are created next and they will isolate the prepped VM from the rest of the network. If we need 400 VMs, two RGs will be created to host all the VMs.
Next step is validate the connections. The Service principal connectivity will be validated to access the Azure resources.
The image is consolidated and is prepared for copy. Remember the image is located in the Master storage account in the steps above.
The Master Image is copied to the other Storage accounts defined for the machine catalogs. Unlike other hypervisor approaches, we don’t need to create snapshots ourselves in this occasion. Azure based Citrix MCS will use the provisioning APIs in Azure to set this all up for us.
The Identity disk for the Preparation VM is created but not attached yet.
Preparation VM (A’) is created after that.
Once the Prep VM is ready, it is stopped to attach the Identity Disk.
At this stage, the Identity Disk is attached to the Preparation VM.
The Preparation VM is started again for further steps.
Once the preparation steps are completed, the VM is stopped.
Preparation VM disk is now copied to the new Storage Account that is defined for MCS. This is the Base Image.
The base image is replicated to other storage accounts within MCS.
The Preparation VM and its’ Identity Disk is now deleted.
Then we have a Pre-Flight check where all the created resources are checked for its integrity by MCS. Now the Base Image ready to be cloned to make more VMs.
Storage Accounts – Legacy Approach
Now, there are two approaches here – Storage Accounts (Legacy ) and On-Demand Provisioning. Let’s discuss Legacy approach until steps 21 to 25.
Identity Disks are created for the required number of VMs that will be created by MCS.
OS Disks (from Base Image) are also created followed by Identity Disks.
VM are provisioned and linked to the OS Disks.
Identity Disks are attached to the VMs.
VMs are stopped to avoid extra costs during billing. (This is the case of VDI machines). When users connect, the machines are started on-demand and VMs are fired up ready for action.
On-Demand Provisioning
In On-Demand provisioning method, MCS will keep all the required settings within the database and will create VMs only when it is required in an on-demand fashion and not pre-created as in traditional MCS.
Only identity Disks and NICs are created during MCS in this approach.
You would have noticed by now, instead of Storage Accounts, Azure Managed Disks are being used here.
When there is user traffic in the farm, Citrix VDAs are created on-demand. As a part of that step, OS Disk is created at VM launch time.
VMs are created and linked to the OS Disks at VM launch time.
As a final step, Identity Disks are attached to the VM at launch time before the VM is ready to serve the users.
Once the VM is no longer needed, the VM is shutdown and deleted.
OS Disks are also deleted post shutdown.
However, the Identity Disks and NICs are retained for future use. When the VMs are required again, the OS Disk will be attached, merged with the Identity Disk before it is available to be used again.
That’s about it peeps. Happy MCSing in the cloud!!
I have done numerous Citrix Workspace Environment Manager (WEM) deployments in the past but never did I think about once doing a blog post on it yet. So, we are doing it this time. For the uninformed, Citrix WEM is a resource management and user persona management tool and is a must-have in every Citrix environment for the following reasons.
It’s FREE for all the Enterprise and Platinum customers that have a valid Citrix Customer Success Services (CSS) agreement.
It’s super impressive if you have applications that consumes large amounts of memory, which most of the modern apps are.
WEM has the following simplified architecture (courtesy of Citrix.com)
There are 3 key pieces for a WEM deployment
Infrastructure Services – It is the brain of the whole solution. It helps synchronizing the agent and admin console with the SQL server and Active Directory. This role CANNOT be installed on a Domain Controller and Desktop Delivery Controller according to Citrix.
Administration Console – Console is used to configure and manage WEM. This could be installed on any standard Windows machine.
Agent – The Workspace Environment Management agent connects to the Workspace Environment Management infrastructure services and is responsible for enforcing the settings you configure by using the administration console. The agent can either be deployed on VDAs or on physical Windows devices (for Transformer use cases). It can be installed on a Windows client (to manage client environments) or on a Windows Server (to manage server environments, or to manage published desktops and applications).
Installation
Pre-Requisites
domain service account
sysadmin access for the service account on the SQL server(s)
an AD group that contains all the WEM admins in the organization
Add the service account to local administrator group on the WEM servers
Install WEM Infrastructure Services
Download the installer binaries and run the .exe for Infrastructure Services
Click Install
Click Next
Accept the EULA
Enter the Customer and Organization Name
Click Next
Click Install
Click Finish. The database management utility will start
Click Create Database
The database creation wizard will start.
Click Next
Tick the box for “Use Integrated Connection” if the account that has been used is a sysadmin on the SQL server. if that’s not the case, use another account that has sysadmin rights
Click Next
Add the WEM Administrator AD group
select the domain service account. This is the broker service account under which the Infra services will be run
set a password for the SQL vuemUser
Click Next
You get the database information summary as below
Click OK
Click Finish
Close the Database Management Utility
WEM Infrastructure Services Configuration
On the server where WEM is installed, run the WEM Infrastructure Service Configuration Utility as an administrator.
On the Database settings tab, enter the Database server name and Database Name that was created in the previous step
If there is a failover server, give the secondary SQL server name and instance
On the Network settings tab, leave everything as default
On the Advanced Settings tab, enter the Infrastructure Service account and the vuemUser SQL password.
Enable the Performance Tuning – Tick that
Decide if you want to enable Google Analytics or not
Enable Scheduled Database Maintenance as below
On the Licensing Tab, tick the box for Global license Server override
Click Save Configuration
This will restart the broker service
Click Yes
Close the WEM Infrastructure Service Configuration utility.
Click Yes
Ensure that the Infrastructure service account has full permissions to the DBSync folder. The installation of the Infrastructure service role should set this up correctly but if that isn’t the case, ensure that the permissions are setup like the below. Else, your WEM upgrades will most likely fail in the future.
If you have multiple WEM infrastructure services servers and you are planning to load balance them, you will need to set up a Kerberos SPN. Follow the command below to set it. Service account name is the account used for WEM Infrastructure Service. No need to add the domain name before the service account name
Run the Citrix Workspace Environment Management Infrastructure Services Setup on the rest of the WEM servers.
Once the installation is complete, do NOT run the Database Management Utility but run the WEM Infrastructure Service Configuration utility instead.
Setup the Kerberos SPN (it is case sensitive so be mindful of how you use the service account on the previous servers)
Citrix WEM Console Install
Run the console install on the WEM servers or any other server of your choice
Accept the EULA
Enter the Customer Name and Organization and Click Next
Select Complete and click Next
Click Install
Click Finish
WEM Agent Install
Once the Infra services and console is installed, you can now install WEM agents on the machines that you need to manage via WEM. In our case, they are Citrix VDAs themselves.
Run the installer binaries for Citrix Workspace Environment Management Agent Setup
Click Install
Click Next
Click Next
Select On-Premises deployment
Select Skip Configuration. These settings will be pushed down via GPOs.
Click Next
You can choose to leave the WEM Cache on the C drive but when using PVS or MCS , its is often good practice to move the cache folder to the persistent drives. I have selected to use the MCS Write Cache disk in the example above.
Click Next
Click Install
Click Finish
Click Close
WEM Initial Configuration
Once the console and WEM services roles are installed, a Configuration Set is required to be created so that it could be applied to the machines that you intend to. They are previously called Sites so don’t freak out if you are used to that terminology in the past.
If you already have a backup of the Configuration set, you can now browse to that and select it and import it.
Else, create a new Configuration set
Click Create
Give it a Name and a description
Click OK
Now it’s time to import default recommended settings. You can find them in the WEM download package.
Click Restore
Restore Wizard will open
Select Settings
Click Next
Click Next
Click Browse and pick the Default Recommended Settings
Click OK
Check all the boxes as shown in the picture below
Click Next
Click RestoreSettings
Say Yes to the warning above
Wait until the restore is finished
Click Finish
To add the agents in WEM console, Click “Active Directory Objects” and then click Machines
Under Actions pane at the bottom, select Add Object
Pick the computer account that you want the policies to be pushed using the WEM agent. You can also choose to add the whole OU to make things a bit more automated.
The basic config is now there. Now if you want to get a bit more deeper into the WEM or understand the concepts a bit more, please feel free to read the blog I wrote a while ago. It has explanations and best practices that you can follow for your environment and customize it according to your needs. It is a good read, I promise!
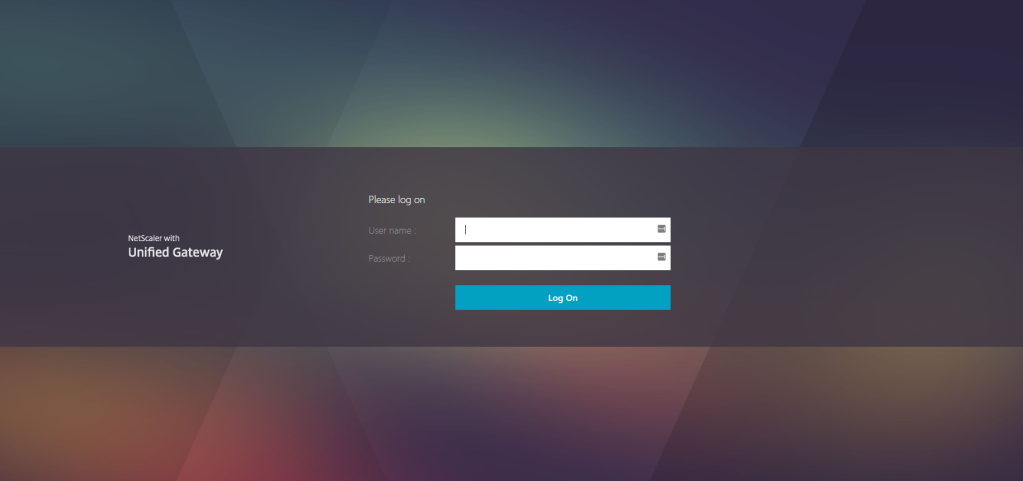
The RDP Proxy functionality is provided as part of the Citrix Gateway and currently is available to all NetScaler Enterprise and Platinum customers.
The following RDP Proxy features provide access to a remote desktop farm or an RDSH session host server through Citrix Gateway:
Secure RDP traffic through CVPN or ICAProxy mode (without Full Tunnel).
Single sign-on (SSO) to RDP servers through Citrix Gateway. Also provides an option to disable SSO if needed).
Enforcement (SmartAccess) feature, where Citrix ADC administrators can disable certain RDP capabilities through Citrix Gateway configuration.
Single/Stateless(Dual) Gateway solution for all needs (VPN/ICA/RDP/Citrix Endpoint Management).
Compatibility with native Windows MSTSC client for RDP without the need for any custom clients.
Use of existing Microsoft-provided RDP client on MACOSX, iOS, and Android.
Firewall Ports
RDP proxy requires port 3389 to be opened from the internet. You could also choose to use other port numbers if you don’t want to use the 3389 port. In a nutshell, just opening 443 port isn’t enough to get this to work.
Initial Configuration
Now to get started, we will need to enable RDP proxy feature if it isn’t turned ON. For that, navigate to System – Settings – Configure Advanced Features and ensure that RDP proxy is turned ON. if not, tick the box to Turn ON RDP proxy feature. You will need NetScaler Enterprise and above for this feature to work.
Create LDAP Profile and Policy
Create an LDAP profile for authentication. Navigate to NetScaler Gateway – Policies– Authentication – LDAP
Now create the LDAP policy. Click on the Policies tab, click Add. Enter the entries as shown in the picture below. Ensure that the correct LDAP profile is selected.
Create the RDP Client Profile
Navigate to NetScaler Gateway – Policies – RDP Profiles and Connections – Client Profiles
Click Add
Give it a name such as RDProxy_Profile and leave the rest of the values default if you would like. I changed the RDP Cookie Validity from 60 sec to 120 seconds
Click OK
Create an RDP Server Profile
Create an RDP Server Profile. Click on the first tab that says Server Profile
Click Add and enter a name for the server profile. Enter the IP address (this is the IP address of the RDP Proxy Virtual Server that you will configure under the NetScaler Gateway). Enter the port number – You can choose to go with the default RDP port if you wish to or choose another one
Click OK
Create a Session Profile
Now, go to NetScaler Gateway – Policies – Session – Session Profiles. Click Add
Give the profile a Name
No changes under the Network Configuration tab. Leave everything as default there
Under Client Experience tab, change Clientless Access to ON and tick Single Sign-on to Web Applications and Credential Index to Primary. the last setting is turning ON Single Sign-on with Windows
Under the Security Tab, select Default Authorization to ALLOW and Secure Browse to ENABLED
Under Published Applications, set ICA PROXY to OFF
Under the Remote Desktop tab, pick the RDP Client profile that was created in the previous step
Click Create
Create a Session Policy
Now create a Session Policy that will be bound to the NetScaler Virtual Server. Remember that we haven’t created the virtual server yet.
Switch to Session Policies tab and click Add. Give the session policy a Name and pick the session profile that we just created in the previous step.
Create a Bookmark
Now create a Bookmark and this is what will appear to the users in the form of an application icon to click on.
Give a Name to the bookmark and enter the name of the string that you want to be displayed in the portal. Enter the Bookmark link in the format rdp://IPaddressOfTheBackendRDSServer
Click Create
Create the Gateway Virtual Server
Let’s create the Gateway Virtual server next. Navigate to NetScaler Gateway node, expand that and under Virtual Servers, click Add
Under Basic Settings, configure the below items
Name – RDPProxy_rdpproxy.fqdn.co.nz
IP Address type – IP Address
IP Address – X.X.X.X
Port – 443
Pick the RDP Server Profile – RDP Server Profile
Ensure that Enable Authentication, AppFlow Logging and State is turned ON
Disable ICA Only
Click OK
Attach a Server Certificate. The certificate can be a wild card cert or you could choose to get a named certificate that matches the external RDP proxy FQDN
Now bind the Primary authentication policy. We are going to use LDAP and hence I will use LDAP policy that we created in the steps above.
Under SSL Parameters, ensure that only TLS1.2 is turned ON for enhancing the security of client connections.
You can choose to go with the default SSL ciphers or modify the ciphers according to the company requirements.
Under Portal theme, I went with RfWebUI which I think is one of the cleanest UIs. You could choose to create a custom one and use that instead.
Under Published Applications, choose the URL Name and select RDP Link (this is the bookmark link that was created)
Under Policies, attach the Session Policy named RDP Session Policy
Click Create
Testing the Setup
Selecting the RfWebUI gives the below logon page and users could simply use their domain user name and password to log in. They don’t need to enter the domain name.
Upon login, you will be shown the Favorites page where you could add links for quick access. This is very similar to the subscriptions in Storefront.
Click on the Desktops tab and you will be able to see all the published Bookmarks there. I have one in there, you can choose to have any number of bookmarks.
Click on the RDP link to launch the application. It will first download the app.rdp file which could be used to launch the application. You will just need to give the users access to the servers locally by adding them to the Remote Desktop Users group or you could choose to do this via AD domain groups to manage it centrally.
In this post, we will discuss how to go about setting up federation between Microsoft Azure, Office 365 and VMware Identity Manager. We will be using a Microsoft developer account in this demo configuration so in the real world, you will need to replace the Office account with your customer one.
The blog is split into 5 sections so feel free to jump to the relevant sections depending on what you are after.
Firstly, we need to setup an Office 365 E3 Developer subscription account to be able to integrate with Workspace ONE. In this section we will cover the process of setting this up. Setting up a developer subscription allows you a 12 -month free trial.
Go to the link below to setup the Office 365 subscription account.
Click the join the Office 365 Developer Program hyperlink
You will now be re-directed a to Join the Office 365 developer program today!
Do not select JOIN NOW
Instead, to the right of the page first select the Sign In icon
On Microsoft Sign in Page type in the email address of an Microsoft account you own (NB! If this account is already associated with an office 365 account you will have to create a new account)
Alternatively Create a new account, if required
Click on the user logo on the top right and ensure that there is a first and last name added for the account as below
Now go back to the developer program join page using an incognito window and sign back in using the same account
Set the Country Code and Company info. Accept the EULA and email opt-in programs
Click Next
On the Office 365 Developer Program Preferences page, select enough check box and optionsto make sure the JOIN button becomes available and the select JOIN. That gives us the below confirmation screen.
Click on Set Up Subscription
In the Setup your developer subscription window, create a unique admin account , for example, your username could be any generic name such as CloudAdmin or office365admin and your Domain could be your first name and surname. Again these are just examples that I used for the demo, please feel free to choose what you like for your deployments.
NB! Ensure you document these credentials
When you are done, select Continue
On the Add phone number for security window type in your Country Code and your phone number
Select SEND code , follow through on the security picture block selecting your relevant pictures, and select Next Enter the Code from your phone and select Set up
Once your registration is complete you can login in using your new ADMIN account. On the your Office 365 Subscription page select and right click the Go to subscription hyper link and select Open Link in New Tab
On the Sign In window , Enter your password and select Sign in
On the Office 365 Page almost in the middle select Admin
On the sign in page pick your new Office365Admin (This is the name of my account) account
If you get prompted with a Welcome to Office 365 Admin Center Page select Skip
Notice the Office 365 E3 Developer Setup is incomplete msg. Select Go to Setup box
NB! Before moving onto the next section, ensure that you are 100% clear what YOUR registered Domain will be.
This is most likely your company’s domain name or if you are doing this for yourself, it is the domain name that you own personally or on behalf of your company.
Note when registering your own domain name with Office 365, there are several approaches. The most seamless and trouble free approach is to register your own Domain Name with GoDaddy. This provides a seamless experience and the verification takes seconds once you have your own domain name from GoDaddy.
There are 2 modifications that you usually make and they are as follows
1. MS record modification
2. MX record modification
Click Next once you enter your domain name in the field below
On the Verify domain page notice there are step-by-step instructions to follow,
Notice that there are DNS records called TXT name, TXT value and TTL
Each namespace will have Registered Zone database. Your Office 365 instance will need to be verified with this namespace
Click on the copy icon next to your MS record
Select Verify at the bottom of the screen
Next step is to update the zone records for the domain name that you hold. I am not going to list the steps in here as it is different for everyone depending on how the domain names are managed.
Go back to your Office 365 domain configuration and click on Verify. it might give you an error because of the time it takes to replicate DNS configuration and it might require you to click on verify button a couple more times.
On Add new users window select Got it, thanks, select Next
On the Assign licenses to unlicensed users page select Next
On Install your Office apps page select Next
On the Migrate email messages page, leave the default Don’t migrate email messages radio button and select Next
On the Choose your online services page, ensure that Exchange, Skype for Business and Mobile Device Management for Office 365 check boxes are selected and select Next
On the Add DNS Records page.
When ready, select Verify at the bottom of the Add DNS Records window.
Notice that when Verify is successful the you just configured your Office 365 Tenant successfully will show and you are asked to provide feedback related to your experience.
However, If Verify is Not successful, ensure that the MS and MX records are updated in DNS correctly.
If successful, You should get a message saying “You’ve reached the end of the setup”, click on Go to Admin Center
In Admin Center:
Select the 3 parallel dots at the lower corner of the left pane, this will expand the console
Select the Spanner icon for Setup and select Domains
In the Home > Domains interface, check to see if your namespace you have associated with your Office 365 setup has a (Default) next to it. If this is the case do the following.
Select your account name that is not set to default :
Select Set as default
Note! Your custom domain cannot be the default domain when federating with VMware identity Manager.
Select Close. Check to see that you have a corresponding configuration in the domain portion of your setup as the screenshot
At the end of the exercise, it should look like the below
Part 2 : Federating Office 365 with VMware Identity Manager
From VMware Identity Manager version 2.8. Support has been added for User Provisioning in Office 365. In Part 2, we will now federate our Office 365 Tenant with a VMware Identity Manager SaaS tenant.
Using your Tenant Admin credentials, login into your SaaS VMware Identity Manager Tenant.
To the right of the Workspace ONE console under Tenant Admin select Administration Console
Select the Identity & Access Management tab
To the right in the Identity & Access Management tab select Setup > User Attributes
In the User Attributes interface, notice you have already set userPrincipalName and distinguishedName to Required and you have already created the objectGUID attribute.
These are pre-req requirements for Federating Office 365 with VMware identity Manager.
Now, go to your Domain Controller and open Active Directory Domains and Trusts
In Active Directory Domain and Trusts MMC snapin select and right-click Active Directory Domains and Trusts
Select Properties
Under the UPN Suffixes Tab under Alternative UPN suffixes type your custom domain name
Eg auckland10.euc-livefire.com
Select Add , select OK to close the window
Now open Active Directory Users and Computers
Navigate to the OU where the users reside. For eg, Corp — Marketing OU
Find the user and right click the accounts and go to Properties.
Under the Accounts tab, change the domain name to Auckland10.euc-livefire.com in our example. Repeat the same for the rest of the users.
Switch back to your VMware Identity Manager SAAS tenant
Under the Identity & Access Management tab select Manage
Select Directories
Select Sync Now for the Livefire Domain
In the Review window, notice that a warning message that Directory Sync Safeguards will apply, select the Ignore Safeguards checkbox above the message
Select Sync Directory
Download and Install the Microsoft Online Services Sign-in Assistant. The link to download the software is here
Install Azure AD Module by running the command below
Install-Module -Name AzureAD
You might need to restart the VM once these two binaries are installed.
Now, its time to delve into the PoSH world. Let’s try some commands 😉
Open the PowerShell shortcut on the desktop named “Windows Azure Active Directory” under administrator account. Type the below command
Connect-Msolservice
It prompts an authentication dialog as above. Use the credentials that you created during the Office 365 setup.
Next we have to create a Service Principal account type in the PowerShell
In the New SaaS Application window, in the Configuration section leave the following as defaults:
-Single Sign-On URL / Application ID / Username Format / Username Value
Add the following: under Application Parameters in the tenant line under Value add YOUR custom Fully Qualified Domain Name ie auckland10.euc-livefire.com
Under Application Parameters in the issuer line under Value add your custom domain name i,e. auckland10.euc-livefire
Make sure there are no hidden carriage returns if you paste this in (Note the issuer has a dash this value must match the IssuerURI in the powershell command)
In the New SaaS Application window, in the Configuration section under Advanced Properties leave the following as defaults:
–Enable Multiple O365 Email Domains / Credential Verification / Signature Algorithm / Digest Algorithm / Assertion Time -Under Custom Attribute Mapping in the UPN and ImmutableID keep the values default there too.
In the New SaaS Application window, in the Access Policies section select NEXT
In the New SaaS Application window, in the Summary section select SAVE
Notice you now have Office365 with Provisioning in the Catalog
Select the check box next Office365 with Provisioning and select EDIT
In the Edit SaaS Application window in the left pane, select Configuration, in the right pane, scroll down until you see Setup Provisioning. Notice you only 4 sections in the left pane.
Change Setup Provisioning from No to Yes. Notice you now have 7 sections in the left pane. We will now go and configure Provisioning. It’s been a super fun ride, isnt it? 😉 Be patient please, we are almost there!!!
In the Edit SaaS Application window in the left pane select Provisioning
In the Provisioning Adapter Configuration under Office 365 Domain type your custom domain, eg. auckland10.euc-livefire.com
Under Client ID, add the ServicePrincipleNames value you recorded earlier
Under Client Secret area type the password your associated with the ServicePrinciple Name
In the Edit SaaS Application window in the bottom right corner select Next
Under the User Provisioning tab, do the below
In the Attribute Name section, select Display Name, In the Edit Mapped Value window, in the Value container select the drop down arrow add the following, $(user.userName) and select SAVE
In the Attribute Name section, select User Principle Name, In the Edit Mapped Value window, in the Value container select the drop down arrow add the following, $(user.userPrincipalName) and select SAVE
In the Attribute Name section, select Guid, In the Edit Mapped Value window, in the Value container select the drop down arrow add the following, $(user.objectGUID) and select SAVE
In the Attribute Name section, select Mail Nickname, In the Edit Mapped Value window, in the Value container select the drop down arrow add the following, $(user.userName) and select SAVE
Select Next
At the end of the configuration, the User provisioning page will look like the below
In the Group Provisioning section,
Under Group Provisioning select + ADD GROUP
In the Add Group to Provision window under Group Name type Mark and then select Marketing@euc-livefire.com, Under Nickname type Livefire Marketing. (or anything that is relevant to your org) Select Save
select NEXT
click SAVE
We will now Enable Provisioning and Save
In the Catalog for Web Apps select the Office 365 with Provisioning and select Edit
In the Edit SaaS Application window in the left pane select Configuration
Scroll down until you see Setup Provisioning and change No to Yes,
on your left pane, click on “4 Provisioning”, Scroll down, next to Enable Provisioning, change the toggle from No to Yes
Select TEST CONNECTION
Select NEXT, select NEXT, select NEXT, select SAVE
We will now do the Entitlement configuration of the Users
In the Catalog for Web Apps select the Office 365 with Provisioning and select Assign
In the Assign wizard type Mark in the search area under Users / User Groups, select Marketing@euc-livefire.com
Under Deployment Type, select the drop down arrow change the Deployment Type to Automatic
In the Assign wizard, review your configuration, in the bottom right hand corner select SAVE
Part 3: Setting up the SAML between VMware Identity Manager and Office 365
Login to your to the VMware Identity Manager Admin Console, as Admin, under the Catalog > Web Apps tab, to the right, select SETTINGS
In the Settings window under SaaS Apps, select SAML Metadata, in the right hand pane under the SAML Metadata heading select DOWNLOAD under Signing Certificate
Using Notepad++ Open the signingCertificate.cer from your default download location .
In the signingCertificate.cer, we will now need to remove all carriage returns the document
Do this with Notepad++ as i have found that it works best. Any hidden carriage returns will cause this config to FAIL
Remove the —–BEGIN CERTIFICATE—– and —–END CERTIFICATE—– lines from the certificate.
Then select the certificate portion of the file and click ctrl + F in the Replace tab at the top type \n in the Find what field.Leave the Replace with field empty. Make sure the Search Mode at the bottom is Extended. Then click on Replace All.
Your certificate should now no longer have carriage returns. Notepad++ will tell you how many instances were replaced and your certificate will look different.
Go back to the PowerShell window and connect to Microsoft Online using the command below
Connect-Msolservice
Now run the command below to setup federation. Dont miss the certificate info at the end of the syntax. i haven’t added it to avoid the messy look.
Entering the password will take you to the Admin Center for O365.
In the left-hand pane under Home, select Users > Active users. Notice that Marketing group Users 1 – 4 has been automatically provisioned with the unique suffix appended for the user principle name. Also notice that your users are Unlicensed.
Click on User1
In the User 1 properties selectthe Product Licenses tab
In the location area select a Location ie New Zealand. Next to Office 365 Enterprise E3 Developer, there is a check box that is unchecked, check the checkbox and select Save.
In the User1 properties select Close.
NB! – Follow steps 1-5 for all the users including the Cloudadmin account to ensure that licensing is applied to all account.
On the User1 properties, in the license and apps tab, scroll down and you will notice that Mobile Device Managerment for Office 365 is Off. We will go and enable this in Azure so that we can do compliance with Workspace OneUEM. Select Cancel to close the Product Licenses window
In your existing browser, open up a new tab and type https://portal.azure.com Your Office365admin credentials should log you in automatically but if not, login with your office365admin account.
On the Welcome to Microsoft Azure window select Maybe later
In the Left-hand pane select Azure Active Directory, then in the middle pane select Mobility (MDM and MAM
In the right hand pane towards the top select Get a free Premium trial to use this feature –>
Under Activate you will see ENTERPRISE MOBILITY + SECURITY E5 highlighted in Purple, below this, select Free Trial
The ENTERPRISE MOBILITY + SECURITY E5 window will launch, to the bottom select Activate
Notice to the right that your free trial has been successfully activated pops up momentarily.
Go back to the tab with your Office 365 Admin console.
Click on User1 and click on the License and apps tab.
Notice that Enterprise Mobility + Security E5 is turned Off.
Next to Enterprise Mobility + Security E5, click on the checkbox, Notice you now have a whole range of Advance Azure security Features
Select Save
NB! Repeat the Licensing process you did for User 1 forUser 2 and on your Office365admin account.
In the Admin Console select both User 2 and Office365admin check boxes
in the menu bar at the top select manage product licenses,
select the radio button next to add to existing product license assignments and click next
turn on the switch for enterprise mobility + security and click add
on the summary window click Close
Now logon to the VIDM portal as a user to test it.
Part 5 : Inserting Office 365 Deep Links into VMware Identity Manager
In this section we will insert Deep Links within VMware Identity Manager portal
Log in to your to your VMware Identity Manager Console as Admin and select the Catalog tab > Web Apps
Select NEW
In the New SaaS Application window under Name type Microsoft Word
You will need to have a .PNG file for the application icons stored somewhere accessible. I have stored mine locally. Under Icon, click on browse, search for the software link on your desktop, and navigate to \Applications\Azurefiles\icons. select your Word.png Icon and select Open. At the bottom right select NEXT
On 2. Configuration in the Single Sign-On section under Authentication type to the right select the drop down and then select Web Application Link
Copy the URL below and edit in Notepad++ the following text named “EXAMPLEDOMAIN.euc-livefire.com” with your assigned domain suffix and then copy the edited URL and Paste under the Target URL
Now log back into the ViDM user tenant portal to test the applications
With this, we have come to the end of this blog post. It was quite a journey for me to learn all these for the first time, I am sure they will be of second nature once we do this a few times at work. Cheers!!
Citrix Workspace Environment Manager is a tremendous addition to any Citrix environment. It changes drastically how resources are consumed on the Citrix servers. It will also help you control what the users have access to on Citrix servers, define Start Menu, blacklist and whitelist processes, shift your GPOs to WEM, printer mappings, drive mappings, file type associations and so on. Talk about super fast logins, WEM is a must have. Why do you not have it? It comes free of cost if you have XenApp/XenDesktop Enterprise and above licenses with Citrix Customer Success Services -Select (valid Software Maintenence)
There are tons of literature on setting up WEM on the internet, so I will skip that step and go straight onto some of the best practices and configuration that I have followed for XenApp environments.
Some of the best guides out there for installing WEM are as follows.
Let’s get started! Please note that all these settings may not be entirely relevant in your environment so enable them with caution or increase/decrease the values to suit your environment. I will explain settings where necessary so that you guys know what they are supposed to do.
I am working with WEM version 4.6, so some of the settings that you are after may not be there or in a different place in the console.
Assuming that you are all set with the WEM, and you have access to the console and you have a configuration set created, below are the settings I will set up right off the bat.
Monitoring
Go to *Monitoring – Configuration – Boot Time Minimum Value and Login Time Minimum Value. Check the values below.
Advanced Settings
* Advanced Settings – Configuration – Main Configuration tab. Some of the settings aren’t being used in my environment so check whats necessary in your case.
Agent Actions. These settings determine whether or not the agent processes actions configured in the Actions tab. These settings apply at login, automatic refresh, or manual (user or administrator triggered) refresh.
Enable (Virtual) Desktop Compatibility. This setting is necessary for the agent to be launched when the user is logged in to session 1. If you have any users on physical desktops or VDI, select this option.
Execute only CMD Agent in Published Applications. If enabled, the agent will launch in command line mode (CMD) when initiating a published application, rather than in UI mode. CMD mode displays a command prompt instead of an agent splash screen.
Cleanup Actions
Settings here are self-explanatory
Agent Options
Enable Offline Mode. If this is disabled, the agent does not fall back on its cache if it cannot connect to the infrastructure service. Note For Offline Mode to work, SQL Server Compact Edition 3.5 SP2 must be installed in the user environment and on the Workspace Environment Management infrastructure server.
Initial Environment/Desktop Cleanup. If enabled, the agent cleans up the environment/desktop at first login only. Be careful with this setting! Please test this thoroughly before allowing this in production
Check Application Existence. If enabled, the agent checks that an application is available to the user/group before creating a shortcut to that application.
Expand App Variables. If enabled, variables are expanded by default (see Environment variables for normal behaviour when the agent encounters a variable).
Enable Cross-Domain User Group Search. If enabled, the agent queries user groups in all Active Directory domains. Note: This is an extremely time-intensive process which should only be selected if necessary.
Broker Service Timeout. The timeout value after which the agent switches to its own cache, when it fails to connect to the infrastructure service. The default value is 2000 milliseconds.
Directory Services Timeout. The timeout value for directory services on the Agent Host machine, after which the agent uses its own internal cache of user group associations. The default value is 2000 milliseconds.
Network Resources Timeout. The timeout value for resolving network resources (network drives or file/folder resources located on the network), after which the agent considers the action has failed. The default value is 500 milliseconds.
Agent Max Degree of Parallelism. The maximum number of threads the agent can use. The default value is 0 (as many threads as physically allowed by the processor), 1 is single-threaded, 2 is dual-threaded, etc. In most cases, this value does not need changing. Available in WEM 4.7 onwards
Advanced Options
Enforce Execution of Agent Actions. If these settings are enabled, the Agent Host will always refresh those actions, even if no changes have been made.
Revert Unassigned Actions. If these settings are enabled, the Agent Host will delete any unassigned actions when it next refreshes.
Automatic Refresh. If enabled, the Agent Host will refresh automatically. By default, the refresh delay is 30 minutes.
Reconnection Actions
Action Processing on Reconnection. These settings control what actions the Agent Host processes upon reconnection to the user environment.
Advanced Processing
Filter Processing Enforcement. If enabled, these options will force the Agent Host to re-process filters at every refresh.
Service Options
These settings configure the Agent Host service.
Agent Cache Refresh Delay. This setting controls how long the Agent Host service will wait to refresh its cache.
SQL Settings Refresh Delay. This setting controls how long the Agent Host service will wait to refresh its SQL connection settings.
Agent Extra Launch Delay. This setting controls how long the Agent Host service will wait to launch the Agent Host executable.
Enable Debug Mode. This enables verbose logging for all Agent Hosts connecting to this site.
Bypass ie4uinit Check. By default, the Agent Host service will wait for ie4uinit to run before launching the Agent Host executable. This setting forces the Agent Host service to not wait for ie4uinit.
Agent Launch Exclusions. If enabled, the Citrix Workspace Environment Management Agent Host will not be launched for any user belonging to the specified user groups.
Console Settings
Forbidden Drives. Any drive letter added to this list is excluded from the drive letter selection when assigning a drive resource.
UI Agent Personalization
These settings let you customize the appearance of the session agent (in UI mode only) in the user’s environment.
UI Agent Options
Disable Administrative Refresh Feedback. When Administrators force a session agent to refresh from the Administration Console, this option prevents a notification tooltip appearing in the user environment. This will disable all the user interactions/notifications with WEM Agent. Very useful to have!
HelpDesk Options
These options control the Agent Host’s help desk functionalities.
Help Link Action. This field controls what happens when the user clicks on the Help command in the Citrix Workspace Environment Management Agent Host.
Custom Link Action. This field controls what happens when the user clicks on the Support command in the Citrix Workspace Environment Management Agent Host.
Enable Screen Capture. If enabled, users are given the option to open a screen capture utility. This allows the user to screenshot any errors in their environment, which they can then send to your support staff.
Enable Send to Support Option. If enabled, the user is able to send screenshots and log files directly to the nominated support email address, with the specified template. This requires a working, configured email client.
Custom Subject. If enabled, the support email generated by the Citrix Workspace Environment Management Agent Host screen capture utility is sent with the specified subject.
Email Template. This field allows you to specify a template for the support email generated by the Citrix Workspace Environment Management Agent Host screen capture utility. Note You must configure the email template to include useful information.
See Dynamic tokens for a list of hash-tags which can be used in the email template. Note Users are only presented with the option to enter a comment if the ##UserScreenCaptureComment## hash-tag is included in the email template.
Use SMTP to Send Email. If enabled, this will send the support email using SMTP instead of MAPI.
Test SMTP. Tests your SMTP settings as entered above to verify that they are correct.
Power Saving
Shut Down At Specified Time. If enabled, the Agent Host will automatically shut off the environment it is running in at the specified local time.
Shut Down When Idle. If enabled, the Agent Host will automatically shut off the environment it is running in after running idle (no user input) for the specified length of time.
I don’t have anything set up for power options as they are more for VDI and servers running in the cloud for cost savings.
Transformer Settings
These options allow you to configure the Transformer feature. Transformer allows agents to connect as web/application launchers which redirect users to the configured remote desktop interface. Use Transformer to convert any Windows PC into a high-performance thin client using a fully reversible ‘kiosk’ mode.
I don’t currently utilize this feature for my customer deployment.
Active Directory Objects
Use this page to specify the users, computers, groups, and organizational units you want to be managed by Workspace Environment Management.
Advanced – AD Settings
Active Directory search timeout. The time period (msec) for Active Directory searches to be performed before they time out. The default value is 1000 msec. I recommend using a timeout value of at least 500 msec to avoid timeouts before searches complete.
Security
These settings allow you to control the applications users are permitted to run by defining rules. This functionality is similar to Windows AppLocker. When you use Workspace Environment Management to manage Windows AppLocker rules, the agent processes (converts) Application Security tab rules into Windows AppLocker rules on the agent host. If you stop the agent processing rules, they are preserved in the configuration set and AppLocker continues running by using the last set of instructions processed by the agent.
Application Security
Process Application Security Rules. When selected, the Application Security tab controls are enabled and the agent processes rules in the current configuration set, converting them into AppLocker rules on the agent host. When not selected, the Application Security tab controls are disabled and the agent does not process rules into AppLocker rules. (In this case, AppLocker rules are not updated.)
Process DLL Rules. When selected, the agent processes DLL rules in the current configuration set into AppLocker DLL rules on the agent host. This option is only available when you select Process Application Security Rules.
Important: If you use DLL rules, you must create a DLL rule with “Allow” permission for each DLL that is used by all the allowed apps.
Caution: If you use DLL rules, users may experience a reduction in performance. This happens because AppLocker checks each DLL that an app loads before it is allowed to run.
Process Management
Lets you define what is allowed to run and what isn’t.
This helps you apply software licensing restrictions (well, in a less intuitive way) using blacklisting. The only caveat is that you will NOT be able to set up individual restrictions for applications. They are managed as a list of processes with a list of groups that will have access to run them. Hence, this will not serve the purpose when you have a list of applications that need to be restricted. Look at Application Security, if you have multiple applications.
Note: This option only works if the session agent is running in the user’s session. To do this use the Main Configuration Agent settings to set the Launch Agent options (at Logon/at Reconnect/for Admins) to launch according to the user/session type, and set Agent Type to “UI”. These options are described in Advanced Settings.
Be super careful with Whitelisting as the moment you add a process in there, WEM will stop all the other processes from running. The safe bet will be using blacklisting unless it is a greenfield environment.
Policies and Profiles
Environmental Settings
These options modify the user’s environmental settings. Some of the options are processed at logon, while some others can be refreshed in session with the agent refresh feature.
Under the known Folders Management tab, Disable Specified Known Folders prevents the creation of the specified user profile known folders at profile creation.
Here is the link to the Canonical names for the Control Panel applets
Although system optimization settings are machine-based and apply to all user sessions, process optimization is user-centric. This means that when a process triggers CPU Spikes Protection in User A’s session, the event is recorded for User A only. When User B starts the same process, process optimization behavior is determined only by process triggers in User B’s session.
Tip
When your virtual machines have different hardware configurations, consider creating multiple configuration sets for them, and configuring the system optimization settings differently for each configuration set. Machines can only belong to one configuration set.
CPU Management
Enable CPU Spikes Protection. Lowers the CPU priority of any process which exceeds the configured percentage of CPU usage, for a configurable period of time.
Whenever a specific process triggers Spike Protection, the event is recorded in the agent’s local database. The agent records trigger events for each user separately. This means that CPU Optimization for a specific process for User A does not affect the behavior of the same process for User B.
Limit Sample Time. This is the time for which a process must exceed the CPU Usage Limit before its CPU priority is lowered.
Idle Priority Time. This is the length of time the process’ priority is lowered. After this time expires, the process CPU Priority returns to its original level.
Exclude Specified Processes. By default, WEM CPU Management excludes all of the most common Citrix and Windows core service processes. You can, however, use this option to Add or Remove processes from an exclusion list for CPU Spikes Protection by executable name (for example notepad.exe). Typically, antivirus processes would be excluded.
CPU clamping is a brute force approach which is computationally expensive. To keep the CPU usage of a troublesome process artificially low, it is better to use CPU Spikes Protection, at the same time as assigning static CPU priorities and CPU affinities to such processes. CPU clamping is best reserved for controlling processes which are notoriously bad at resource management, but which cannot stand to be dropped in priority.
To find out if CPU Clamping is working, follow the Citrix KB below
These settings allow you to optimize application RAM usage.
Note
Please note that enabling this will increase the disk usage if the pagefile has been setup to system managed pagefile size. Change it to use a fixed pagefile size after performing some calculations. This is also found to increase the storage IO so if you see similar issues in your environment, come back and check the Memory Optimization settings. May be play around with it a bit and change the settings to a conservative value such as 30 mins for Idle Sample Time
IO Management
Fast Logoff
Fast Logoff ends the HDX connection to a remote session immediately, giving users the impression that the session was immediately closed. However, the session itself continues through the session logoff phases in the background on the VDA.
Note
Fast Logoff supports XenApp and RDS resources only.
Now, there are Actions, Filters and Assignments which I am not going to talk to you about now as you will have a completely different set of applications and rules that you would like to apply in your environment.
It’s been a long post, and since I need a coffee desperately, I will talk about setting up applications, network drives, printers, file associations and so on in another blog post. There are a few blogs currently out there that have step-by-step instructions on how to do that. Feel free to comment with any useful tips and the good stuff that you are doing in your environment using WEM. Adios!
I always wanted to document this so it would help me for my next assignment, but I never did. As a result, I was always having to refer my previous customer environments or As-Built documents for this information which was quite a pain. Well, that’s gonna change today as I am going to put this up on my blog so that it can becomes my quick and easy reference place.
As mentioned in the title, this is going to be the baseline policy set upon which you can build yours with any specific policies pertaining to your environment, Also, all the settings that I have mentioned here may not be applicable or work for you or you may even not see all of them due to older UPM version, XenApp version etc etc.
Please note that some of the settings found in newer UPM versions aren’t listed here as well. I will continue to update it as Citrix releases new UPM versions but this should give you a good start nonetheless.
Exclusion List – Directories
$Recycle.Bin
AppData\LocalLow
!ctx_internetcache!
!ctx_localappdata!\Microsoft\Windows\Burn
!ctx_localappdata!\Microsoft\Windows\CD Burning
!ctx_localappdata!\Microsoft\Windows Live
!ctx_localappdata!\Microsoft\Windows Live Contacts
!ctx_localappdata!\Microsoft\Terminal Server Client
!ctx_localappdata!\Microsoft\Messenger
!ctx_localappdata!\Microsoft\OneNote
!ctx_localappdata!\Microsoft\Outlook
!ctx_localappdata!\Microsoft\AppV
!ctx_localappdata!\Windows Live
!ctx_localappdata!\Sun
!ctx_roamingappdata!\Sun\Java\Deployment\cache
!ctx_roamingappdata!\Sun\Java\Deployment\log
!ctx_roamingappdata!\Sun\Java\Deployment\tmp
AppData\Local\Microsoft\Windows\INetCache
AppData\Local
AppData\Roaming\Citrix\PNAgent\AppCache
AppData\Roaming\Citrix\PNAgent\Icon Cache
AppData\Roaming\Citrix\PNAgent\ResourceCache
AppData\Roaming\ICAClient\Cache
AppData\Roaming\Sun\Java\Deployment\cache
AppData\Roaming\Sun\Java\Deployment\log
AppData\Roaming\Sun\Java\Deployment\tmp
Citrix
Java
Local Settings
Music
My Pictures
My Videos
Pictures
Videos
AppData\Roaming\Macromedia\FlashPlayer\macromedia.com\support\flashplayer\sys
AppData\Roaming\Macromedia\FlashPlayer\#SharedObject
Downloads
Saved Games
Searches
Application Data\Sun\Java\Deployment\cache
Application Data\Sun\Java\Deployment\log
Application Data\Sun\Java\Deployment\tmp
Local Settings\Application Data\Microsoft\AppV
Local Settings\Application Data\Microsoft\Messenger
Local Settings\Application Data\Microsoft\OneNote
Local Settings\Application Data\Microsoft\Outlook
Local Settings\Application Data\Microsoft\Terminal Server Client
Local Settings\Application Data\Microsoft\Windows Live
Local Settings\Application Data\Microsoft\Windows Live Contacts
Local Settings\Application Data\Microsoft\Windows\Burn
Local Settings\Application Data\Microsoft\Windows\CD Burning
Local Settings\Application Data\Sun
Local Settings\Application Data\Windows Live
Local Settings\Temporary Internet Files
AppData\Local\Microsoft\AppV
AppData\Local\Microsoft\Messenger
AppData\Local\Microsoft\OneNote
AppData\Local\Microsoft\Outlook
AppData\Local\Microsoft\Terminal Server Client
AppData\Local\Microsoft\Windows Live
AppData\Local\Microsoft\Windows Live Contacts
AppData\Local\Microsoft\Windows\Burn
AppData\Local\Microsoft\Windows\CD Burning
AppData\Local\Sun
AppData\Local\Windows Live
AppData\Local\microsoft\windows\Temporary Internet Files
AppData\Local\Microsoft\Windows\INetCookies
AppData\local\Google\Chrome\User Data\Default\Media Cache
AppData\Local\Google\Chrome\User Data\Default\Cache
AppData\local\Google
Define events or actions which Profile management logs in depth:
Common warnings Enabled
Common information Enabled
File system notifications Enabled
File system actions Enabled
Registry actions Enabled
Registry differences at logoff Enabled
Active Directory actions Enabled
Policy values at logon and logoff Enabled
Logon Enabled
Logoff Enabled
Personalized user information Enabled
Log Settings Enabled
Enable Logging Enabled
Maximum size of the log file Enabled
Maximum size in bytes 10485760
Profile Handling
Delay before deleting cached profiles Enabled
Delay(Seconds) 0
Delete locally cached profiles on logoff Enabled
Local profile conflict handling Enabled
If both a local Windows user profile and a Citrix user profile in the user store both exist: Delete local profile
Profile streaming Enabled Streamed user profile groups Disabled Timeout for pending area lock files (days) Enabled
Timeout for pending area lock files (days) 1
Advanced settings
Disable automatic configuration Disabled Number of retries when accessing locked files Enabled Number of retries: 5 Process Internet cookie files on logoff Enabled
Profile Management
Active write back Enabled Enable Profile management Enabled Excluded groups Disabled Path to user store Enabled
Process logons of local administrators Enabled Processed groups Disabled
It’s been a while since I wrote on my blog so let’s get straight into the post without much mucking around. This time we will discuss how to go about setting up Storefront load balancing using NetScalers. This can be configured on a standalone NetScaler or a NetScaler pair in HA. The recommendation is obviously to get this setup on a HA NetScaler pair so that NetScaler outage wouldn’t result in Storefront also being unavailable.
My Storefront version is 3.11 and have a cluster with 2 Storefront servers. NetScaler version is 11.1 but the NS version shouldn’t matter much as the steps would be more or less the same for other NetScaler firmware versions – newer or older. (unless you are too far behind)
Pre-Requisites
To configure Storefront load balancing we need the following –
2 or more Storefront servers
an IP address for the virtual server that hosts the LB configuration
SSL certificate that points to the intended load balanced URL of Storefront – the certificate can be a wild card or a named certificate
First Things First
Logon to your NetScaler and navigate to System — Settings — Configure Basic Features. Ensure that Load Balancing is selected, if not select it and click OK
Give the Storefront server a name and enter the IP address of the server. Ensure that “Enable after creating” is selected. Click Create
Add the second Storefront server following the above steps. If you have more than 2 servers, add all of them.
Create Monitors
New NetScaler version come with a built-in Storefront monitor so we are going to make use of it here. Go to Traffic Management –Load Balancing — Monitors and click Add
Here I am only going to create a single monitor to probe all my Storefront servers. You can choose to create multiple monitors depending upon the number of Storefront servers that you have. In my case, i will create just one.
Give a name to the monitor and select the type as STOREFRONT
Now select Special Parameters tab and provide the name of the Store that you have created in Storefront. Check the 2 entries – Storefront Account Service and Check Back End Services.
If you had selected “Check Backend Services“, you will need to perform the steps in the Storefront Changes section later down in this post. Else, you could completely ignore it.
Click on the Standard Parameters tab. Ensure that Secure is selected as below. Click Create
Create Service Groups
Go to Traffic Management –Load Balancing — Service Groups
Give a name to the service group and select the protocol as SSL. Check the entries below
State
Health Monitoring
AppFlow Logging (only if you have NetScaler MAS in your environment)
Click OK
Under Service Group Members, add the server entities that we created earlier. Once done, they will look like the below
Under Settings, type the Header as X-Forwarded-For
Under Monitors, bind the monitor that we created before
Under SSL Parameters, setup the settings as below
Under Ciphers, setup the ciphers based on your company security policy.
Once done, Service Group for Storefront should look like this
Now, it’s time to create the Virtual Server
Virtual Server
As mentioned in the pre-requisites section , we need an IP address for this. If the NetScalers are sitting in the DMZ, a DMZ IP address is required. In my case, NetScalers are hosted internally so i will use an internal unused IP address.
We will also need the SSL certificate here.
Go to Traffic Management –Load Balancing — Virtual Servers
Click Add
Give a Name to the virtual server and select the protocol as SSL
Specify the IP address under IP Address field and specify the port # as 443
Click More and specify the settings as below (note, that AppFlow logging only needs to be enabled if you have a NetScaler MAS setup or other monitoring solutions that could make use of AppFlow logs)
Under Services and Service Groups, click on Load Balancing Virtual Server ServiceGroup Binding
Click Add Binding and select the Service Group that you created in the previous step. Click OK
Once completed, the page should look like the below. Click Close and click Done
It’s time to attach the certificate. Go to Traffic Management — SSL — Manage Certificates / Keys / CSRs
Click on Upload button and upload your certificate file to NetScaler
Go to Traffic Management — SSL — Certificates — Server certificates
Under Certificate, click on Server Certificate and then Install
Give a certificate key-pair name and choose the certificate that was just uploaded in the previous step. Click Install
Now, go back to Traffic Management –Load Balancing — Virtual Servers
Select the Virtual server created for Storefront and click Edit. Under Certificates, select Server Certificate and then Click Add Binding
Under SSL Ciphers, select the ciphers that you would like to be in place. I am going with the default one. This is not the most secure for a production setup so go with something that’s secure enough for your organization.
Under SSL Parameters, configure the settings as below. Click OK
Under Method, Select LEASTRESPONSETIME for the Load Balancing Method. Configure a Backup LB Method, I choose LEAST CONNECTION
Under Persistence, select COOKIEINSERT for Persistence with a time-out value of 0. You can also read why I selected the timeout value of 0 here
Under Backup persistence, select SOURCEIP with a timeout of 60. Fill in the Netmask as in the picture
Click OK and then Done
We have now completed almost 90% of the config. There are a couple of things left so hold on tight.
The configuration so far will ensure that load balancing will be performed between the Storefront servers ( I know, i know I haven’t setup the DNS entries for the load balanced VIP)
If someone type in the http URL of LB Storefront in their browser, it will not go anywhere. It will show them the IIS page instead. So how do we ensure that the users are redirected to the correct Storefront page (https version) every single time? We will setup another virtual server on port 80 with a redirect URL configured.
Let’s do that now.
Under Traffic Management –Load Balancing — Virtual Servers, Click Add
Under Basic Settings, give the virtual server a Name and select protocol as HTTP
Specify the same IP address as for the Storefront LB VIP and provide 80 for the Port #
Click OK/Create
Under Persistence, select SOURCEIP with a timeout of 2 mins
Click OK
Under Protection, type in the correct HTTPS URL that you would want the users to be redirected to under Redirect URL field
Click OK. Then click Done
You will notice that the virtual server will be marked as down
DNS Changes
Now head over to the DNS server and open the DNS Console
Create an A record pointing to the Storefront LB name with the IP address configured on the vServer for LB configuration.
Storefront Changes
This is the last step, I promise. Head over to the Storefront servers and it’s time now to run some Powershell commands
Now, the monitors that we created earlier will be marked as Down if we didn’t perform this step prior to creating them on the NetScaler. That’s because the monitor created was based on HTTPS and by default, Storefront monitoring is done on HTTP
To change this to HTTPS. We need to configure the monitor service to use HTTPS instead. On all the StoreFront 3.0 servers perform the following steps.
Run PowerShell as an administrator.
Navigate to the Scripts (C:\Program Files\Citrix\Receiver StoreFront\Scripts) folder via the Powershell on the Storefront server,
Run ImportModules.ps1
Run the below command
Get-DSServiceMonitorFeature
Now, type the below to setup the Storefront Monitor on HTTPS
The names Spectre and Meltdown invoke feelings of dread in even the most seasoned IT engineer. To those uninitiated, let me get you up-to-speed quickly.
Spectre is a vulnerability that takes advantage of “Intel Privilege Escalation and Speculative Execution”, and exposes user memory of an application to another malicious application. This can expose data such as passwords.
Meltdown is a vulnerability that takes advantage of “Branch prediction and Speculative Execution”, and exposes kernel memory. A compromised server or client OS running virtualized could gain access to kernel memory of the host exposing all guest data.
Both vulnerabilities take advantage of a 20-year-old method of increasing processor performance.
As a result, code will need to be updated to address these vulnerabilities at OS and OEM-manufacturer levels, at the expense of system performance.
On their part, Microsoft reluctantly admits that performance will suffer. “Windows Server on any silicon, especially in any IO-intensive application, shows a more significant performance impact when you enable the mitigations to isolate untrusted code within a Windows Server instance,” wrote Terry Myerson, Executive Vice President for the Windows and Devices group.
According to Geek Wire, these two vulnerabilities which take advantage of a 20-year-old design flaw in modern processors can be “mitigated;” the word we’re apparently using to describe this new world in 2018, in which servers lose roughly 10 to 20% performance for several common workloads.
This affects not only workloads executed against local, on-site resources but even those utilizing services, such as AWS, Google Public Cloud or Azure.
Reader submission @ The Register showing CPU before / after patches
We’ve heard from some of our insiders who use Login VSI to validate system performance that they’re seeing a reduction of 5% in user-density after performing Microsoft recommendations. Knowing that the vulnerability wasn’t solved by OS updates alone we, at Login VSI, wanted the ability to test the impending hardware vendor firmware / BIOS changes.
Now is the time to capture your baseline performance
How do you know how much of an impact the fixes for Spectre and Meltdown will be if you don’t have anything to compare it to? Keep in mind that these patches will need to be installed on a number of systems in your solution including server hardware, operating systems, storage subsystems and so on.
Many of our customers perform tests where they compare a known good solution, or a baseline, with changes that have been made. This gives them the ability to accurately assess the performance impact of that change, which in turn allows them to compensate with more hardware, or further tuning of the applications and OS. The patented methods used by Login VSI provide a quantifiable result for determining the impact of a change in virtual desktop and published application environments.
Using Login VSI
If you wish to test the changes before pushing them into your production environment, then use Login VSI to put a load, representative of your production users, on the system. This will objectively show how much more CPU will be used as a result of the Spectre or Meltdown patches. It is expected that the end users will incur increased latency to their applications and desktops as a result of the higher CPU utilization.
Using Login PI
While it is not recommended, if you are planning on pushing the patches into your production environment to “see how it goes”, then install Login PI now to get an accurate representation of performance related to user experience. This will give you the ability to then compare to that same experience after the patches have been installed. We expect that you will see latency to the end user increase as a result of higher CPU utilization. If you already struggle with CPU utilization in your solution, there is a good chance you’ll be also using Login PI to test your availability.
As we complete our testing we will be sharing our findings in a series of articles.
“If your computer has a vulnerable processor and runs an unpatched operating system, it isNOT SAFE TO WORK WITH SENSITIVE INFORMATION”. – Security Experts who discovered Meltdown / Spectre
If sensitive data is part of your business (Such as ours!) patching is not a matter of if, but when.
Ask yourself:
How long can you afford to have your company’s data exposed to malicious intent? Do you want to be the next Equifax or Target?
In this article series, we will provide some insight from our lab environments. Be aware your results may vary based upon individual workload and configuration.
Microsoft has released a Security Advisory
The vulnerability affects both the client and server OSs of Windows. This is compounded when dealing with large-scale published application and desktops deployments. The advisor can be found at the following location:
Microsoft acknowledges addressing these vulnerabilities from a software perspective is limited, and therefore, without the OEMs providing updates the loop is not closed.
In the interim we can start measuring the impact of the Microsoft fixes.
They offer guidance for both Desktop and Server OSs:
Desktop – January 2018 Security Update. Security Advisory: Click Here!
NOTE – Certain AV solutions are not compatible with the security update released by Microsoft. As such, unless an AV vendor has a registry flag, QualityCompat, they will not receive the January Security update and will still be vulnerable.
With the upcoming OEM hardware patch releases we expect to be able to produce a variety of interesting and informative results. Please stay tuned for the next articles!
AppDisk is an awesome technology from Citrix but it comes with its own quirks which admins/consultants should be aware of. Below are some of the items that i thought are important to know about the technology and how to set it up.
There are a few things to keep in mind before attempting to create an AppDisk.
AppDisks will only work with virtual machines
AppDisk creation from the Studio doesn’t work with manually built servers.
You will need to have a machine catalog based on MCS or PVS. While building the catalog, the wizard will hook into the PVS Stores and “reserve” a VM for AppDisk creation.
when you specify a size for the AppDisk, you wouldn’t be able to utilize all the size that you allocated. for eg, for an AppDisk size of 5 GB only, 3.66 are useable so always give some extra when creating appdisks
Don’t create snapshots of the machine prior to creating the AppDisk when using MCS Catalogs
There is currently no way to resize the AppDisk from within the Studio. PowerShell is the way to go.
There is NO versioning built into AppDisks at this stage. All that you are doing when clicking on “Create New Version” is creating a clone of the existing AppDisk which could be used to edit and update the AppDisk
Some of the commands that you will find useful when working with AppDisks are as follows
>Get-AppLibAppDisk
>Get-AppLibTask
To get a list of all the active tasks running, run the below
>Get-AppLibTask -active $true
To stop a particular task, run the Get-AppLibTask and take a note of the task ID
>Stop-AppLibTask
The above stop command will not remove the failed task from the Studio console. to remove it completely from the studio, run the following command
>Remove-AppLibTask
In many cases, AppDisks work on different OSs. For example, you can add an AppDisk that was created on a Windows 7 VM to a Delivery Group containing Windows 2008 R2 machines, as long as both OSs have the same bitness (32 bit or 64 bit) and both support the application. However, Citrix recommends you do not add an AppDisk created on a later OS version (such as Windows 10) to a Delivery Group containing machines running an earlier OS version (such as Windows 7), because it might not work correctly.
Boot the reserved VM into the Maintenance environment and leave it at the login screen
Head to the Studio console and select the AppDisk node. Click Create AppDisk
Specify the size of the disk and a name of the AppDisk in the wizard.
As soon as the AppDisk creation begins, the VM will be restarted. Boot the VM back into the Maintenance vDisk
Now wait for the process to complete
In the mean time, you would be able to see a drive mapping with label (Citrix) being created on the VM with the specified disk size of the AppDisk (5 GB in my case)
Refresh the Studio console to ensure that the VM is powered ON and is registered.
Be patient as this could take while to complete.
If the process gets stuck at “Creating…..” state, run the command
Get-AppLibTask -active $true
Check the value of TaskProgress and if it is at 95%, its time to restart the VM.
Once restarted, boot the machine back into the Maintenance disk
Ensure that the VM is registered. Login to the VDA now and make sure that the AV agent isnt running (I have seen that logging into the server helps speed up things)
The AppDisk creation process should now be complete.
Its time now to install the applications- Right click the AppDisk name and select Install Applications
Once you are happy with the app install, its time to seal the disk
Right click and select “Seal AppDisk”
When the sealing process is started, the VM will restart. Just ensure that the VM restarts back into the maintenance disk
Once the server is back up, log into the server to speed up the sealing process. if there are AV agents running, temporarily disable it
The VM will restart again
choose the maintenance disk again and boot into it
it is at this stage, it will start AppDNA disk analysis (assuming that you have AppDNA integration configured)
Refresh the Studio now and you can see the Appdisk is at Ready(AppDNA:Capturing) state
Soon the process should complete. The AppDisk should now be ready for app delivery
Head on to the PVS console and delete the Maintenance vDisk that was initially created for AppDisk . Once the AppDisk is sealed, you MUST boot into the vDisk version before the Maintenence version to be able to see the applications installed on the AppDisk. Strange but true 🙂
If you need to edit(add more apps) a Sealed Appdisk, create a fresh Maintenance vDisk and continue with the updates. The older Maintenance vDisks will not work once sealed and should be removed from PVS console (Versioning)
Assigning an AppDisk
As previously stated, AppDisks require a machine catalog that isnt assigned to any delivery groups. So naturally the first step after creating an AppDisk is to create a delivery group and attach the AppDisk to it.
Updating an AppDisk
Create a Maintenance vDisk from the PVS Console
Change the VM type to Maintenance in the PVS Console (Device Collections)
If the Prep machine is already a member of a Delivery group, remove it from the delivery group.
Boot the Prep VM into the Maintenance vDisk and leave it at the login screen
Go to AppDisk node in Citrix Studio and select the AppDisk that needs to be updated.
Choose Create New Version
Give it a name and select the Machine catalog name where the prep machine resides
Click Create New Version
At this point, it creates a Control Disk
The Prep VM will now restart. the next step is to “Reserve” the Virtual machine
Boot the VM back into the Maintenance vDisk
It then proceeds with the Layer creation and completes it. It would say ready to install applications in Studio
Proceed to install applications as you would normally do
Seal the Appdisks when completed.
Delete the Maintenance version from the PVS console and change the VM type to Production from Maintenance
Diagnosing issues with AppDisk
AppDisks come with a logging tool that could be found here at C:\Program Files\Citrix\personal vDisk\bin\CtxAppDisksDiag.exe
Run the above tool as an admin and select the folder where you would like to see the log files and click OK
Importing an AppDisk
There are times you will need to import a pre-created AppDisk to the Studio. This method will also work for the manually built virtual machines.
Carl Stalhood has detailed the process to import AppDisks in his blog post here
Setting up flash redirection to work in Citrix could sometimes be a daunting task. There are a multitude of moving parts to this solution and a slight error could lead to days of troubleshooting and remediation work. I thought i will document the procedures that I followed to successfully setup Flash redirection to work on XenApp 7.5 farm and thin clients for a customer environment.
I am not going into the details of this technology and what each versions flash redirection does as you can read about them here
I strongly recommend you read the PDF document from Citrix on HDX redirection in general.
The below procedures apply to all the versions of XenApp and XenDesktop where flash redirection is applicable. My particular case was XenApp 7.5 with IE 11
We will split the setup into 2 parts – Server side (VDA or Citrix Servers) setup and Client side setup
Server Side setup
Citrix Policies – Setup the Citrix policies for flash in Studio or Delivery Services Console as the case may be. Below is how they should look like if they are correctly configured. Also note that the latency threshold may differ according to your network conditions.
Flash Hotfixes – Look out for any specific hotfixes by Citrix to enable Flash acceleration. There is one required for XenApp 7.5 VDA and is available here . You may have a different version so go online and check if there is a specific hotfox availabe for Flash redirection to work. I had to download the hotfix and install on the VDA
Version of IE – 32 bit Internet Explorer must be used for Flash redirection to work even if you are using a 64 bit OS like Windows Server 2012 R2. Citrix recommends using IE 11
Flash Player Active X Plugins – Active X plugins are required on the server side for flash acceleration to work. These plugins integrate with Internet Explorer and could be installed separately if you are using IE 10 and below. You may visit Adobe Flash website to download a specific version of the Active X component. With IE 11, the Active X components are built-in alongside the browser (not a good thing in my opinion) and update are available as Windows updates from Microsoft’s site.
Flash Player NPAPI Plugins – It’s good to keep the IE Active X Controls and the NPAPI plugin versions the same. Though NPAPI plugins are required only for non-IE browsers according to theory, this seem to have an effect on the success of flash redirection
Special IE Settings – Disable Enhanced Protection Mode in IE, Some websites like YouTube.com need to be added to compatibility view mode for flash redirection to work. you may also need to add the website to Trusted Sites in IE in certain cases.
Client Side Setup
Flash Player Active X Plugins/Controls – This is a critical piece. This should either be equal to or greater than the version being run on the server.
Flash Player NPAPI Plugins – I would say this is the most important bit as we found out that even though you use IE in the Citrix session, NPAPI versions are compatibility checked and matched. If the check failed, flash redirection stopped working regardless of the Active X (IE) version. Keep client side NPAPI version the same or above as your NPAPI version on the server for Flash redirection to work.
Configure the ADM file for HDX Mediastream for Flash on all the corporate domain joined clients. This is not a requirement but still nice to have configured. Without this, your clients will still work if they meet the rest of the requirements
Other key things to note
Dont perform an upgrade of an existing Flash player plugin for client or server. Always install a fresh copy.
Flash Logging is a must have when you setup flash redirection. In most of the cases, logging will be turn ON by default and will be found under Event Viewer > Applications and Service Log > Citrix >Multimedia >Flash
When Flash redirection works, PseudoContainer.exe will run on the client device. Spot it using Task Manager >Details/Processes Tab
Here is a quick and easy way to load balance your Citrix Director instances in a XenApp or XenDesktop environment.
Below is my environment
Citrix Director servers ( Controller servers in most cases) – director-1 and director-2
A NetScaler HA pair ( you can do this on a stand alone NetScaler as well)
Monitors
Firstly, create a monitor for the Director services
Navigate to Traffic Management >Load Balancing >Monitors and click Add
Give it a name and select type as HTTP ( if there are no SSL certificates installed on the Director servers). Click on the Special Parameters tab and under the HTTP Type box, enter GET /Director/LogOn.aspx?cc=true
Before you click Create, ensure that it is enabled and Secure box is ticked if SSL certs are being used.
Click Create
Servers
Second step is to create Servers
Navigate to Traffic Management >Load Balancing >Servers and click Add
Add your Director servers here
Similarly, add the second Director servers as well
Service Groups
Now create the Service Group
Navigate to Traffic Management >Load Balancing >Service Groups and click Add
Give the Service Group a name and protocol is HTTP and click OK
Now Edit the service group that was just created and click on Service Group members and add the newly created services, director-1 and director-2
Once added, it will look like the below
Click Close. Click on the Monitors link as below and add the monitor that was created in Step 1
Once add the screen will look like the below. Click Close
The service group will look like the below once the above steps are completed.
Click Done
Responder Policy
A Responder policy needs to be created to redirect the users from the root of the IIS web server to the Director page.
Please note that Responder feature may need to be enabled first before you can use it.
Click on the + sign next to AppExpert and select Responder. Right click and choose Enable Feature. The yellow exclamation mark will disappear when you do that.
Once enabled, Navigate to AppExpert >Responder > Actions
Now think of a nice name to call the load balanced Director instance. you will need to add a DNS host entry later on for this name. the name that i have chosen is director
Give it a descriptive name and use the drop down for Type to select Redirect
Under Expressions, type the string here with the quotes as below
"http://director.domain.co.nz/Director"
Click Create
Time now to create the Responder policy. The one that we created earlier was a Responder action.
Give a descriptive name to the Responder policy and under the Action drop down menu, select the name of the action that was created in previous step. Under the Expressions field, type
HTTP.REQ.URL.CONTAINS(“Director”).NOT
Click Create
Virtual Server for Load balancing
Reserve an IP address to use for the virtual server.
On the left, navigate to Traffic Management >Load Balancing >Virtual Servers and click Add on the right. Give it a name and select the Protocol as HTTP
Specify the IP address for virtual server and the port number as 80. Click OK. Note that in production environments, use secure Director access by using an SSL certificate. For the purpose of demo, we are using an unsecure connection
On the page where it says, Services and Service Groups, click No Load Balancing Virtual Server ServiceGroup Binding
Add the service group that was created in earlier steps
Click Continue
On the right hand side under Advanced Settings, Click Persistence
Select SOURCE IP as the Persistence and change the timeout value to 245 ( the default time out value for Director is 245 mins). Leave the rest of the settings as defaults and Click OK
Now, move on to the right hand side again and select Policies
Select Responder as the policy and Type as Request and click Continue
.
Select the redirect policy created earlier and click Bind
Click Done
Ensure that the virtual server is marked as UP in green.
DNS Config
Create a host A record in DNS for the name which in my case is director
Test the Director URL and ensure that it redirects you to the correct URL and also login and confirm that Director is usable.
That’s all you need to do to setup Director load balancing using NetScaler.
With the release of 7.6 feature pack 3, the default graphics delivery behavior has changed and the enhanced Thinwire Compatibility mode is not available via user policies. You will need to take into consideration about the different use cases and the importance of policy precedence to ensure the intended delivery method is used. If FrameHawk is specifically applied to a subset of users, they will use FrameHawk even if a higher priority policy specifies Thinwire Compatibility mode. here is a cheat sheet from Citrix to make your life a lot easier when configuring HDX policies
Here is a dump of all that you can do via the PowerShell cmdlets in a XenApp /XenDesktop 7.x world. Note that the below has been taken from a XenApp 7.5 controller so there might be SDK updates in the newer releases.
Run the below command below in a PowerShell administrative window
There are many a times when you would want to prevent XenDesktop/XenApp 7.x power management from powering off virtual machines in the catalog. If you ever wondered how to do it, here are the steps
Open the PowerShell in administrative mode on the Controller server
asnp citrix*
Set-BrokerDesktopGroup "Delivery group Name" -AutomaticPowerOnForAssignedDuringPeak $True
if the above doesnt fix it, then run the below command as well which will ensure that all the VMs are ready for connections all the time
Set-BrokerDesktopGroup "<Delivery group Name>" -PeakBufferSizePercent 100 -OffPeakBufferSizePercent -100
The below PowerShell script could be used to deliver automated emails on the Citrix License usage for Citrix Admins.
Where do you run this script from?
Citrix License Server
How do you run this?
The script could be saved as a file with an extension of .ps1
Also ensure that you have a folder called report_do_not_delete created in the C: drive on the license server. Also, make the relevant changes in the script marked in Red. Run the script as a scheduled task at a specific time to receive the license usage reports in your mailbox or run it manually from a PowerShell window in Admin mode
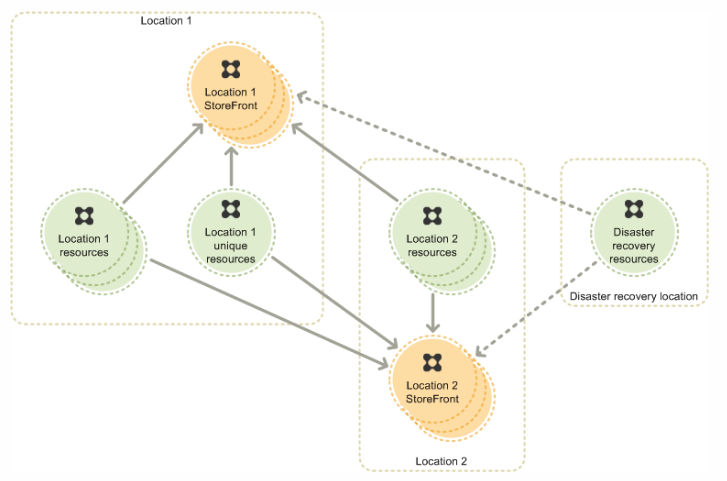
I am currently working on a XenDesktop 7.6 project that is designed to span 2 datacenters, Auckland and Sydney. One of the critical customer requirement is to redirect the user connections to their primary site regardless of their location first and failover to secondary site if the primary site is down. They also have a bunch of call center users in Manila, Philippines who should be assigned to primary site Sydney and Auckland as a failover site. Auckland users must be directed to Auckland XenDesktop site and Sydney users must be redirected to Sydney datacenter for their primary apps and desktops. There were also some additional requirements that are outlined below. In summary, the below are the technical requirements
Redirect users to their nearest NetScalers
Provide single published application icons for the same applications across both sites so that the application access is seamless to the user
Users will be mapped to a primary site( Auckland or Sydney) and will need to failover to the secondary site in case of primary site unavailability
Provide a single URL for application access for the users in all the sites, Auckland, Sydney and Manila.
Any unique applications from both sites should be enumerated.
There are certain applications that should be launched from one particular site for all the users due to the application backend requirements (limitations)
How do we achieve the above? This was something that was impossible to do with Citrix Web Interface up to versions 5.4. Wait, there is some hope.
XenDesktop Site Details
Auckland XenDesktop site consists of XenDesktop 7.6 site alongside Storefront 2.6 cluster with 2 nodes and NetScaler 10.5 for GSLB.
Sydney site also has a distinct XenDesktop site with a SF cluster with 2 nodes and a NetScaler for GSLB ( All same versions as in Auckland)
Design
Let’s look at how each element should be designed to achieve the above stated requirements.
Requirement 1 – Redirect users to their nearest NetScalers
This is quite an easy one and we would have done this countless times in our previous projects – yes, the good old GSLB ( Global Server Load Balancing). I am not going to reinvent the wheel here as there are some fantastic literature about this already from Citrix and from Carl Stalhood. I recommend the one from Carl as he has the latest one based on NetScaler 10.5
Requirement 2 – Provide single published application icons for the same applications across both sites so that the application access is seamless to the user
I am sure this is quite new to a lot of people out there, at least for me it was. This is where Storefront comes in. Citrix has built some excellent intelligence around Storefront to achieve this quite easily. This feature is technically called Resource Aggregation. There is an good explanation on this from Citrix here which i recommend every one to read. The key for this to work is to keep the application and desktop names the same across both XenDesktop sites. The path of application executables must also match for this to work. if there are differences, then they will be shown up as separate applications.
Also please note that AppController applications cannot be aggregated via this method.
Here is an excerpt from Citrix edocs on the above with changes relevant to my setup “Where a desktop or application with the same name and path on the server is available from both Sydney and Auckland, StoreFront aggregates these resources and presents users with a single icon. This behavior is a result of setting the aggregationGroup attribute to AggregationGroup1 for both the Sydney and Auckland deployments. Users clicking on an aggregated icon are typically connected to the resource in their location, where available. However, if a user already has an active session on another deployment that supports session reuse, the user is preferentially connected to the resource on that deployment to minimize the number of sessions used.”
Requirement 3 – Users will be mapped to a primary site( Auckland or Sydney) and will need to failover to the secondary site in case of primary site failure
The idea here is to split the users into 2 groups and assign them a primary site – In the end, one group will have the primary site assigned as Auckland and the other with primary site assigned as Sydney.
The key here is to add the users to separate AD groups for each sites and configure the XenDesktop sites/farms in a specific order (Manage Delivery Controllers in SF) and use the word “Failover” in Storefront configuration. I will get to this in detail in the Setup section below.
Requirement 4 – Provide a single URL for application access for the users in all the sites, Auckland, Sydney and Manila.
GSLB could do this quite easily. Please refer to the above links
Requirement 5 – Any unique applications from both sites should be enumerated.
This is already explained in parts under Requirement 2. If there is a case where any unique applications are to be delivered from one site for all the users, all that is required to be done is to publish that application in the relevant site. The application will appear when the enumeration is done and clicking it will take the users to the site from where the application is published.
Requirement 6 – There are certain applications that should be launched from one particular site for all the users due to the application backend requirements (limitations)
This use case is relevant when there are 2 or more applications with the same name across datacenters and you would need your users to always go to one datacenter to launch it. if the application isnt available at the primary datacenter, then it will be launched from the secondary datacenter. This is done by adding “Primary” and Secondary” keywords in the application description. Doing this will override the application load balancing/Failover rules specified above and will attempt to launch first from the Primary site. if the primary site app isn’t available for any reason, launch it from the Secondary site.
How this is all setup in Storefront
All the configurations are made in Web.Config file residing on the Storefront servers. Please also note that the changes must be made to the config file of the Stores and not the Web version of the Stores.
Now before you get started with the configuration, there are a few things that you need to have beforehand to make your life easier. XML Notepad will be one of them and the other will be the sample configuration from Citrix which could be found here
I recommend using XML Notepad as it makes the Web.Config file look ridiculously simple.
Getting Started
Create the Store as you usually do via Storefront Console. Update the information under “Manage Delivery Controllers”. Also ensure that you add the secondary site info as well in here now. This piece is very important in the process as the names that are used here will be reused in the Storefront configs later on in the Web.Config file. Once you make changes to Web.Config file, you cant change the “Manage Delivery Controllers” section via the GUI anymore for that store.
My Sydney Storefront cluster store will look like this after configuration. Please also refer the order of the sites – very important. First one must be Sydney followed by Auckland.
Sydney Site is called SYD and Auckland site is called AKL
Those who have keen eyes must also have noticed that the “Edit” button is missing from the above. This is the file after the changes are made.
My Auckland Storefront cluster will have the above settings reversed.
Now create 2 AD Groups – One to host Sydney users and another one for Auckland Users. Add the users accordingly to it.
Get the SID of these groups – I used Sysinternals PsGetSid tool
Now to the main part, Web.Config file changes
Web.Config file
All StoreFront store configurations can be found in the respective web.config file .\inetpub\wwwroot\Citrix\\web.config.
This is where we add the configuration for StoreFront High availability.
For convenience, I made a backup copy of the web.config file before making any changes.
As you will be making a lot of changes it is much simpler to edit the file direct on the server and not have to keep copying it back and forth to your machine each time.
I recommend you copy the example configuration from Citrix from here
Then in XML notepad, expand citrix.deliveryservices –> resourcesCommon and delete anything underneath resourcesCommon
Then right click citrix.deliveryservices and click paste.
Your web.config should now look like this
Delete 2 references to “equivalentFarmSet” under the node “equivalentFarmSets” and the config file should look like the below. You would also need to remove one “farm” and a backup reference. Overall It should look like the below. If it doesn’t, you are not going to achieve what you need.
Now start populating the data values on the right and mine looked like the below after the config.
The ones marked with red dots are descriptors so you could add what you like there.
Once you have done that, you have half of the logic in place. now for the other half, copy the node “UserFarmMapping” and paste it under “UserFarmMappings”. Look for the extra “s” XD
Once copied, you will need to reverse the entries for the failover to work. The copied part looked like this after the final config
This is the final configuration below for the Sydney Storefront cluster. Save the Web.Config file. Close the file. Make sure that the changes are propagated to the other SF servers in the Sydney cluster using the GUI.
Now, I will have to repeat the same process for the Auckland Storefront cluster in residing in Auckland datacenter
Just reverse all the settings that are made above and to those who are still confused on how it all should look like at the other end, below are a couple of screenshots from Auckland side.
This is how the Store config is via the GUI in Auckland. Look at the order as I want the Auckland site to be processed first followed by Sydney controllers
Citrix Studio Configuration
Add the Auckland_Test_Users AD group to the Delivery Group in Auckland site.
Now how do you get the failover to happen to Sydney for Auckland users?? Well, create another 2 groups – one for Auckland and another for Sydney. use the Sydney group and add it in Auckland Delivery group. I didn’t talk about the extra 2 groups in the beginning to keep it simple. In fact you will need 2 AD groups per datacenter site. In my screenshot above, i used an account for testing – sydctxuser
Now the Sydney Delivery group is configured as below
Please note that the Auckland account is added for failover. Use the second Auckland group in here in a production setup.
There you have it. You have a storefront that is intelligent enough to route the users based on their mappings and provide high availability. Also here is a copy of the configuration part of the web.config file as a sample below. Just change the items marked in BOLD except for “Default” entries
The Network Policy Server (NPS) extension for Azure MFA adds cloud-based MFA capabilities to your authentication infrastructure using your existing servers. With the NPS extension, you can add phone call, text message, or phone app verification to your existing authentication flow without having to install, configure, and maintain new servers.
This extension was created for organizations that want to protect VPN connections without deploying the Azure MFA Server. The NPS extension acts as an adapter between RADIUS and cloud-based Azure MFA to provide a second factor of authentication for federated or synced users.
When using the NPS extension for Azure MFA, the authentication flow includes the following components:
NetScaler receives requests from VPN clients or Citrix ICA Proxy users and converts them into RADIUS requests to NPS servers.
NPS Server connects to Active Directory to perform the primary authentication for the RADIUS requests and, upon success, passes the request to any installed extensions.
NPS Extension triggers a request to Azure MFA for the secondary authentication. Once the extension receives the response, and if the MFA challenge succeeds, it completes the authentication request by providing the NPS server with security tokens that include an MFA claim, issued by Azure STS.
Azure MFA communicates with Azure Active Directory to retrieve the user’s details and performs the secondary authentication using a verification method configured to the user.
Pre-Requisites
There are some requirements that are needed to be met for deploying this solution.
Licenses
The NPS Extension for Azure MFA is available to customers with licenses for Azure Multi-Factor Authentication (included with Azure AD Premium, EMS, or an MFA stand-alone license). Consumption-based licenses for Azure MFA such as per user or per authentication licenses are not compatible with the NPS extension.
Libraries
These libraries are installed automatically with the extension.
The Microsoft Azure Active Directory Module for Windows PowerShell is installed, if it is not already present, through a configuration script you run as part of the setup process. There is no need to install this module ahead of time if it is not already installed.
Azure Active Directory
Everyone using the NPS extension must be synced to Azure Active Directory using Azure AD Connect, and must be registered for MFA.
When you install the extension, you need the directory ID and admin credentials for your Azure AD tenant. You can find your directory ID in the Azure portal. Sign in as an administrator. Search for and select the Azure Active Directory, then select Properties. Copy the GUID in the Directory ID box and save it. You use this GUID as the tenant ID when you install the NPS extension.
Network requirements
The NPS server needs to be able to communicate with the following URLs over ports 80 and 443.
Verify that your sync status is Enabled and that your last sync was less than an hour ago.
Determine which authentication methods your users can use
There are two factors that affect which authentication methods are available with an NPS extension deployment:
The password encryption algorithm used between the RADIUS client (VPN, Netscaler server, or other) and the NPS servers.
PAP supports all the authentication methods of Azure MFA in the cloud: phone call, one-way text message, mobile app notification, OATH hardware tokens, and mobile app verification code.
CHAPV2 and EAP support phone call and mobile app notification.
The input methods that the client application such as VPN, Netscaler, or others can handle. For example, does the VPN client have some means to allow the user to type in a verification code from a text or mobile app?
Register users for MFA
Before you deploy and use the NPS extension, users that are required to perform two-step verification need to be registered for MFA. More immediately, to test the extension as you deploy it, you need at least one test account that is fully registered for Multi-Factor Authentication.
Make sure that users have successfully registered for Azure Multi-Factor Authentication. If users have previously only registered for self-service password reset (SSPR), StrongAuthenticationMethods is enabled for their account. Azure Multi-Factor Authentication is enforced when StrongAuthenticationMethods is configured, even if the user only registered for SSPR.
Install the Network Policy Server role in your environment. You can choose to install this on any domain joined Server OS machine in the network.
Ideally, you would want to sit close to your Active Directory server just to make it quicker to send traffic for Authentication and Authorization. Or Just install this straight on your AD server, it’s totally up to you.
Installing the NPS role is dead easy. Just fire up your Server Manager and go to Manage – Add Roles and Features. Select Network Policy and Access Services
It will ask you to install Remote Server Administration Tools. Say Add Features.
Click Next (3 times) until you reach the Confirmation page. Click Install
Once installed, you will need to register the server in Active Directory.
Open the NPS console as below and right click the NPS node and click Register Server in Active Directory
Now it’s time to install the NPS extension for Azure.
Installing and Configuring NPS Extension for Azure MFA
Stop!
1) Before you proceed with this step, you will need to have the Azure Administrator account handy. 2) Ensure that NPS server could access the internet to the URLs specified in section Network Requirements
Once downloaded, run the NpsExtnForAzureMfaInstaller.exe as an Administrator. If you want to change the install location, Click Options and choose a different location.
if not, just Click Install
The setup is quick. Click Close, once finishes.
Open PowerShell as Administrator. You have to have your Azure Portal admin credentials handy before this step.
Navigate to the install location for NPS Extension C:\Program Files\Microsoft\AzureMfa\Config using PowerShell.
Run the Powershell script in that directory AzureMfaNpsExtnConfigSetup.ps1 as below
PowerShell will begin the installation of NuGet provider assemblies including MSOnline cmdlets
It’s gonna tell you that you are installing this from an untrusted repository. Just say A for Yes to All and continue.
Now, PowerShell will take you to portal.azure.com where you will need your Azure AD admin credentials to login.
Login with your Azure credentials
At this stage, it will ask for the Tenant ID. Copy the Directory ID and paste it in the PS window
It does a few things as below
## It creates a Self-Signed certificate
## It grants private key access to NETWORK SERVICE
## Restarts the NPS Policy Service
You may now exit out of PowerShell as it is time to configure NPS.
Configure NPS
Configure RADIUS Clients
Open the NPS console and navigate to RADIUS Clients and Server Folder
Expand the folder and Right Click on RADIUS Clients
Select New
Configure the settings as below
Give it a Friendly Name
Enter the IP address of the NetScaler (NSIP)
Enter a Shared Secret Key (Save this key as we will need this later)
Click Ok
Add all the RADIUS clients following the steps above. If you set this up on a NetScaler HA configuration, you will have 2 NetScaler NSIPs to add. You should something similar as follows.
Configure Remote RADIUS Servers
Select the node – Remote RADIUS Server Groups
Right- click and select New
Give a Group Name
Click Add
Type the IP address or name of the Active Directory Domain Controller Server in there and Click OK.
Tip!
The AD server is required to be added for the Remote RADIUS node. This is where the RADIUS/NPS server triggers the first step of authentication and will be passed on to the AD server for validating the LDAP credentials. If you add the NPS server details in here, it will NOT work!
You can choose to add the FQDN of the domain controller or just use the IP address. You can multiple DCs in here for redundancy.
Click on the Authentication/Accounting tab. Configure it as below
Click on the Load Balancing tab now and supply the weightage to the servers if you are adding multiple AD servers.
You can also configure the Timeout settings in here.
Notice that I have increased the timeout values to 60. This is important when using phone calls and SMS based authentication because they take more time. Even when using the Microsoft Authenticator app, default values are a little too less, so adjust it according to your environment.
Add all the servers that you intend to use as Domain Controllers in here.
Configure Connection Request Policies
It is time now to create a Connection Request Policy. We need a couple of them for this deployment. There are a few things to keep in mind as follows before we proceed to create the policies.
The default built-in connection request policy uses NPS as a RADIUS server and processes all authentication requests locally.
To configure a server running NPS to act as a RADIUS proxy and forward connection requests to other NPS or RADIUS servers, you must configure a remote RADIUS server group in addition to adding a new connection request policy that specifies conditions and settings that the connection requests must match.
If you do not want the NPS to act as a RADIUS server and process connection requests locally, you can delete the default connection request policy.
If you want the NPS to act as both a RADIUS server, processing connection requests locally, and as a RADIUS proxy, forwarding some connection requests to a remote RADIUS server group, add a new policy using the following procedure and then verify that the default connection request policy is the last policy processed by placing it last in the list of policies. This is the approach we are using for NetScaler deployment.
Create a Connection Request Policy for No Forward
Open the NPS server console and expand Policies node
Right Click Connection Request Policies and choose New
Give the policy a Name
Click Next
Click Add
Select Client IPv4 Address
Click Add again
Specify the Client IP v4 Addresses – This will be the NetScaler NSIP if RADIUS isnt load balanced. If load balanced, you must use the Subnet IP of the NetScaler (SNIP)
Click Next
Configure Authentication as below
Click Next
Configure the Authentication exactly as below
Click Next a couple of times until the Summary page is reached.
Create the second Connection Request Policy for Forwarding
Right Click Connection Request Policies and choose New
Give the policy a Name
Click Next
Click Add
Select NAS Identifier
Click Add again
Enter the name of the NAS Identifier – MFA
Click OK
click Next
Configure the Authentication as below – MS-CHAP-v2
Click Next
If you are on the Summary page, click Finish
The two connection request policies should be moved up in the policy priority order and should look like the below.
Create the Network Policy
Go to the Network Policies node
Right Click and select New
Give the policy a Name
Click Next
Click Add
Select NAS Identifier
Enter MFA in there
Click Add again
Click Next
Select AccessGranted
Click Next
Configure the Authentication methods as below
a few more extra clicks will get you to the Summary page.
Click Finish on the Summary page.
Make the policy that we just created higher up in the order.
Disable the existing or built-in Network policies.
Disable the existing Network Policies (Default)
Move the new Network Policy to the top and assign it priority 1
Repeat the above steps on all the other NPS servers that you have in the deployment.
NetScaler Configuration
You can now proceed to create your vServer in NetScaler. It could be a NetScaler Gateway or a VPN vServer. In this post, i will not be showing how to create a NetScaler vServer. It is fairly straightforward and there are tons of blog posts on it on the internet. You will just need to set eveything up just like how you would setup a single factor Gateway portal in NetScaler.
You will need to make sure that ports 1812 and 1813 are open from the NetScaler to the backend NPS server (bi-directional)
If you have multiple subnet IPs on the NetScaler, use a Net profile to isolate traffic to a particular source IP address.
If you aren’t load balancing NetScaler, NSIPs are the source IP address. Otherwise SNIPs will need to be used. (The client IPv4 address entries that you made in the previous step will change accordingly)
Create RADIUS Policies and Profiles
Go to NetScaler Gateway node – Policies – Authentication – RADIUS
Go to Servers tab and click Add
Give a name to the Server profile
Enter the IP address of the NPS server
Port is 1812
Enter the Shared Secret Key
Change the time out to 60 seconds if you intend to use phone calls, SMS or phone app auth.
Test the connection and ensure that you get all green
Click More
Enter the NAS ID here – MFA
Password encoding as mschapv2
Click Create
Similarly, create additional RADIUS servers using the same steps above.
Create RADIUS policies now to attach the RADIUS server profiles so that it could be bound to vServers.
Create a RADIUS policy and attach the profile as below
Once, your vServer is ready, the RADIUS policy could be attached to the vServer as a primary authentication. Doing this will still perform Active Directory LDAP authentication after which the NPS extension will check the second factor authentication.
You can now test with an account that is MFA enabled. If everything is setup correctly, MFA will work fine and prompt with a second factor.
Troubleshooting
Always check the Authentication server status of RADIUS server in NetScaler. It should be green when the traffic is allowed. if it is not, check why? Work with your NW team to figure out why the traffic doesnt reach the NPS backend or being returned back.
Add a DNS A record entry for the Remote URL for Citrix access
If the NetScaler IPs (NSIP) don’t work, try the Subnet IP as RADIUS clients. If you make a change, ensure that the change is reflected in the Network Policies too.
On NetScalers where multiple subnet IPs are used, isolate the traffic using NET Profiles.
Check aaad.debug logs on NetScaler.
if you get the below, it is mosty likely an issue with the RADIUS client IPs. It is just that the wrong IP is being used.
No valid RADIUS responses received.
Rejecting with error code 4004
Look out for Routing issues. If your NPS servers are sitting in a different subnet as compared to NetScaler IPs, looking at the Route table could shed some light. If routes are missing, add them. But please remember not to break existing traffic. If unsure, ask the network guy for assistance.
Check the Dial-In tab in AD properties for the user. Ensure that the user is allowed access. Or You can configure NPS to override the AD settings by setting the below (look for the red dot below)
Event Logging – Ensure that NPS logs are turned ON. Log files will be found at C:\Windows\System32\LogFiles. Make sure that the logs are set to DTS compliant. Event Viewer is also a reliable source.
If you don’t want to limit non-MFA users from accessing the portal, you can add the below registry keys to the NPS servers. This will allow users who aren’t registered in Azure MFA to continue to authenticate using LDAP authentication. This is vital during migration phase. However, this setting must be removed before you move into production.
If you have noticed the Restart button for published desktops in Citrix Virtual Apps and Desktops 7 1912 LTSR recently and wondered why in the world Citrix would give users access to users to restart machines, you are not alone. Make no mistake, this is a perfectly fine setting to be enabled out-of-the-box for VDI deployments where just Desktop OSes are being published or on the delivery group that contains Desktop OSes. You would want your users to be able to restart the desktop every now and then anyway.
Now after going through the Citrix SDK documentation, I found the below notes for the -AllowRestart argument that governs the restart button.
AllowRestart (System.Boolean) Indicates if the user can restart sessions delivered from the rule’s desktop group. Session restart is handled as follows: For sessions on single-session power-managed machines, the machine is powered off, and a new session launch request made; for sessions on multi-session machines, a logoff request is issued to the session, and a new session launch request made; otherwise the property is ignored.
So, it isn’t too bad to have that button available for RDSH delivery groups but should probably be called something else. The name “restart” has a negative vibe to it in multi-session world. lol
The option\button will appear like the below.
How would you remove the Restart option?
You will need to do this via Powershell.
asnp citrix*
Get-BrokerAccessPolicyRule
Find the delivery group that has RDSH based published desktops and take a note of the Name parameter. You can do this on all the delivery groups if you want to disable this button for all published desktops, both RDSH and VDI.
Run the below command to find the value for the delivery group that you want to turn OFF the setting for. The parameter we are looking for is AllowRestart. When the value is True, Restart button is shown. Setting it to False will remove the button from Storefront.
If you have implemented DirectAccess for your users so that they could connect to corporate network whilst they work from home, you might have come across this issue while using Citrix. Users would be able to connect to Storefront portal and authenticate themselves but when they try to launch applications it fail. Users will also notice the below Citrix Receiver dialog with no apparent error messages.
The users who connect directly to Storefront without DirectAccess have no issues to launch applications.
The Cause
When you have DirectAccess enabled on user PCs, it expects hostname/FQDN values for initiating traffic between the client and the DA gateway. By default, Citrix XenApp tries to connect on IP addresses to bypass the infrastructure reliance on DNS. So, we will need to find a way to switch that behaviour to an FQDN based connection initiation.
Let’s look at the .ICA files to see what’s in there. The below screenshot is of an ICA file that shows IP addresses. This setup will NOT work for DirectAccess connections.
The Fix
To fix this, you will need to change a DNS parameter in XenApp/XenDesktop 7.x farms.
asnp citrix*
Get-BrokerSite
You will need to change the value from False to True
Set-BrokerSite -DnsResolutionEnabled $True
Running a Get-BrokerSite after that will show that the value has been changed from False to True
Now, let’s inspect the ICA file again. You can find the ICA files from your User profile folder. I had mine under