I am currently working on a XenDesktop 7.6 project that is designed to span 2 datacenters, Auckland and Sydney. One of the critical customer requirement is to redirect the user connections to their primary site regardless of their location first and failover to secondary site if the primary site is down. They also have a bunch of call center users in Manila, Philippines who should be assigned to primary site Sydney and Auckland as a failover site. Auckland users must be directed to Auckland XenDesktop site and Sydney users must be redirected to Sydney datacenter for their primary apps and desktops. There were also some additional requirements that are outlined below. In summary, the below are the technical requirements
- Redirect users to their nearest NetScalers
- Provide single published application icons for the same applications across both sites so that the application access is seamless to the user
- Users will be mapped to a primary site( Auckland or Sydney) and will need to failover to the secondary site in case of primary site unavailability
- Provide a single URL for application access for the users in all the sites, Auckland, Sydney and Manila.
- Any unique applications from both sites should be enumerated.
- There are certain applications that should be launched from one particular site for all the users due to the application backend requirements (limitations)
How do we achieve the above? This was something that was impossible to do with Citrix Web Interface up to versions 5.4. Wait, there is some hope.
XenDesktop Site Details
Auckland XenDesktop site consists of XenDesktop 7.6 site alongside Storefront 2.6 cluster with 2 nodes and NetScaler 10.5 for GSLB.
Sydney site also has a distinct XenDesktop site with a SF cluster with 2 nodes and a NetScaler for GSLB ( All same versions as in Auckland)
Design
Let’s look at how each element should be designed to achieve the above stated requirements.
Requirement 1 – Redirect users to their nearest NetScalers
This is quite an easy one and we would have done this countless times in our previous projects – yes, the good old GSLB ( Global Server Load Balancing). I am not going to reinvent the wheel here as there are some fantastic literature about this already from Citrix and from Carl Stalhood. I recommend the one from Carl as he has the latest one based on NetScaler 10.5
Requirement 2 – Provide single published application icons for the same applications across both sites so that the application access is seamless to the user
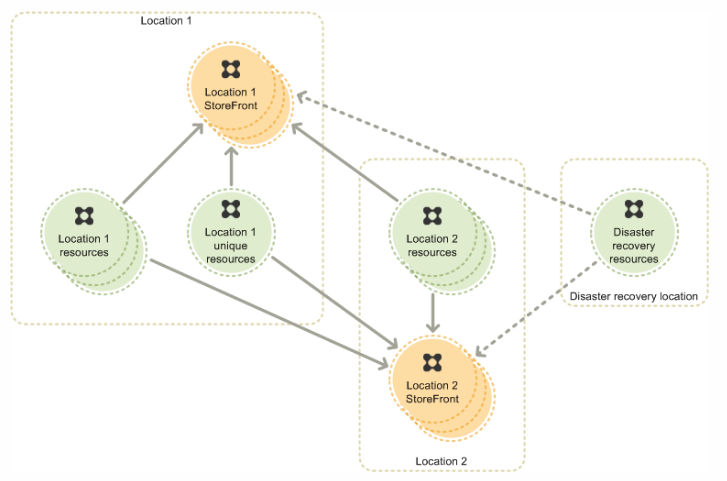
I am sure this is quite new to a lot of people out there, at least for me it was. This is where Storefront comes in. Citrix has built some excellent intelligence around Storefront to achieve this quite easily. This feature is technically called Resource Aggregation. There is an good explanation on this from Citrix here which i recommend every one to read. The key for this to work is to keep the application and desktop names the same across both XenDesktop sites. The path of application executables must also match for this to work. if there are differences, then they will be shown up as separate applications.
Also please note that AppController applications cannot be aggregated via this method.
Here is an excerpt from Citrix edocs on the above with changes relevant to my setup “Where a desktop or application with the same name and path on the server is available from both Sydney and Auckland, StoreFront aggregates these resources and presents users with a single icon. This behavior is a result of setting the aggregationGroup attribute to AggregationGroup1 for both the Sydney and Auckland deployments. Users clicking on an aggregated icon are typically connected to the resource in their location, where available. However, if a user already has an active session on another deployment that supports session reuse, the user is preferentially connected to the resource on that deployment to minimize the number of sessions used.”
Requirement 3 – Users will be mapped to a primary site( Auckland or Sydney) and will need to failover to the secondary site in case of primary site failure
The idea here is to split the users into 2 groups and assign them a primary site – In the end, one group will have the primary site assigned as Auckland and the other with primary site assigned as Sydney.
The key here is to add the users to separate AD groups for each sites and configure the XenDesktop sites/farms in a specific order (Manage Delivery Controllers in SF) and use the word “Failover” in Storefront configuration. I will get to this in detail in the Setup section below.
Requirement 4 – Provide a single URL for application access for the users in all the sites, Auckland, Sydney and Manila.
GSLB could do this quite easily. Please refer to the above links
Requirement 5 – Any unique applications from both sites should be enumerated.
This is already explained in parts under Requirement 2. If there is a case where any unique applications are to be delivered from one site for all the users, all that is required to be done is to publish that application in the relevant site. The application will appear when the enumeration is done and clicking it will take the users to the site from where the application is published.
Requirement 6 – There are certain applications that should be launched from one particular site for all the users due to the application backend requirements (limitations)
This use case is relevant when there are 2 or more applications with the same name across datacenters and you would need your users to always go to one datacenter to launch it. if the application isnt available at the primary datacenter, then it will be launched from the secondary datacenter. This is done by adding “Primary” and Secondary” keywords in the application description. Doing this will override the application load balancing/Failover rules specified above and will attempt to launch first from the Primary site. if the primary site app isn’t available for any reason, launch it from the Secondary site.
How this is all setup in Storefront
All the configurations are made in Web.Config file residing on the Storefront servers. Please also note that the changes must be made to the config file of the Stores and not the Web version of the Stores.
Now before you get started with the configuration, there are a few things that you need to have beforehand to make your life easier. XML Notepad will be one of them and the other will be the sample configuration from Citrix which could be found here
I recommend using XML Notepad as it makes the Web.Config file look ridiculously simple.
Getting Started
Create the Store as you usually do via Storefront Console. Update the information under “Manage Delivery Controllers”. Also ensure that you add the secondary site info as well in here now. This piece is very important in the process as the names that are used here will be reused in the Storefront configs later on in the Web.Config file. Once you make changes to Web.Config file, you cant change the “Manage Delivery Controllers” section via the GUI anymore for that store.
My Sydney Storefront cluster store will look like this after configuration. Please also refer the order of the sites – very important. First one must be Sydney followed by Auckland.
Sydney Site is called SYD and Auckland site is called AKL
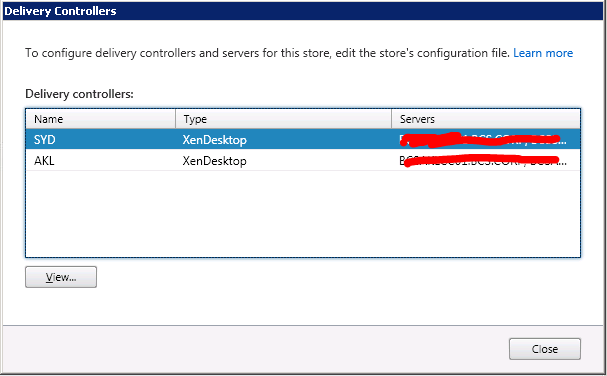
Those who have keen eyes must also have noticed that the “Edit” button is missing from the above. This is the file after the changes are made.
My Auckland Storefront cluster will have the above settings reversed.
Now create 2 AD Groups – One to host Sydney users and another one for Auckland Users. Add the users accordingly to it.
Get the SID of these groups – I used Sysinternals PsGetSid tool
Now to the main part, Web.Config file changes
Web.Config file
All StoreFront store configurations can be found in the respective web.config file .\inetpub\wwwroot\Citrix\\web.config.
This is where we add the configuration for StoreFront High availability.
For convenience, I made a backup copy of the web.config file before making any changes.
As you will be making a lot of changes it is much simpler to edit the file direct on the server and not have to keep copying it back and forth to your machine each time.
I recommend you copy the example configuration from Citrix from here
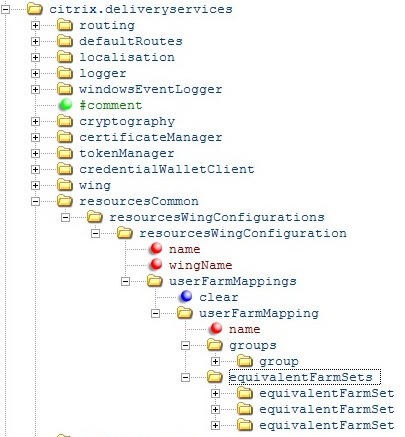
Then in XML notepad, expand citrix.deliveryservices –> resourcesCommon and delete anything underneath resourcesCommon
Then right click citrix.deliveryservices and click paste.
Your web.config should now look like this
Delete 2 references to “equivalentFarmSet” under the node “equivalentFarmSets” and the config file should look like the below. You would also need to remove one “farm” and a backup reference. Overall It should look like the below. If it doesn’t, you are not going to achieve what you need.
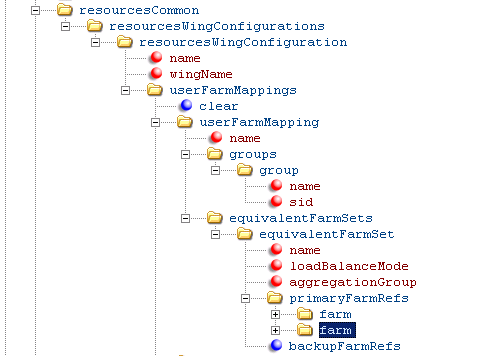
Now start populating the data values on the right and mine looked like the below after the config.
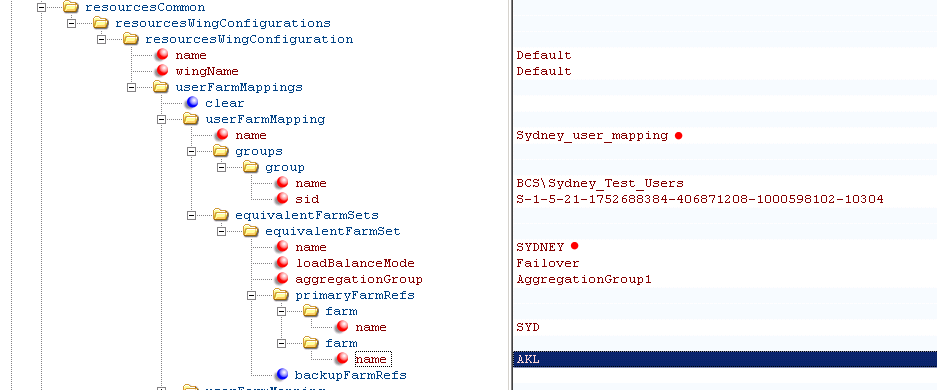
The ones marked with red dots are descriptors so you could add what you like there.
Once you have done that, you have half of the logic in place. now for the other half, copy the node “UserFarmMapping” and paste it under “UserFarmMappings”. Look for the extra “s” XD
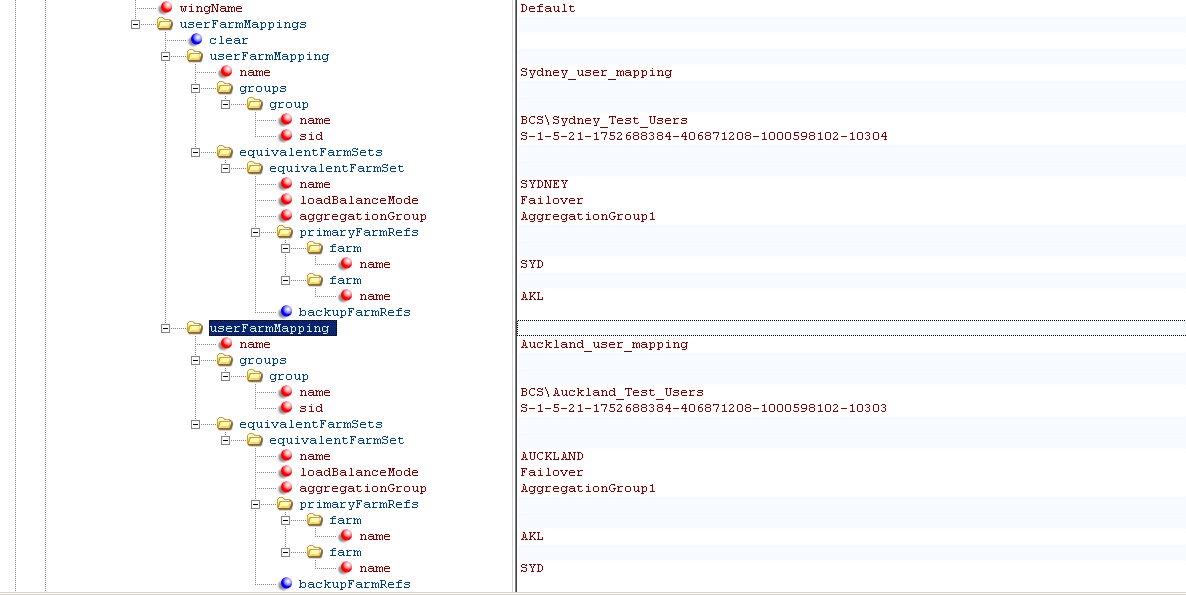
Once copied, you will need to reverse the entries for the failover to work. The copied part looked like this after the final config
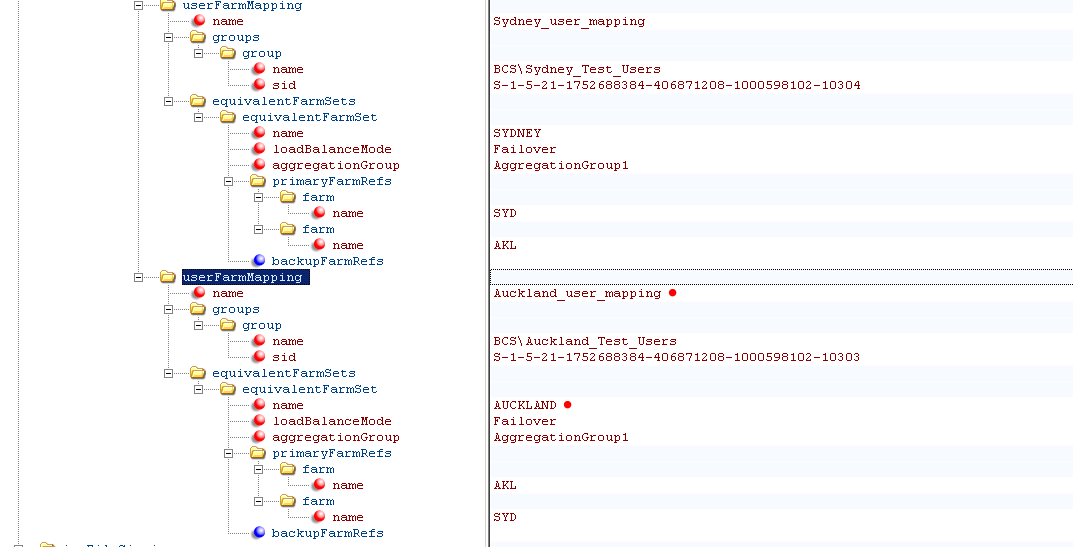
This is the final configuration below for the Sydney Storefront cluster. Save the Web.Config file. Close the file. Make sure that the changes are propagated to the other SF servers in the Sydney cluster using the GUI.
Now, I will have to repeat the same process for the Auckland Storefront cluster in residing in Auckland datacenter
Just reverse all the settings that are made above and to those who are still confused on how it all should look like at the other end, below are a couple of screenshots from Auckland side.
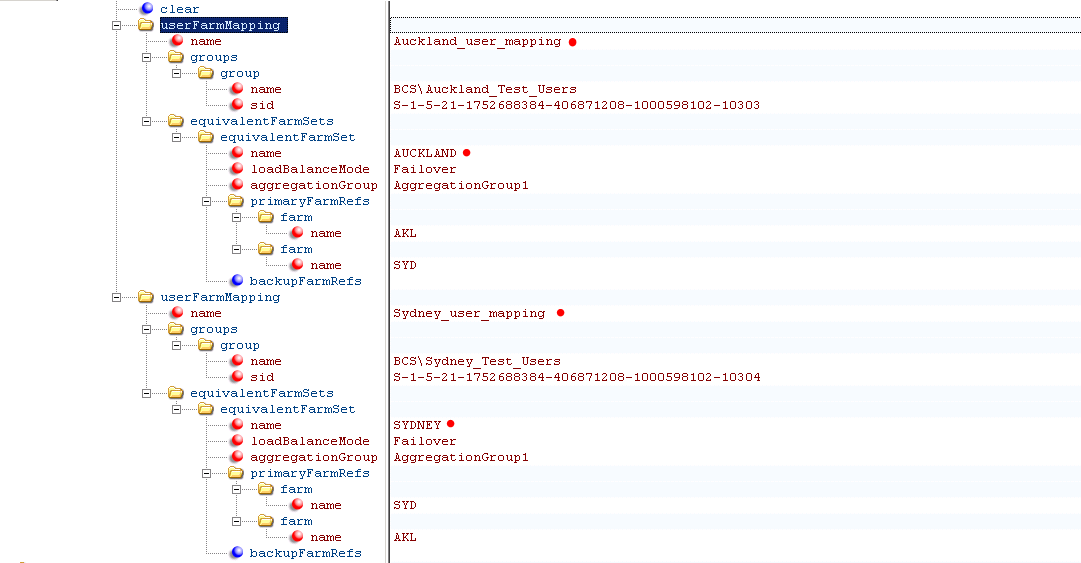
This is how the Store config is via the GUI in Auckland. Look at the order as I want the Auckland site to be processed first followed by Sydney controllers

Citrix Studio Configuration
Add the Auckland_Test_Users AD group to the Delivery Group in Auckland site.
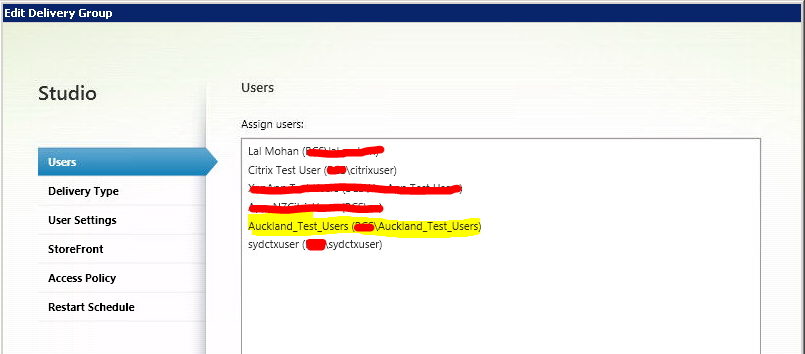
Now how do you get the failover to happen to Sydney for Auckland users?? Well, create another 2 groups – one for Auckland and another for Sydney. use the Sydney group and add it in Auckland Delivery group. I didn’t talk about the extra 2 groups in the beginning to keep it simple. In fact you will need 2 AD groups per datacenter site. In my screenshot above, i used an account for testing – sydctxuser
Now the Sydney Delivery group is configured as below
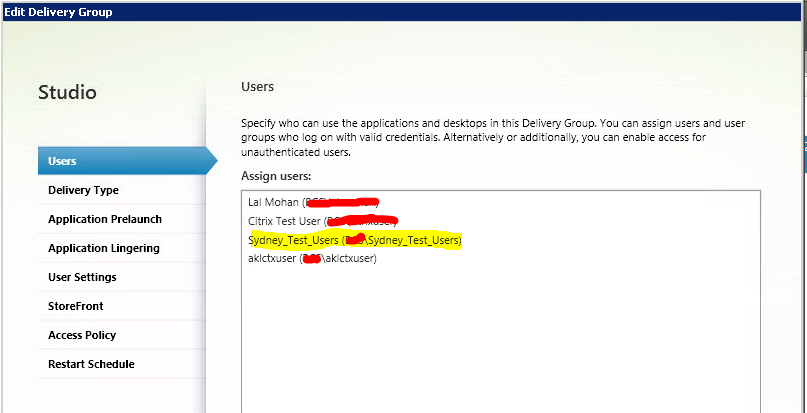
Please note that the Auckland account is added for failover. Use the second Auckland group in here in a production setup.
There you have it. You have a storefront that is intelligent enough to route the users based on their mappings and provide high availability. Also here is a copy of the configuration part of the web.config file as a sample below. Just change the items marked in BOLD except for “Default” entries
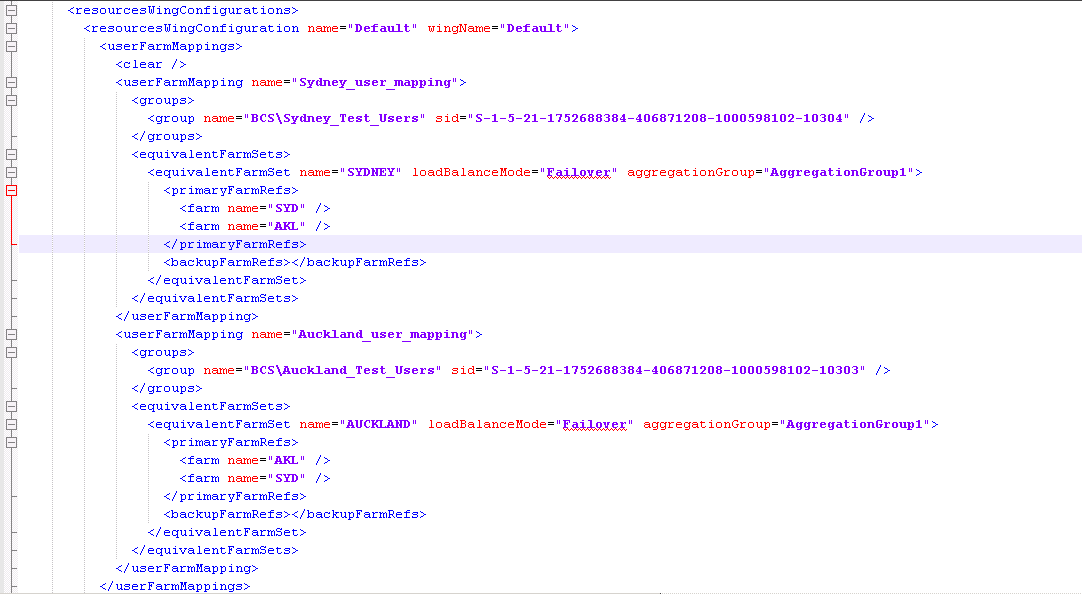
<resourcesWingConfigurations>
        <resourcesWingConfiguration name="Default" wingName="Default">
          <userFarmMappings>
            <clear />
            <userFarmMapping name="Sydney_user_mapping">
              <groups>
                <group name="BCS\Sydney_Test_Users" sid="S-1-5-21-1752688384-406871208-1000598102-10304" />
              </groups>
              <equivalentFarmSets>
                <equivalentFarmSet name="SYDNEY" loadBalanceMode="Failover" aggregationGroup="AggregationGroup1">
                  <primaryFarmRefs>
                    <farm name="SYD" />
                    <farm name="AKL" />
                  </primaryFarmRefs>
                  <backupFarmRefs></backupFarmRefs>
                </equivalentFarmSet>
              </equivalentFarmSets>
            </userFarmMapping>
            <userFarmMapping name="Auckland_user_mapping">
              <groups>
                <group name="BCS\Auckland_Test_Users" sid="S-1-5-21-1752688384-406871208-1000598102-10303" />
              </groups>
              <equivalentFarmSets>
                <equivalentFarmSet name="AUCKLAND" loadBalanceMode="Failover" aggregationGroup="AggregationGroup1">
                  <primaryFarmRefs>
                    <farm name="AKL" />
                    <farm name="SYD" />
                  </primaryFarmRefs>
                  <backupFarmRefs></backupFarmRefs>
                </equivalentFarmSet>
              </equivalentFarmSets>
            </userFarmMapping>
          </userFarmMappings>
        </resourcesWingConfiguration>
      </resourcesWingConfigurations>

Leave a Reply