In this post, we will discuss how to go about setting up federation between Microsoft Azure, Office 365 and VMware Identity Manager. We will be using a Microsoft developer account in this demo configuration so in the real world, you will need to replace the Office account with your customer one.
The blog is split into 5 sections so feel free to jump to the relevant sections depending on what you are after.
Part 1: Setting Up a Developer Account
Part 2 : Federating Office 365 with VMware Identity Manager
Part 3: Setting up the SAML between VMware Identity Manager and Office 365
Part 4 : Testing the Federation Setup
Part 5 : Inserting Office 365 Deep Links into VMware Identity Manager
Part 1: Setting Up a Developer Account
Firstly, we need to setup an Office 365 E3 Developer subscription account to be able to integrate with Workspace ONE. In this section we will cover the process of setting this up. Setting up a developer subscription allows you a 12 -month free trial.
Go to the link below to setup the Office 365 subscription account.
https://docs.microsoft.com/en-us/office/developer-program/office-365-developer-program-get-started
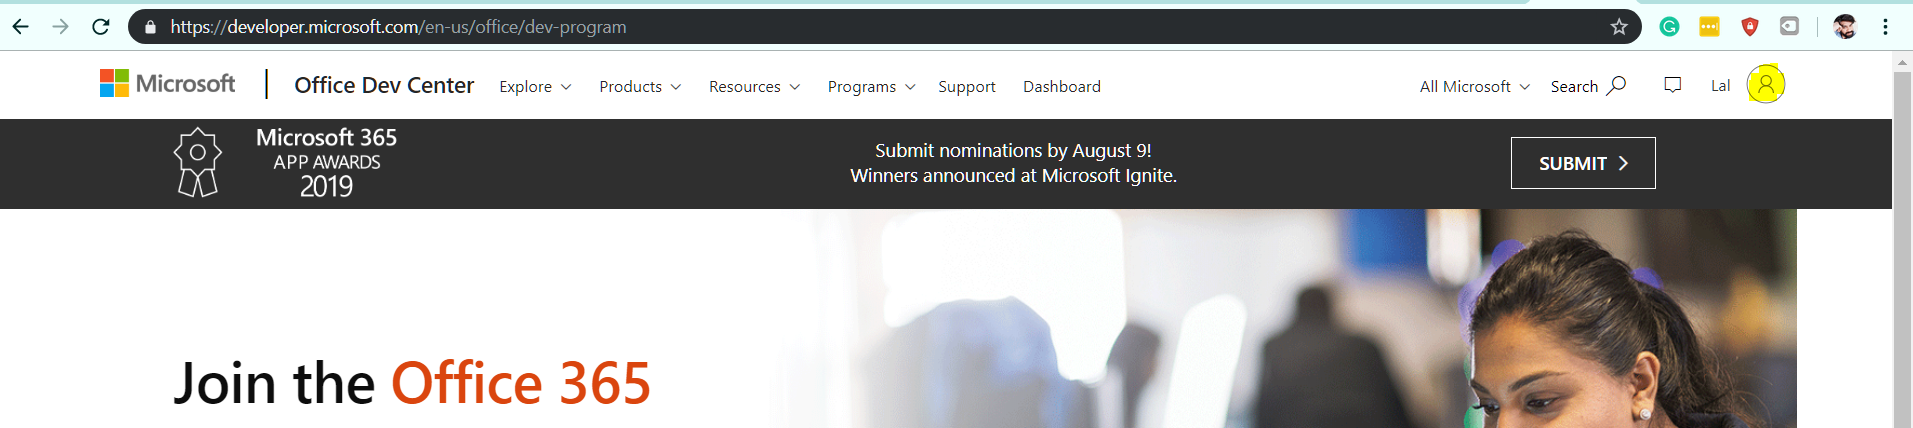
Click the join the Office 365 Developer Program hyperlink

You will now be re-directed a to Join the Office 365 developer program today!
Do not select JOIN NOW
Instead, to the right of the page first select the Sign In icon
On Microsoft Sign in Page type in the email address of an Microsoft account you own
(NB! If this account is already associated with an office 365 account you will have to create a new account)
Alternatively Create a new account, if required
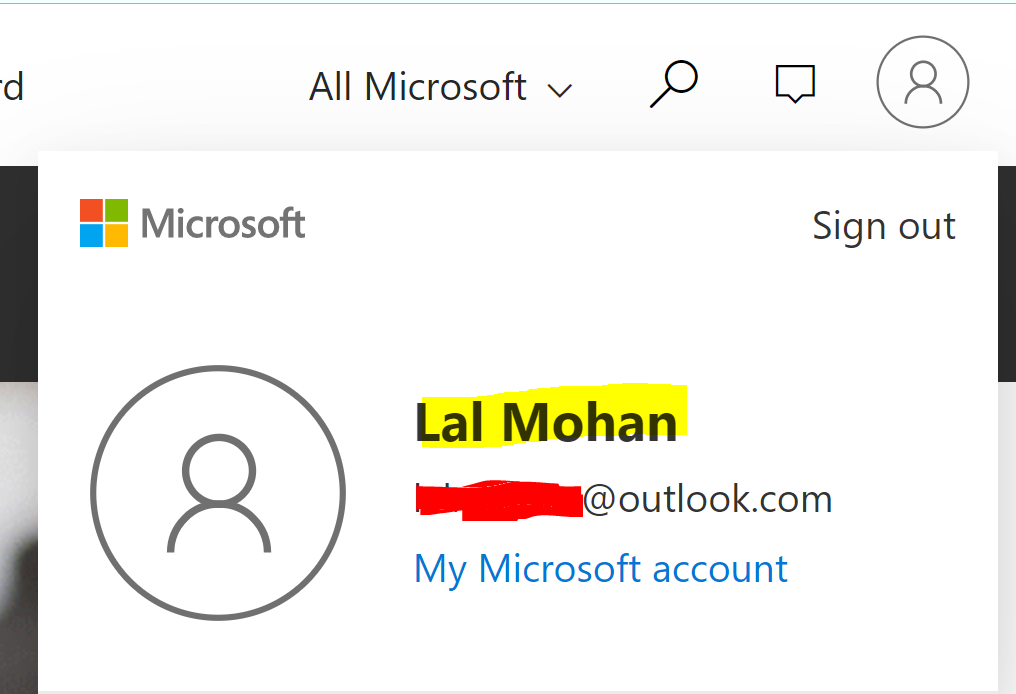
Click on the user logo on the top right and ensure that there is a first and last name added for the account as below
Now go back to the developer program join page using an incognito window and sign back in using the same account
https://developer.microsoft.com/en-us/office/dev-program
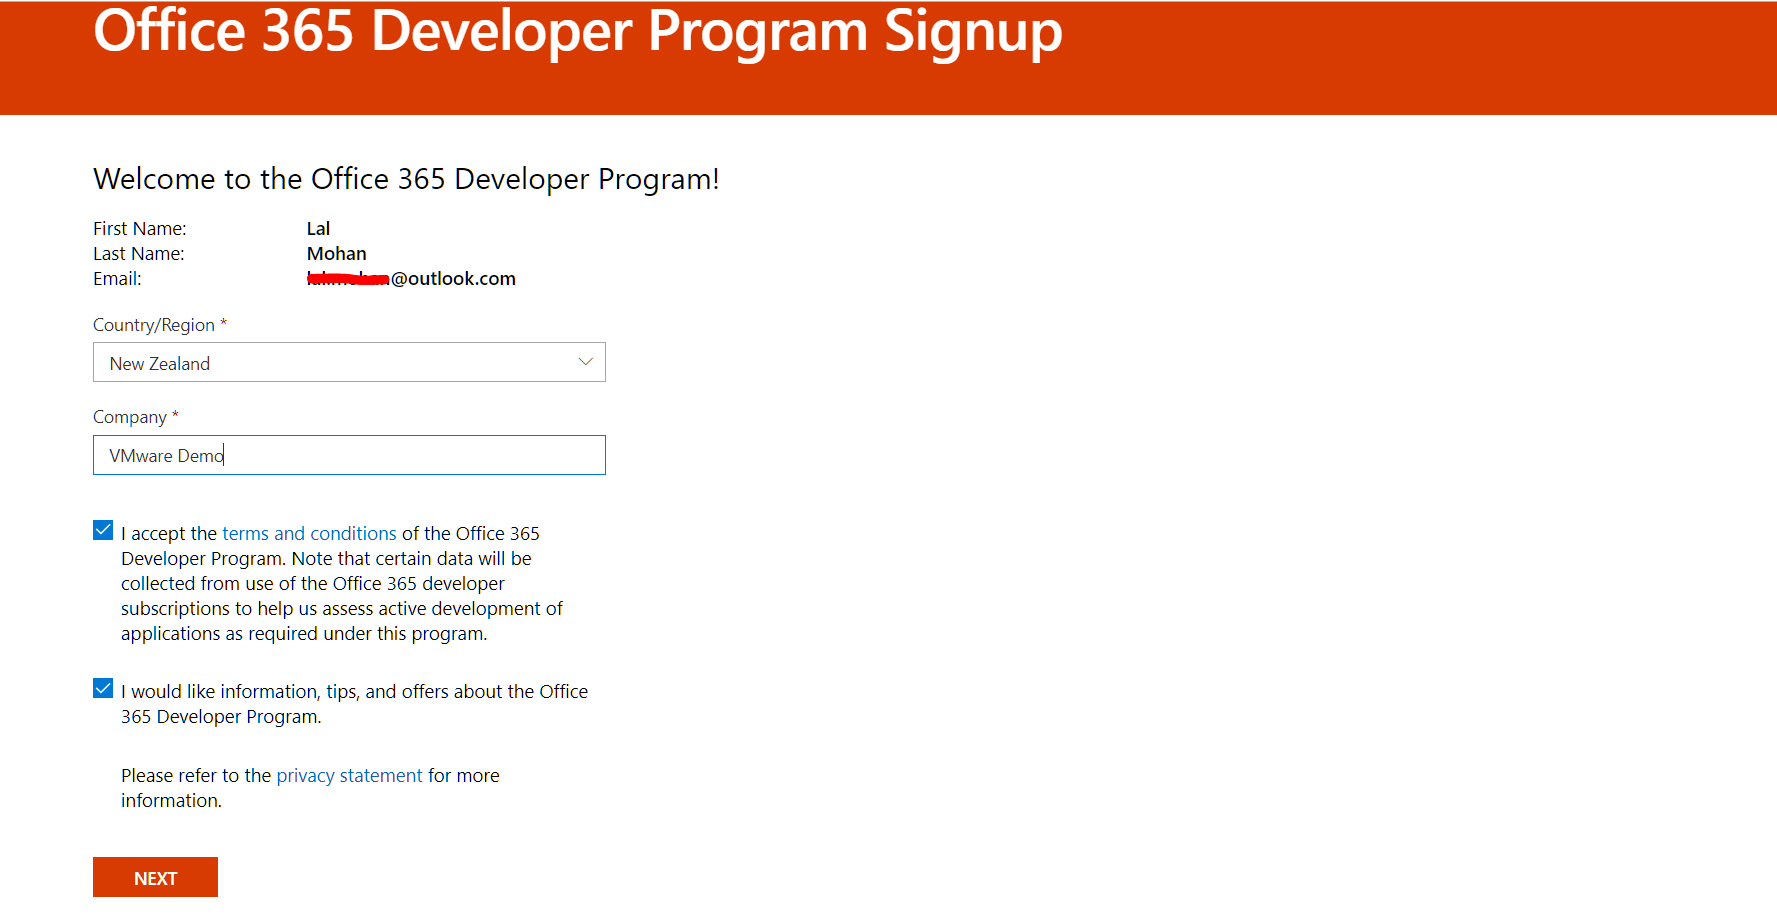
Set the Country Code and Company info. Accept the EULA and email opt-in programs
Click Next
On the Office 365 Developer Program Preferences page, select enough check box and options to make sure the JOIN button becomes available and the select JOIN. That gives us the below confirmation screen.
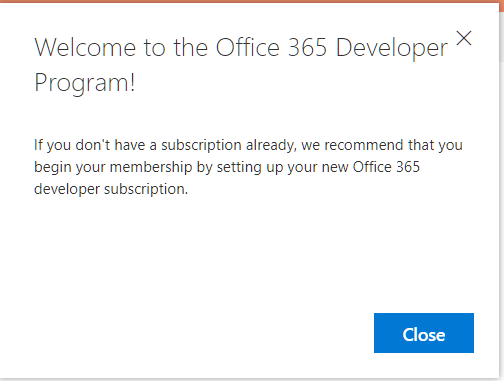
Click on Set Up Subscription

In the Setup your developer subscription window, create a unique admin account , for example, your username could be any generic name such as CloudAdmin or office365admin and your Domain could be your first name and surname. Again these are just examples that I used for the demo, please feel free to choose what you like for your deployments.
NB! Ensure you document these credentials
When you are done, select Continue
On the Add phone number for security window type in your Country Code and your phone number
Select SEND code , follow through on the security picture block selecting your relevant pictures, and select Next Enter the Code from your phone and select Set up
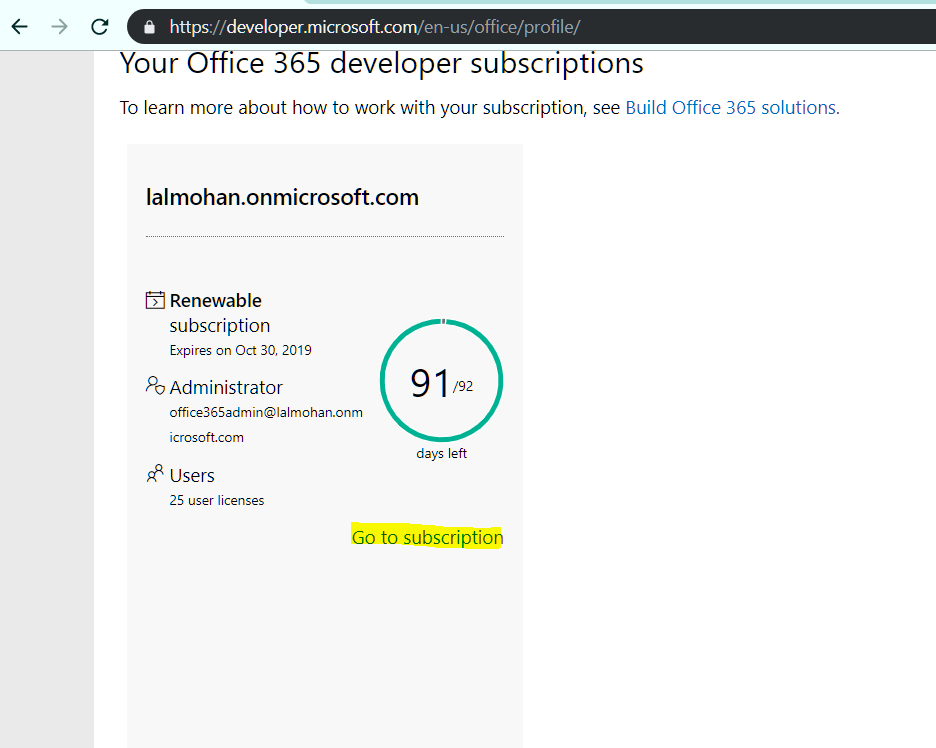
Once your registration is complete you can login in using your new ADMIN account. On the your Office 365 Subscription page select and right click the Go to subscription hyper link and select Open Link in New Tab
On the Sign In window , Enter your password and select Sign in
On the Office 365 Page almost in the middle select Admin

On the sign in page pick your new Office365Admin (This is the name of my account) account
If you get prompted with a Welcome to Office 365 Admin Center Page select Skip

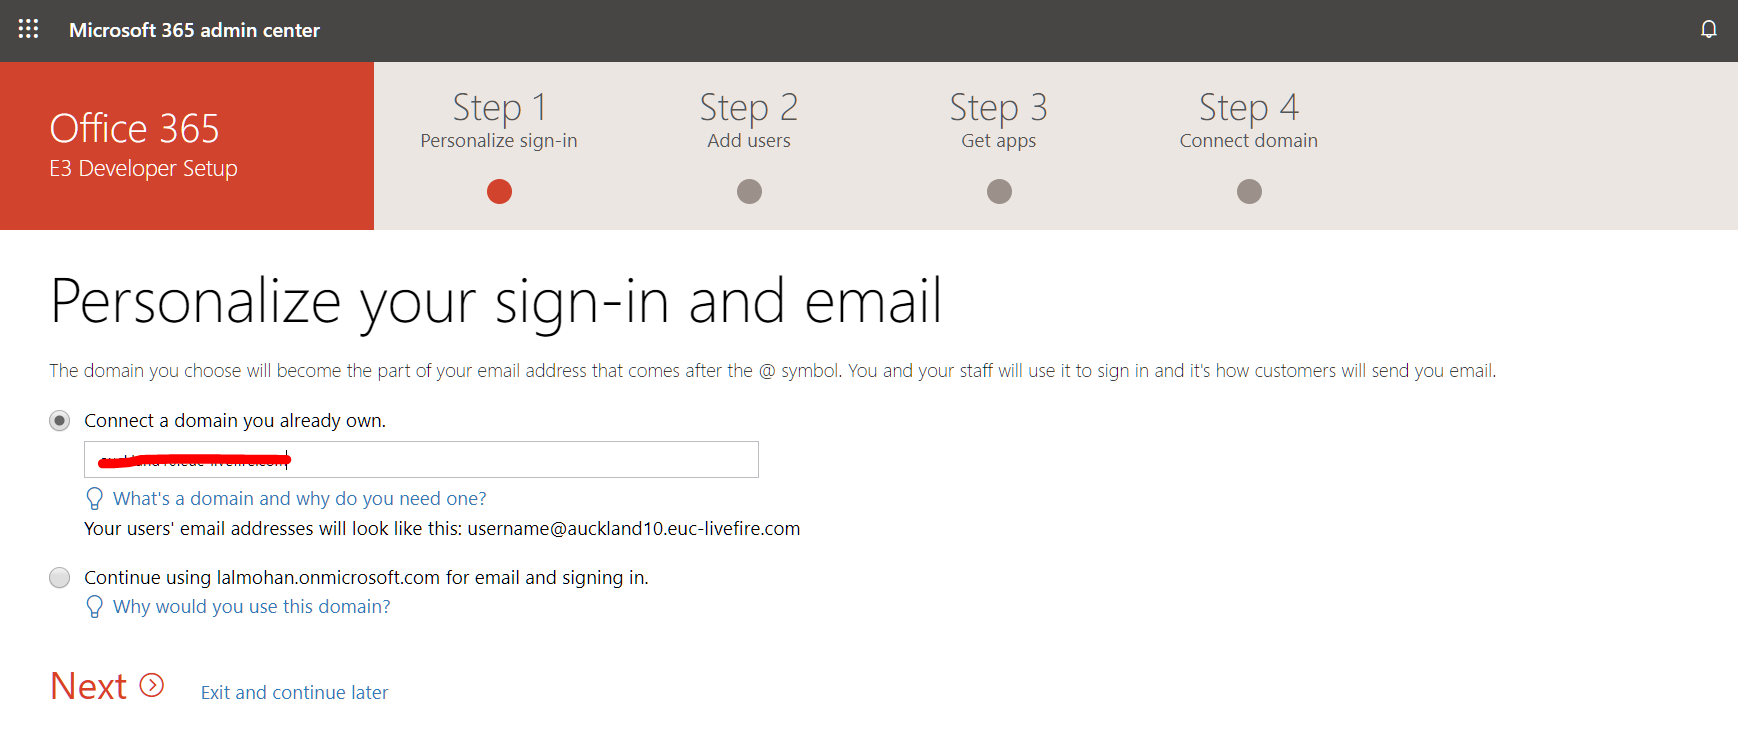
Notice the Office 365 E3 Developer Setup is incomplete msg. Select Go to Setup box

NB! Before moving onto the next section, ensure that you are 100% clear what YOUR registered Domain will be.
This is most likely your company’s domain name or if you are doing this for yourself, it is the domain name that you own personally or on behalf of your company.
Note when registering your own domain name with Office 365, there are several approaches. The most seamless and trouble free approach is to register your own Domain Name with GoDaddy. This provides a seamless experience and the verification takes seconds once you have your own domain name from GoDaddy.
There are 2 modifications that you usually make and they are as follows
1. MS record modification
2. MX record modification
Click Next once you enter your domain name in the field below
On the Verify domain page notice there are step-by-step instructions to follow,
Notice that there are DNS records called TXT name, TXT value and TTL
Each namespace will have Registered Zone database. Your Office 365 instance will need to be verified with this namespace
Click on the copy icon next to your MS record
Select Verify at the bottom of the screen
Next step is to update the zone records for the domain name that you hold. I am not going to list the steps in here as it is different for everyone depending on how the domain names are managed.
Go back to your Office 365 domain configuration and click on Verify. it might give you an error because of the time it takes to replicate DNS configuration and it might require you to click on verify button a couple more times.

On Add new users window select Got it, thanks, select Next

On the Assign licenses to unlicensed users page select Next

On Install your Office apps page select Next

On the Migrate email messages page, leave the default Don’t migrate email messages radio button and select Next

On the Choose your online services page, ensure that Exchange, Skype for Business and Mobile Device Management for Office 365 check boxes are selected and select Next

On the Add DNS Records page.
When ready, select Verify at the bottom of the Add DNS Records window.
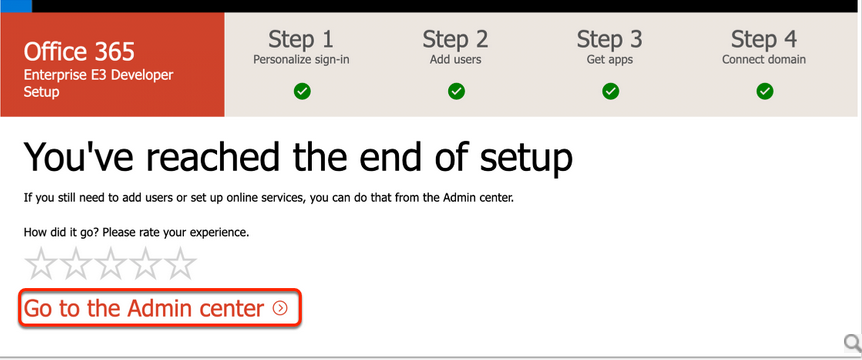
Notice that when Verify is successful the you just configured your Office 365 Tenant successfully will show and you are asked to provide feedback related to your experience.
However, If Verify is Not successful, ensure that the MS and MX records are updated in DNS correctly.
If successful, You should get a message saying “You’ve reached the end of the setup”, click on Go to Admin Center
In Admin Center:
- Select the 3 parallel dots at the lower corner of the left pane, this will expand the console
- Select the Spanner icon for Setup and select Domains

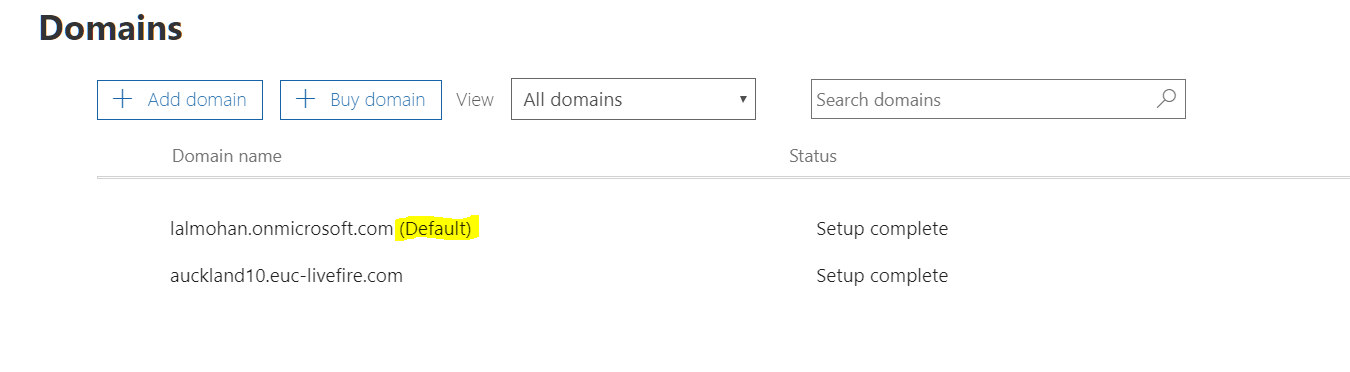
In the Home > Domains interface, check to see if your namespace you have associated with your Office 365 setup has a (Default) next to it. If this is the case do the following.
- Select your account name that is not set to default :
- Select Set as default
Note!
Your custom domain cannot be the default domain when federating with VMware identity Manager.
Select Close. Check to see that you have a corresponding configuration in the domain portion of your setup as the screenshot
At the end of the exercise, it should look like the below
Part 2 : Federating Office 365 with VMware Identity Manager
From VMware Identity Manager version 2.8. Support has been added for User Provisioning in Office 365. In Part 2, we will now federate our Office 365 Tenant with a VMware Identity Manager SaaS tenant.
Using your Tenant Admin credentials, login into your SaaS VMware Identity Manager Tenant.
- To the right of the Workspace ONE console under Tenant Admin select Administration Console

Select the Identity & Access Management tab
- To the right in the Identity & Access Management tab select Setup > User Attributes

In the User Attributes interface, notice you have already set userPrincipalName and distinguishedName to Required and you have already created the objectGUID attribute.
These are pre-req requirements for Federating Office 365 with VMware identity Manager.

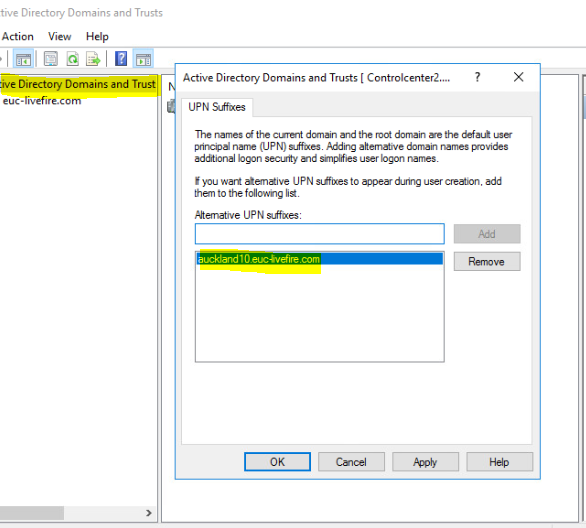
Now, go to your Domain Controller and open Active Directory Domains and Trusts
In Active Directory Domain and Trusts MMC snapin select and right-click Active Directory Domains and Trusts
Select Properties Under the UPN Suffixes Tab under Alternative UPN suffixes type your custom domain name
Eg auckland10.euc-livefire.com
Select Add , select OK to close the window
Now open Active Directory Users and Computers
Navigate to the OU where the users reside. For eg, Corp — Marketing OU
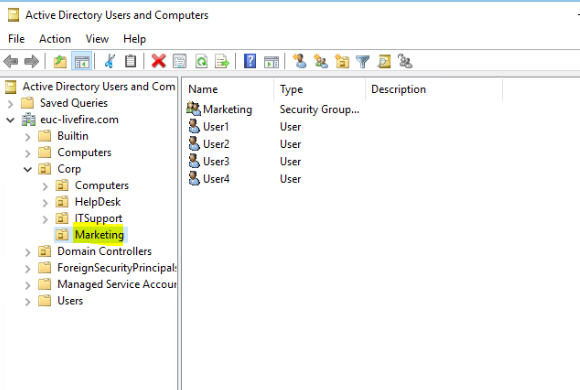
Find the user and right click the accounts and go to Properties.
Under the Accounts tab, change the domain name to Auckland10.euc-livefire.com in our example. Repeat the same for the rest of the users.

Switch back to your VMware Identity Manager SAAS tenant
- Under the Identity & Access Management tab select Manage
- Select Directories
- Select Sync Now for the Livefire Domain
- In the Review window, notice that a warning message that Directory Sync Safeguards will apply, select the Ignore Safeguards checkbox above the message
- Select Sync Directory

Download and Install the Microsoft Online Services Sign-in Assistant. The link to download the software is here
Install Azure AD Module by running the command below
Install-Module -Name AzureAD
You might need to restart the VM once these two binaries are installed.
Now, its time to delve into the PoSH world. Let’s try some commands 😉
Open the PowerShell shortcut on the desktop named “Windows Azure Active Directory” under administrator account. Type the below command
Connect-Msolservice
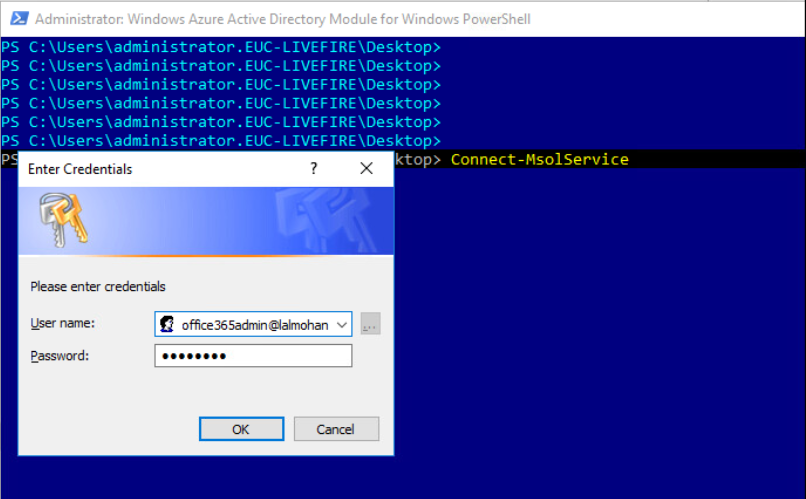
It prompts an authentication dialog as above. Use the credentials that you created during the Office 365 setup.
Next we have to create a Service Principal account type in the PowerShell
$sp = New-MSOLServicePrincipal -DisplayName 'ServPrinc1' -Type password -Value 'yourpassword'
Next we are going to assign a role to the ServPrinc1 user
Add-MsolRoleMember -RoleName 'User Account Administrator' -RoleMemberType ServicePrincipal -RoleMemberObjectId $sp.ObjectId
Next we will type echo $sp to get the GUID for the ServicePrincipalNames
Copy the ServicePrincipalNames value with out the { }

Revert back to your VMware Identity Manager SaaS Tenant Admin Console
- Select the Catalog Tab in the Admin Console, select NEW
- In the New SaaS Application window under Definition select or browse from catalog
- In the DEFINITION window to the right in the search area type off
- Select Office365 with Provisioning by selecting the + sign to the right

On the New SaaS Application window select Next

In the New SaaS Application window, in the Configuration section add the following:
Under Target URL, add the following
https://login.microsoftonline.com/common/oauth2/authorize?client_id=00000002-0000-0ff1-ce00-000000000000&response_mode=form_post&response_type=code+id_token&scope=openid+profile&redirect_uri=https%3a%2f%2foutlook.office365.com&domain_hint=auckland10.euc-livefire.com
- In the New SaaS Application window, in the Configuration section leave the following as defaults:
-Single Sign-On URL / Application ID / Username Format / Username Value
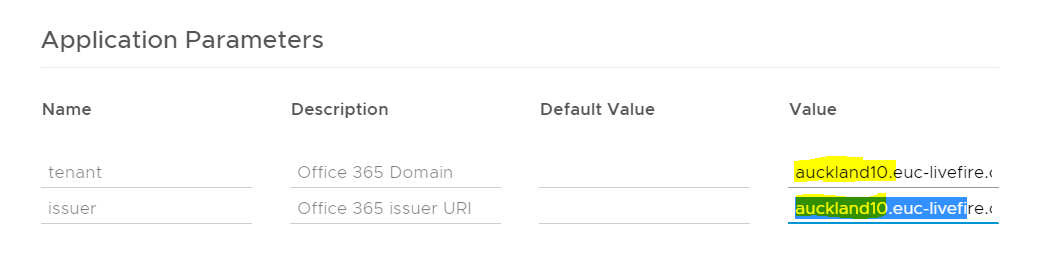
Add the following: under Application Parameters in the tenant line under Value add YOUR custom Fully Qualified Domain Name ie auckland10.euc-livefire.com
Under Application Parameters in the issuer line under Value add your custom domain name i,e. auckland10.euc-livefire
Make sure there are no hidden carriage returns if you paste this in (Note the issuer has a dash this value must match the IssuerURI in the powershell command)
In the New SaaS Application window, in the Configuration section under Advanced Properties leave the following as defaults:
–Enable Multiple O365 Email Domains / Credential Verification / Signature Algorithm / Digest Algorithm / Assertion Time
-Under Custom Attribute Mapping in the UPN and ImmutableID keep the values default there too.
In the New SaaS Application window, in the Access Policies section select NEXT

In the New SaaS Application window, in the Summary section select SAVE

Notice you now have Office365 with Provisioning in the Catalog
- Select the check box next Office365 with Provisioning and select EDIT
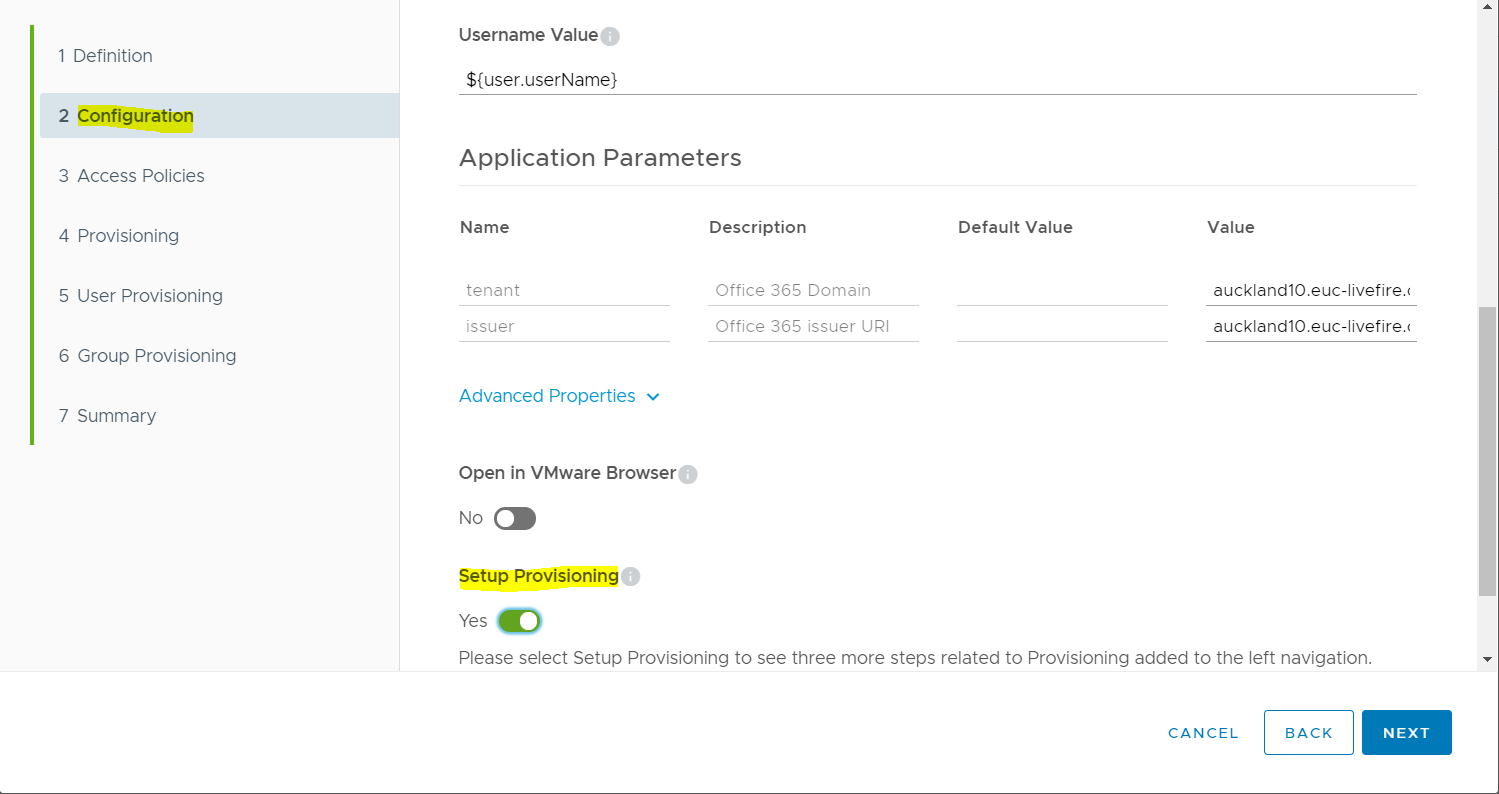
- In the Edit SaaS Application window in the left pane, select Configuration, in the right pane, scroll down until you see Setup Provisioning. Notice you only 4 sections in the left pane.
- Change Setup Provisioning from No to Yes. Notice you now have 7 sections in the left pane. We will now go and configure Provisioning. It’s been a super fun ride, isnt it? 😉 Be patient please, we are almost there!!!
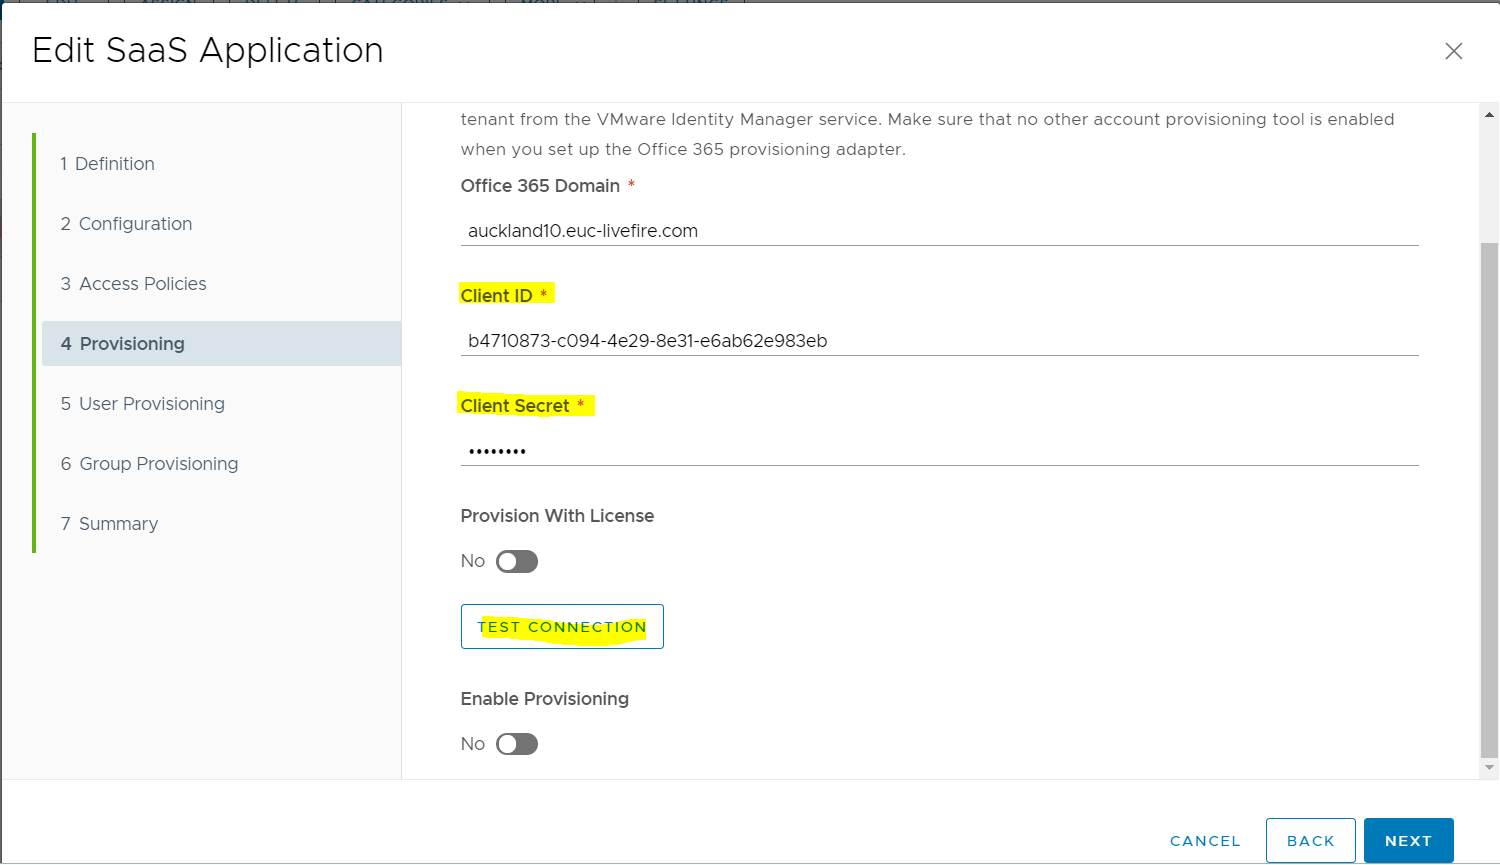
In the Edit SaaS Application window in the left pane select Provisioning
- In the Provisioning Adapter Configuration under Office 365 Domain type your custom domain, eg. auckland10.euc-livefire.com
- Under Client ID, add the ServicePrincipleNames value you recorded earlier
- Under Client Secret area type the password your associated with the ServicePrinciple Name
- In the Edit SaaS Application window in the bottom right corner select Next
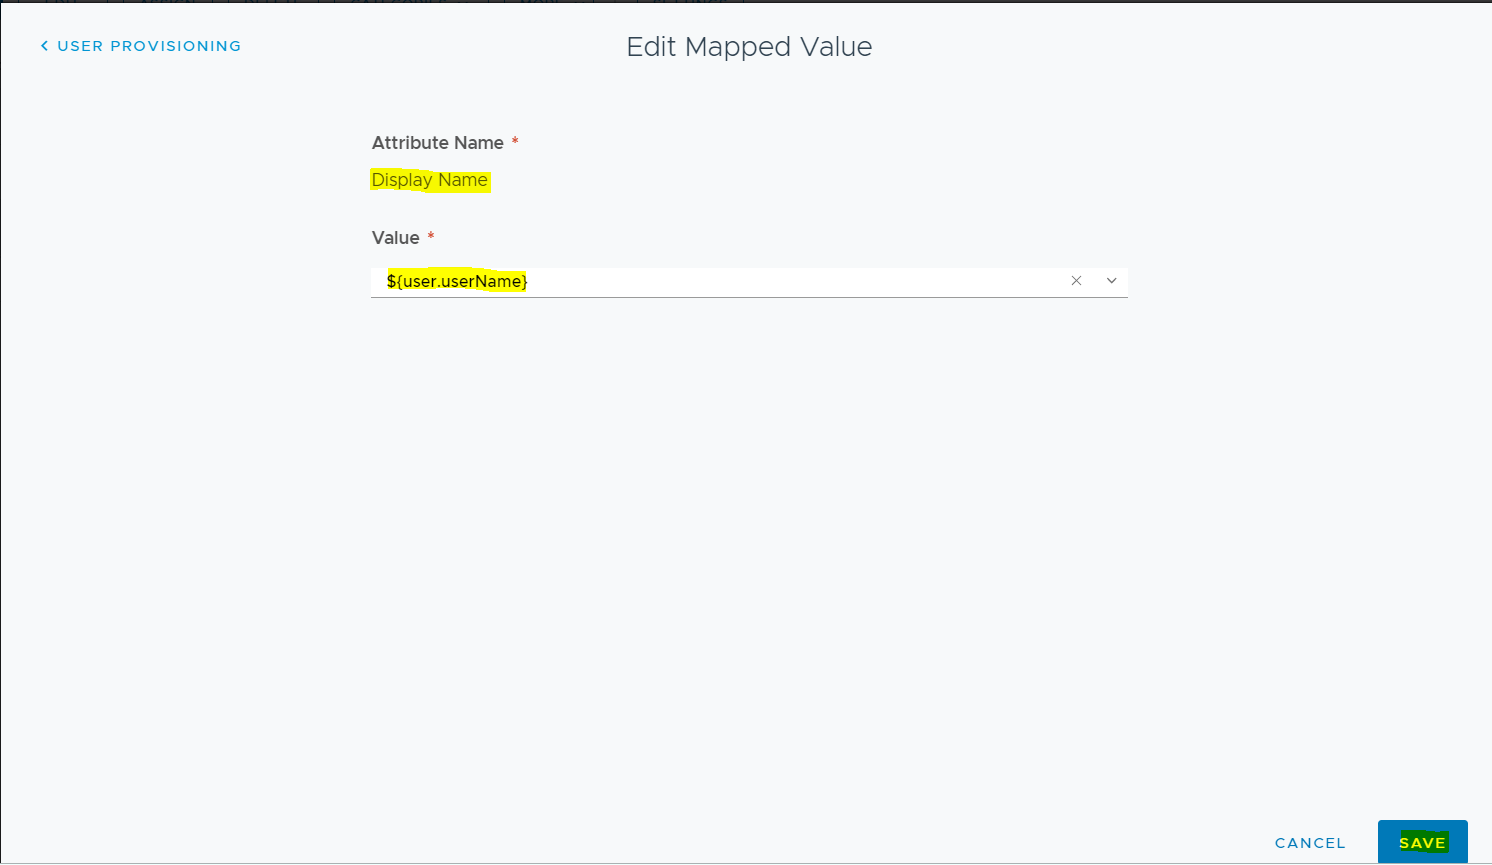
Under the User Provisioning tab, do the below
- In the Attribute Name section, select Display Name, In the Edit Mapped Value window, in the Value container select the drop down arrow add the following, $(user.userName) and select SAVE
- In the Attribute Name section, select User Principle Name, In the Edit Mapped Value window, in the Value container select the drop down arrow add the following, $(user.userPrincipalName) and select SAVE
- In the Attribute Name section, select Guid, In the Edit Mapped Value window, in the Value container select the drop down arrow add the following, $(user.objectGUID) and select SAVE
- In the Attribute Name section, select Mail Nickname, In the Edit Mapped Value window, in the Value container select the drop down arrow add the following, $(user.userName) and select SAVE
- Select Next
At the end of the configuration, the User provisioning page will look like the below

In the Group Provisioning section,
- Under Group Provisioning select + ADD GROUP
- In the Add Group to Provision window under Group Name type Mark and then select [email protected], Under Nickname type Livefire Marketing. (or anything that is relevant to your org) Select Save
- select NEXT
- click SAVE

We will now Enable Provisioning and Save
- In the Catalog for Web Apps select the Office 365 with Provisioning and select Edit
- In the Edit SaaS Application window in the left pane select Configuration
- Scroll down until you see Setup Provisioning and change No to Yes,
- on your left pane, click on “4 Provisioning”, Scroll down, next to Enable Provisioning, change the toggle from No to Yes
- Select TEST CONNECTION
- Select NEXT, select NEXT, select NEXT, select SAVE

We will now do the Entitlement configuration of the Users
- In the Catalog for Web Apps select the Office 365 with Provisioning and select Assign
- In the Assign wizard type Mark in the search area under Users / User Groups, select [email protected]
- Under Deployment Type, select the drop down arrow change the Deployment Type to Automatic
- In the Assign wizard, review your configuration, in the bottom right hand corner select SAVE

Part 3: Setting up the SAML between VMware Identity Manager and Office 365
Login to your to the VMware Identity Manager Admin Console, as Admin, under the Catalog > Web Apps tab, to the right, select SETTINGS
- In the Settings window under SaaS Apps, select SAML Metadata, in the right hand pane under the SAML Metadata heading select DOWNLOAD under Signing Certificate
- Using Notepad++ Open the signingCertificate.cer from your default download location .

In the signingCertificate.cer, we will now need to remove all carriage returns the document
Do this with Notepad++ as i have found that it works best. Any hidden carriage returns will cause this config to FAIL
- Remove the —–BEGIN CERTIFICATE—– and —–END CERTIFICATE—– lines from the certificate.
- Then select the certificate portion of the file and click ctrl + F in the Replace tab at the top type \n in the Find what field.Leave the Replace with field empty. Make sure the Search Mode at the bottom is Extended. Then click on Replace All.
- Your certificate should now no longer have carriage returns. Notepad++ will tell you how many instances were replaced and your certificate will look different.


Go back to the PowerShell window and connect to Microsoft Online using the command below
Connect-Msolservice
Now run the command below to setup federation. Dont miss the certificate info at the end of the syntax. i haven’t added it to avoid the messy look.
Set-MsolDomainAuthentication -DomainName auckland10.euc-livefire.com -Authentication Federated -IssuerUri “auckland10.euc-livefire.com” -FederationBrandName “auckland10Corp” -PassiveLogOnUri “https://lalm0204.vidmpreview.com/SAAS/API/1.0/POST/sso” -ActiveLogOnUri “https://lalm0204.vidmpreview.com/SAAS/auth/wsfed/active/logon” -LogOffUri “https://login.microsoftonline.com/logout.srf” -MetadataExchangeUri “https://lalm0204.vidmpreview.com/SAAS/auth/wsfed/services/mex” -SigningCertificate
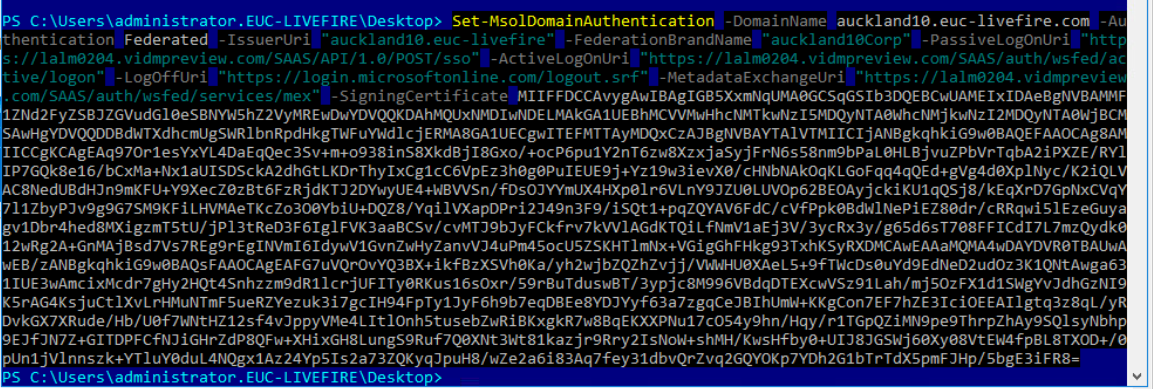
In the command above ensure that you add the certificate information at the end. This is very important to do.
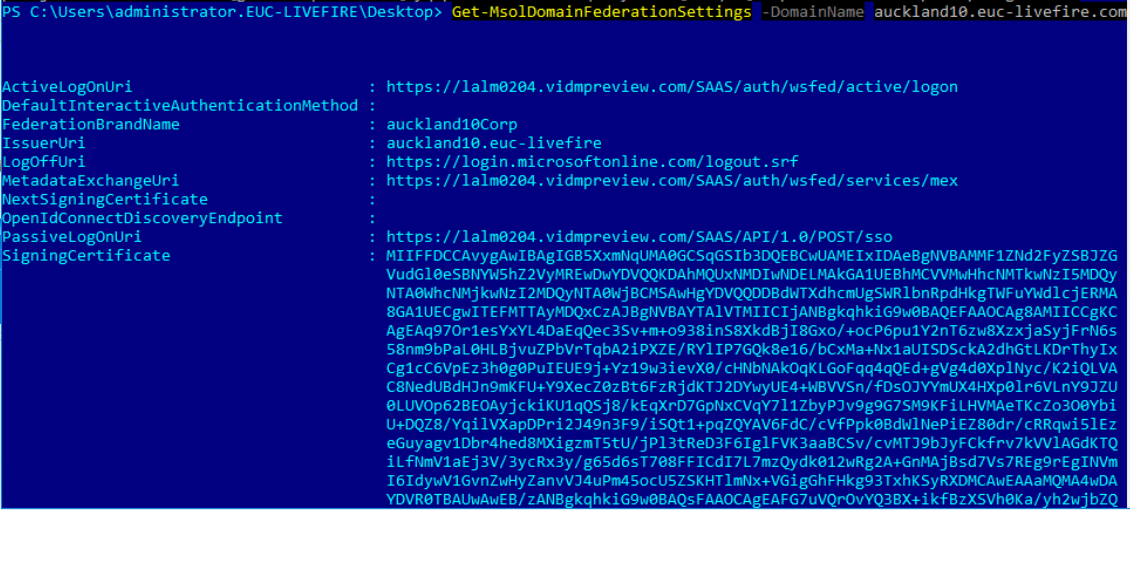
We will now check the federation with the following command in powershell
Get-MsolDomainFederationSettings -domainName auckland10.euc-livefire.com
Part 4 : Testing the Federation Setup
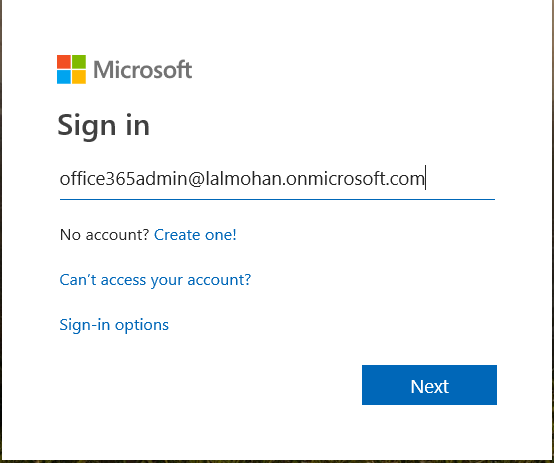
Login back to your office 365 Tenant with your office Admin account with this url https://admin.microsoft.com/Adminportal/Home?source=applauncher#/homepage
and use your office365admin account . This is the same account that we created as a part of Office 365 setup.
Entering the password will take you to the Admin Center for O365.
- In the left-hand pane under Home, select Users > Active users. Notice that Marketing group Users 1 – 4 has been automatically provisioned with the unique suffix appended for the user principle name. Also notice that your users are Unlicensed.
- Click on User1
- In the User 1 properties selectthe Product Licenses tab
- In the location area select a Location ie New Zealand. Next to Office 365 Enterprise E3 Developer, there is a check box that is unchecked, check the checkbox and select Save.
- In the User1 properties select Close.
- NB! – Follow steps 1-5 for all the users including the Cloudadmin account to ensure that licensing is applied to all account.

On the User1 properties, in the license and apps tab, scroll down and you will notice that Mobile Device Managerment for Office 365 is Off. We will go and enable this in Azure so that we can do compliance with Workspace OneUEM. Select Cancel to close the Product Licenses window

In your existing browser, open up a new tab and type https://portal.azure.com Your Office365admin credentials should log you in automatically but if not, login with your office365admin account.
- On the Welcome to Microsoft Azure window select Maybe later
- In the Left-hand pane select Azure Active Directory, then in the middle pane select Mobility (MDM and MAM
- In the right hand pane towards the top select Get a free Premium trial to use this feature –>
- Under Activate you will see ENTERPRISE MOBILITY + SECURITY E5 highlighted in Purple, below this, select Free Trial
- The ENTERPRISE MOBILITY + SECURITY E5 window will launch, to the bottom select Activate
- Notice to the right that your free trial has been successfully activated pops up momentarily.

Go back to the tab with your Office 365 Admin console.
- Click on User1 and click on the License and apps tab.
- Notice that Enterprise Mobility + Security E5 is turned Off.
- Next to Enterprise Mobility + Security E5, click on the checkbox, Notice you now have a whole range of Advance Azure security Features
- Select Save
- NB! Repeat the Licensing process you did for User 1 forUser 2 and on your Office365admin account.
- In the Admin Console select both User 2 and Office365admin check boxes
- in the menu bar at the top select manage product licenses,
- select the radio button next to add to existing product license assignments and click next
- turn on the switch for enterprise mobility + security and click add
- on the summary window click Close

Now logon to the VIDM portal as a user to test it.
Part 5 : Inserting Office 365 Deep Links into VMware Identity Manager
In this section we will insert Deep Links within VMware Identity Manager portal
Log in to your to your VMware Identity Manager Console as Admin and select the Catalog tab > Web Apps
- Select NEW
- In the New SaaS Application window under Name type Microsoft Word
- You will need to have a .PNG file for the application icons stored somewhere accessible. I have stored mine locally. Under Icon, click on browse, search for the software link on your desktop, and navigate to \Applications\Azurefiles\icons. select your Word.png Icon and select Open. At the bottom right select NEXT
- On 2. Configuration in the Single Sign-On section under Authentication type to the right select the drop down and then select Web Application Link

Copy the URL below and edit in Notepad++ the following text named “EXAMPLEDOMAIN.euc-livefire.com” with your assigned domain suffix and then copy the edited URL and Paste under the Target URL
https://login.microsoftonline.com/login.srf?wa=wsignin1.0&whr=EXAMPLEDOMAIN.euc-livefire.com&wreply=https://office.live.com/start/Word.aspx?auth=2
Select NEXT > SAVE & ASSIGN
- Under Users / User Groups in the Search area type Mark, select [email protected]
- Under Deployment Type select Automatic and select SAVE

Repeat the above steps for the rest of the Office applications as follows
Excel
https://login.microsoftonline.com/login.srf?wa=wsignin1.0&whr=auckland10.euc-livefire.com&wreply=https://www.office.com/launch/excel?auth=2&home=1
PowerPoint
https://login.microsoftonline.com/login.srf?wa=wsignin1.0&whr=auckland10.euc-livefire.com&wreply=https://www.office.com/launch/powerpoint?auth=2
Outlook
https://login.microsoftonline.com/common/oauth2/authorize?client_id=00000002-0000-0ff1-ce00-000000000000&response_mode=form_post&response_type=code+id_token&scope=openid+profile&redirect_uri=https%3a%2f%2foutlook.office365.com&domain_hint=auckland10.euc-livefire.comom
Now log back into the ViDM user tenant portal to test the applications
With this, we have come to the end of this blog post. It was quite a journey for me to learn all these for the first time, I am sure they will be of second nature once we do this a few times at work. Cheers!!

Leave a Reply