Icons, seemingly small graphical representations of applications, hold significant value in a Citrix farm for several reasons. They serve as visual cues for end-users, aiding in the quick identification of applications, and contribute to the overall user experience. Extracting icon information is essential for various purposes, ranging from branding and customization to troubleshooting and migrating applications between farms.
In this post, we will discuss two scenarios:
- Migrating apps from an old farm to a new one without the original icon files.
- Assigning a customized icon to published desktops.
Published Apps
If you are migrating apps from an old farm to a new one and you do not have the original icon files, you can use the following steps to extract the icon information from the applications:
Take a note of the published application name in the source farm. Now run the below commands in the source farm.
asnp Citrix*
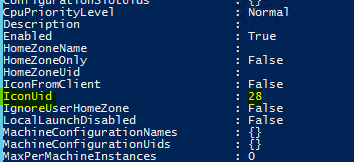
Get-BrokerApplication -PublishedName "My Published App"
PublishedName is the name of the application in Studio.
Now, take a note of the IconUid. In my case, it is 28
Now run the below to get the Encoded data for the icon stored in the Citrix database. All the icons in the Citrix farm are stored as a Base64 String and all we need is that EncodedIconData and we can magically recreate the icon file even if we don’t have access to the original .ico file anymore.
Get-BrokerIcon -Uid 28

Sometimes, you may need to increase the Powershell buffer so that the results don’t truncate. You can use the below switches to capture the entire result on the PowerShell window or pipe it into a csv file. You can try a few examples below to see what works best for your needs.
Get-BrokerIcon -Uid 28 | FT EncodedIconData -Autosize
Get-BrokerIcon -Uid 28 | FT EncodedIconData -Wrap -Autosize | Out-File -FilePath C:\Temp\icons.txt
Get-BrokerIcon -Uid 28 | select EncodedIconData | Export-CSV <path to the csv file>
Take a note of the value for EncodedIconData and head over to the new farm
Once there, you can run the below to load the Citrix commandlets
asnp citrix*

New-BrokerIcon -EncodedIconData "EncodedIconData value"

Run the below to take a note of the Uid for the newly added icon
Get-BrokerIcon | FT Uid, EncodedIconData
In our case, it is the last one in the list

6 is the Uid
Find your application in the new farm where you would need the icon applied
Get-BrokerApplication -Name "My New app"
Take a note of the IconUid value. In my case, it’s 4
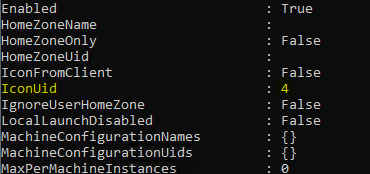
You will need to replace 4 with 6
To do that, run the following
Get-BrokerApplication -Name "My New App" | Set-BrokerApplication -IconUid 6

Refresh the Studio and you will see that the icon is updated.
Published Desktops
To assign a customized icon to published desktops in a delivery group, you can use the following steps.
asnp citrix*
Get-BrokerDesktopGroup -name "Name of DG"
The above Get-BrokerDesktopGroup command allow us to view the icon UID in case we need to rollback.
Now import a new icon and assign it to the delivery group
$icon=Get-BrokerIcon -FileName "C:\temp\favicon.ico" | New-BrokerIcon | Select-Object Uid
Get-BrokerDesktopGroup -name "Name of DG" | Set-BrokerDesktopGroup -IconUid $icon.Uid
Since we are adding a new icon to the Site config, this will allocate UID as the next available number on the Site config based on the icons list and is expected to be different across different Sites based on the config and publishing of DG
Verify the new UID by running the below
Get-BrokerDesktopGroup -name "Name of DG"
In case of a rollback, you can run the below
Set-BrokerDesktopGroup -name "Name of DG" -IconUid "number"
Now if you wish to change the icon for ALL the published desktops in a farm, the changes could be made to the Storefront servers rather than on the Controllers. This will take effect for ALL the delivery groups created in the Citrix farm.
- Login to your Storefront and navigate to
C:\inetpub\wwwroot\Citrix\store1\App_Data- Rename the Desktop.ico file to Desktop.ico_old or something else
- Copy the custom icon that you would like to use into the folder and change the name to Desktop.ico
- Restart IIS
- You will need to repeat these steps on the other storefronts in the environment.
- That will change the icon for all the desktops served from the farm
That’s about it. And I will conclude this post with a handy online tool that you could use to create the icon files as per your requirement. The tool could be found here https://www.icoconverter.com/


Leave a Reply