
The Network Policy Server (NPS) extension for Azure MFA adds cloud-based MFA capabilities to your authentication infrastructure using your existing servers. With the NPS extension, you can add phone call, text message, or phone app verification to your existing authentication flow without having to install, configure, and maintain new servers.
This extension was created for organizations that want to protect VPN connections without deploying the Azure MFA Server. The NPS extension acts as an adapter between RADIUS and cloud-based Azure MFA to provide a second factor of authentication for federated or synced users.
When using the NPS extension for Azure MFA, the authentication flow includes the following components:
- NetScaler receives requests from VPN clients or Citrix ICA Proxy users and converts them into RADIUS requests to NPS servers.
- NPS Server connects to Active Directory to perform the primary authentication for the RADIUS requests and, upon success, passes the request to any installed extensions.
- NPS Extension triggers a request to Azure MFA for the secondary authentication. Once the extension receives the response, and if the MFA challenge succeeds, it completes the authentication request by providing the NPS server with security tokens that include an MFA claim, issued by Azure STS.
- Azure MFA communicates with Azure Active Directory to retrieve the user’s details and performs the secondary authentication using a verification method configured to the user.
Pre-Requisites
There are some requirements that are needed to be met for deploying this solution.
Licenses
The NPS Extension for Azure MFA is available to customers with licenses for Azure Multi-Factor Authentication (included with Azure AD Premium, EMS, or an MFA stand-alone license). Consumption-based licenses for Azure MFA such as per user or per authentication licenses are not compatible with the NPS extension.
Libraries
These libraries are installed automatically with the extension.
- Visual C++ Redistributable Packages for Visual Studio 2013 (X64)
- Microsoft Azure Active Directory Module for Windows PowerShell version 1.1.166.0
The Microsoft Azure Active Directory Module for Windows PowerShell is installed, if it is not already present, through a configuration script you run as part of the setup process. There is no need to install this module ahead of time if it is not already installed.
Azure Active Directory
Everyone using the NPS extension must be synced to Azure Active Directory using Azure AD Connect, and must be registered for MFA.
When you install the extension, you need the directory ID and admin credentials for your Azure AD tenant. You can find your directory ID in the Azure portal. Sign in as an administrator. Search for and select the Azure Active Directory, then select Properties. Copy the GUID in the Directory ID box and save it. You use this GUID as the tenant ID when you install the NPS extension.
Network requirements
The NPS server needs to be able to communicate with the following URLs over ports 80 and 443.
- https://adnotifications.windowsazure.com
- https://login.microsoftonline.com
- https://credentials.azure.com
Additionally, connectivity to the following URLs is required to complete the setup of the adapter using the provided PowerShell script
- https://login.microsoftonline.com
- https://provisioningapi.microsoftonline.com
- https://aadcdn.msauth.net
Sync domain users to the cloud
This step may already be complete on your tenant, but it’s good to double-check that Azure AD Connect has synchronized your databases recently.
- Sign in to the Azure portal as an administrator.
- Select Azure Active Directory > Azure AD Connect
- Verify that your sync status is Enabled and that your last sync was less than an hour ago.
Determine which authentication methods your users can use
There are two factors that affect which authentication methods are available with an NPS extension deployment:
- The password encryption algorithm used between the RADIUS client (VPN, Netscaler server, or other) and the NPS servers.
- PAP supports all the authentication methods of Azure MFA in the cloud: phone call, one-way text message, mobile app notification, OATH hardware tokens, and mobile app verification code.
- CHAPV2 and EAP support phone call and mobile app notification.
- The input methods that the client application such as VPN, Netscaler, or others can handle. For example, does the VPN client have some means to allow the user to type in a verification code from a text or mobile app?
Register users for MFA
Before you deploy and use the NPS extension, users that are required to perform two-step verification need to be registered for MFA. More immediately, to test the extension as you deploy it, you need at least one test account that is fully registered for Multi-Factor Authentication.
Use these steps to get a test account started:
- Sign in to https://aka.ms/mfasetup with a test account.
- Follow the prompts to set up a verification method.
- Create a Conditional Access policy to require multi-factor authentication for the test account.
Important!
Make sure that users have successfully registered for Azure Multi-Factor Authentication. If users have previously only registered for self-service password reset (SSPR), StrongAuthenticationMethods is enabled for their account. Azure Multi-Factor Authentication is enforced when StrongAuthenticationMethods is configured, even if the user only registered for SSPR.
Combined security registration can be enabled that configures SSPR and Azure Multi-Factor Authentication at the same time. For more information, see Enable combined security information registration in Azure Active Directory.
You can also force users to re-register authentication methods if they previously only enabled SSPR.
Installing Network Policy Server Role
Install the Network Policy Server role in your environment. You can choose to install this on any domain joined Server OS machine in the network.
Ideally, you would want to sit close to your Active Directory server just to make it quicker to send traffic for Authentication and Authorization. Or Just install this straight on your AD server, it’s totally up to you.
Installing the NPS role is dead easy. Just fire up your Server Manager and go to Manage – Add Roles and Features. Select Network Policy and Access Services
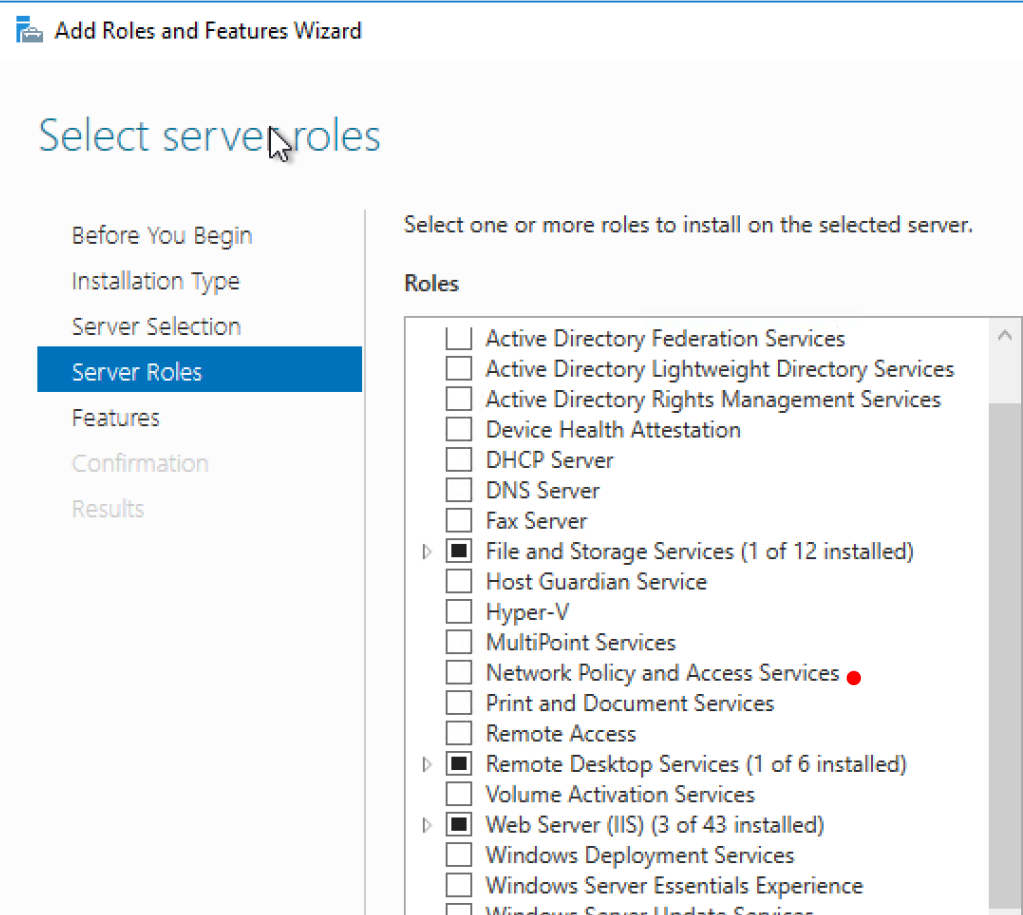
It will ask you to install Remote Server Administration Tools. Say Add Features.

Click Next (3 times) until you reach the Confirmation page. Click Install
- Once installed, you will need to register the server in Active Directory.
- Open the NPS console as below and right click the NPS node and click Register Server in Active Directory

Now it’s time to install the NPS extension for Azure.
Installing and Configuring NPS Extension for Azure MFA
Stop!
1) Before you proceed with this step, you will need to have the Azure Administrator account handy.
2) Ensure that NPS server could access the internet to the URLs specified in section Network Requirements
- Download the NPS Extension from the URL NPS Extension for Azure

- Once downloaded, run the NpsExtnForAzureMfaInstaller.exe as an Administrator. If you want to change the install location, Click Options and choose a different location.
- if not, just Click Install

- The setup is quick. Click Close, once finishes.

- Open PowerShell as Administrator. You have to have your Azure Portal admin credentials handy before this step.
- Navigate to the install location for NPS Extension C:\Program Files\Microsoft\AzureMfa\Config using PowerShell.
- Run the Powershell script in that directory AzureMfaNpsExtnConfigSetup.ps1 as below

- PowerShell will begin the installation of NuGet provider assemblies including MSOnline cmdlets

- It’s gonna tell you that you are installing this from an untrusted repository. Just say A for Yes to All and continue.
- Now, PowerShell will take you to portal.azure.com where you will need your Azure AD admin credentials to login.
- Login with your Azure credentials
- At this stage, it will ask for the Tenant ID. Copy the Directory ID and paste it in the PS window
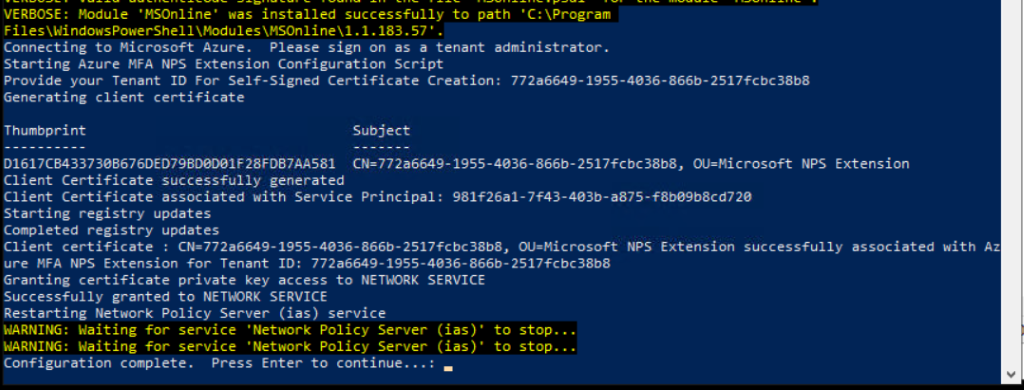
It does a few things as below
- It creates a Self-Signed certificate
- It grants private key access to NETWORK SERVICE
- Restarts the NPS Policy Service
You may now exit out of PowerShell as it is time to configure NPS.
Configure NPS
Configure RADIUS Clients
- Open the NPS console and navigate to RADIUS Clients and Server Folder
- Expand the folder and Right Click on RADIUS Clients
- Select New
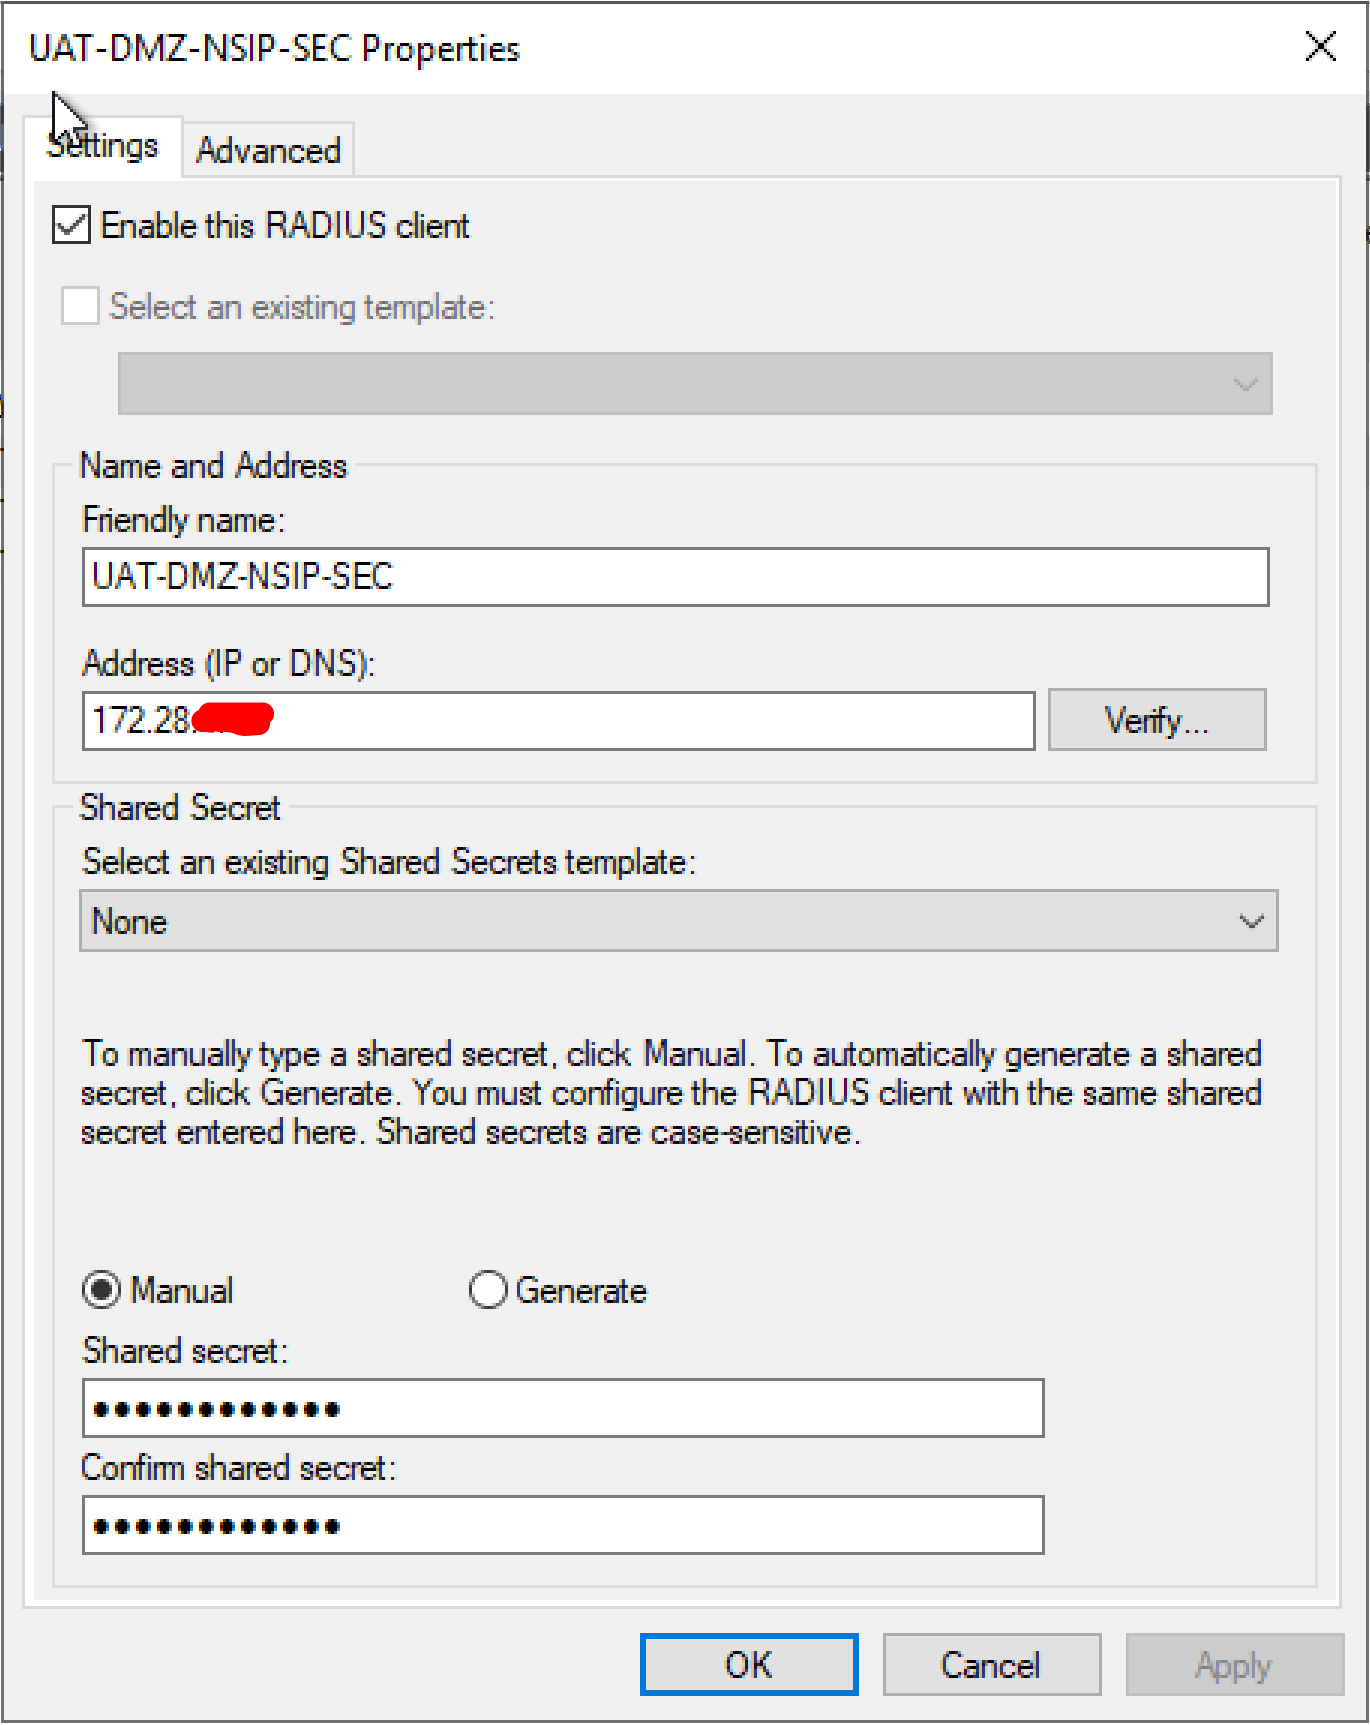
- Configure the settings as below
- Give it a Friendly Name
- Enter the IP address of the NetScaler (NSIP)
- Enter a Shared Secret Key (Save this key as we will need this later)
- Click Ok
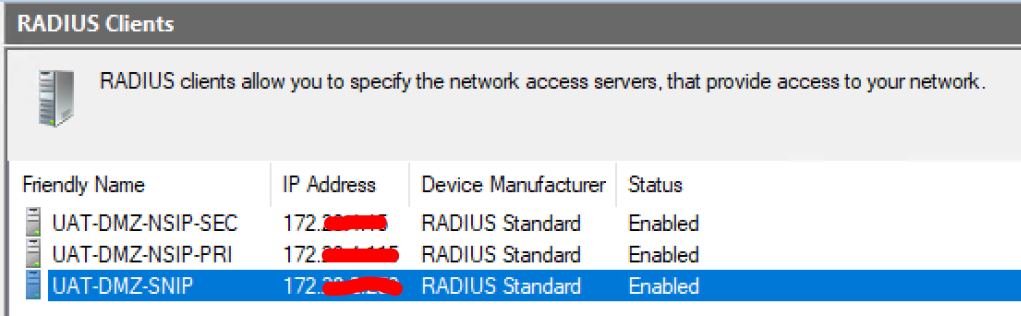
Add all the RADIUS clients following the steps above. If you set this up on a NetScaler HA configuration, you will have 2 NetScaler NSIPs to add. You should something similar as follows.
Configure Remote RADIUS Servers
- Select the node – Remote RADIUS Server Groups
- Right- click and select New
- Give a Group Name
- Click Add

- Type the IP address or name of the RADIUS Server in there and Click OK.

You can choose to add the FQDN of the RADIUS server or just use the IP address. You can multiple servers in here for redundancy.

- Click on the Authentication/Accounting tab. Configure it as below
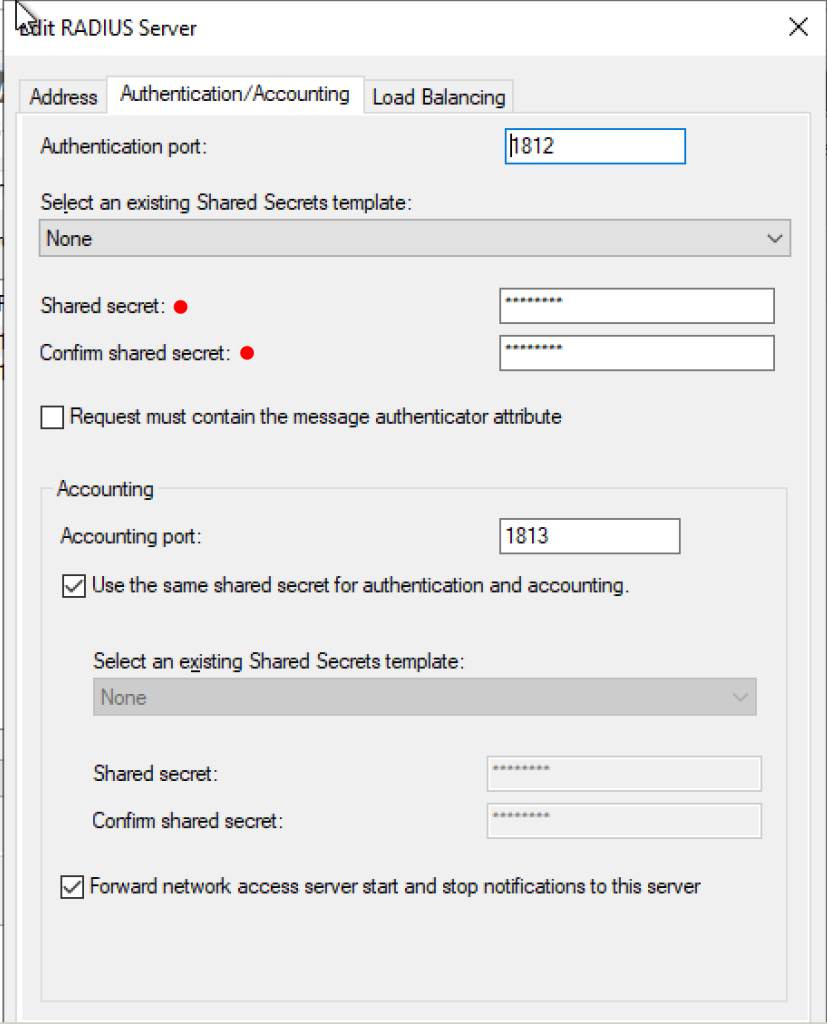
- Click on the Load Balancing tab now and supply the weightage to the servers if you are adding multiple servers.
- You can also configure the Timeout settings in here.

Notice that I have increased the timeout values to 60. This is important when using phone calls and SMS based authentication because they take more time. Even when using the Microsoft Authenticator app, default values are a little too less, so adjust it according to your environment.
Add all the servers that you intend to use as RADIUS servers in here.

Configure Connection Request Policies
It is time now to create a Connection Request Policy. We need a couple of them for this deployment. There are a few things to keep in mind as follows before we proceed to create the policies.
- The default built-in connection request policy uses NPS as a RADIUS server and processes all authentication requests locally.
- To configure a server running NPS to act as a RADIUS proxy and forward connection requests to other NPS or RADIUS servers, you must configure a remote RADIUS server group in addition to adding a new connection request policy that specifies conditions and settings that the connection requests must match.
- If you do not want the NPS to act as a RADIUS server and process connection requests locally, you can delete the default connection request policy.
- If you want the NPS to act as both a RADIUS server, processing connection requests locally, and as a RADIUS proxy, forwarding some connection requests to a remote RADIUS server group, add a new policy using the following procedure and then verify that the default connection request policy is the last policy processed by placing it last in the list of policies. This is the approach we are using for NetScaler deployment.
Create a Connection Request Policy for No Forward
- Open the NPS server console and expand Policies node
- Right Click Connection Request Policies and choose New

- Give the policy a Name

- Click Next
- Click Add
- Select Client IPv4 Address
- Click Add again

- Specify the Client IP v4 Addresses – This will be the NetScaler NSIP if RADIUS isnt load balanced. If load balanced, you must use the Subnet IP of the NetScaler (SNIP)
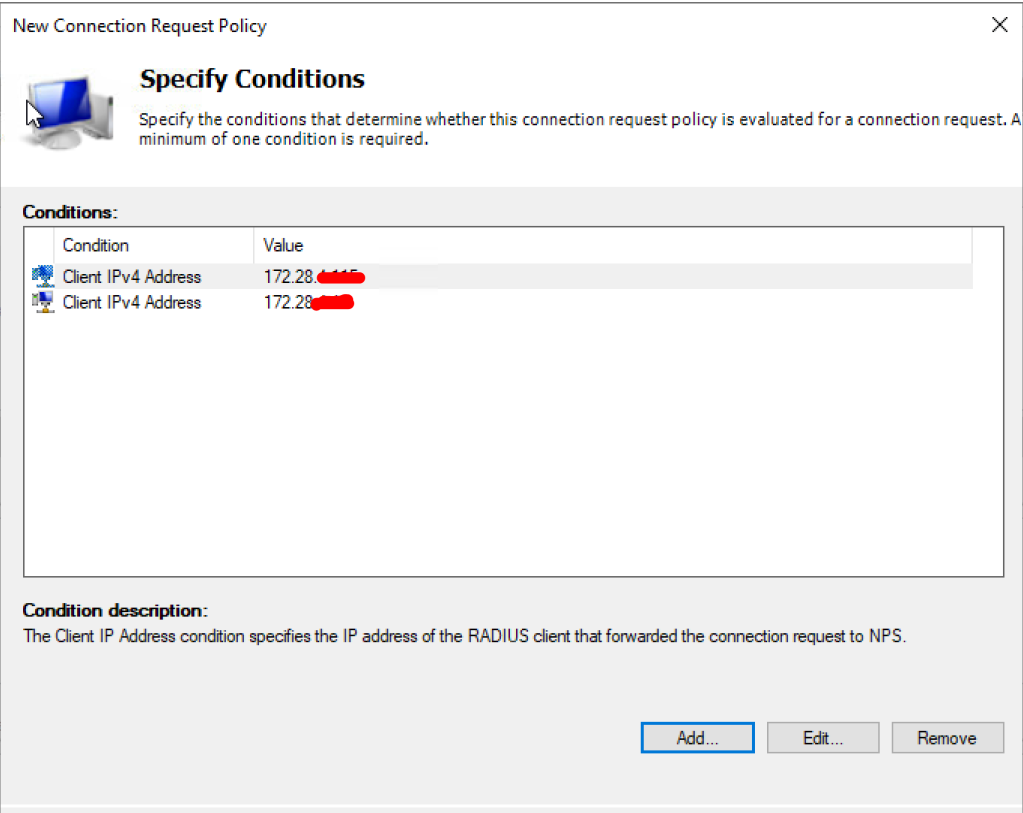
- Click Next
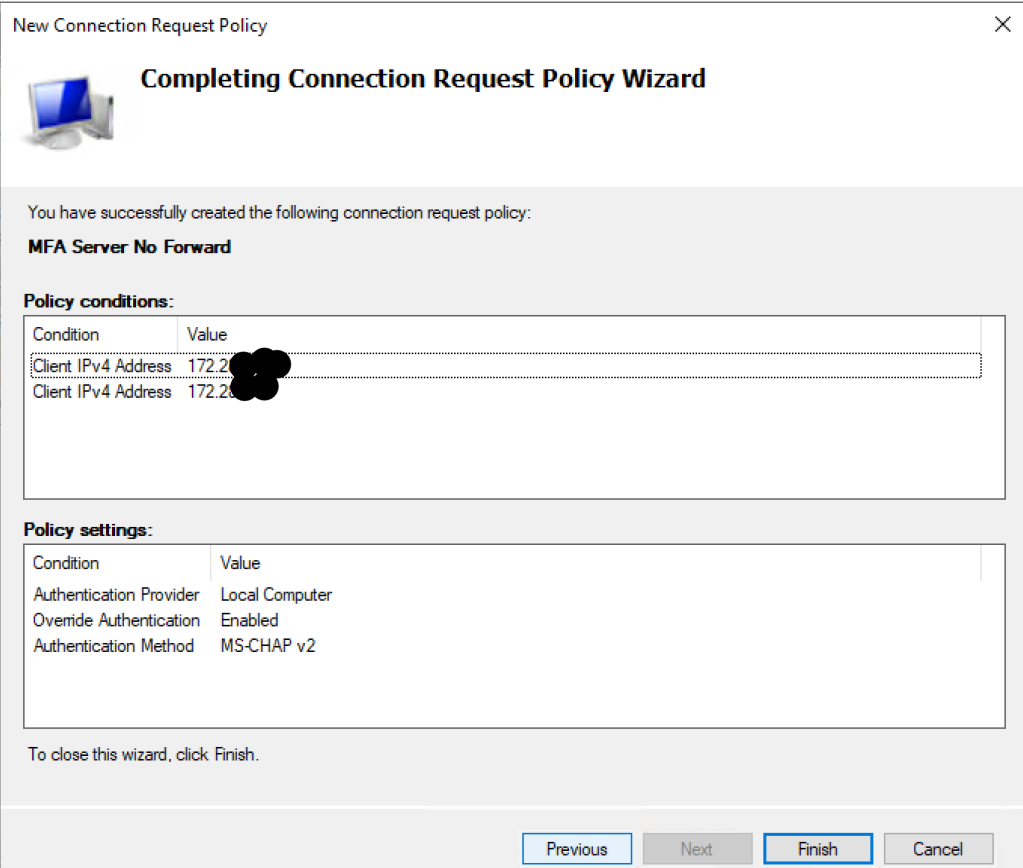
- Configure Authentication as below
- Click Next

- Configure the Authentication exactly as below

- Click Next a couple of times until the Summary page is reached.
Create the second Connection Request Policy for Forwarding
- Right Click Connection Request Policies and choose New
- Give the policy a Name
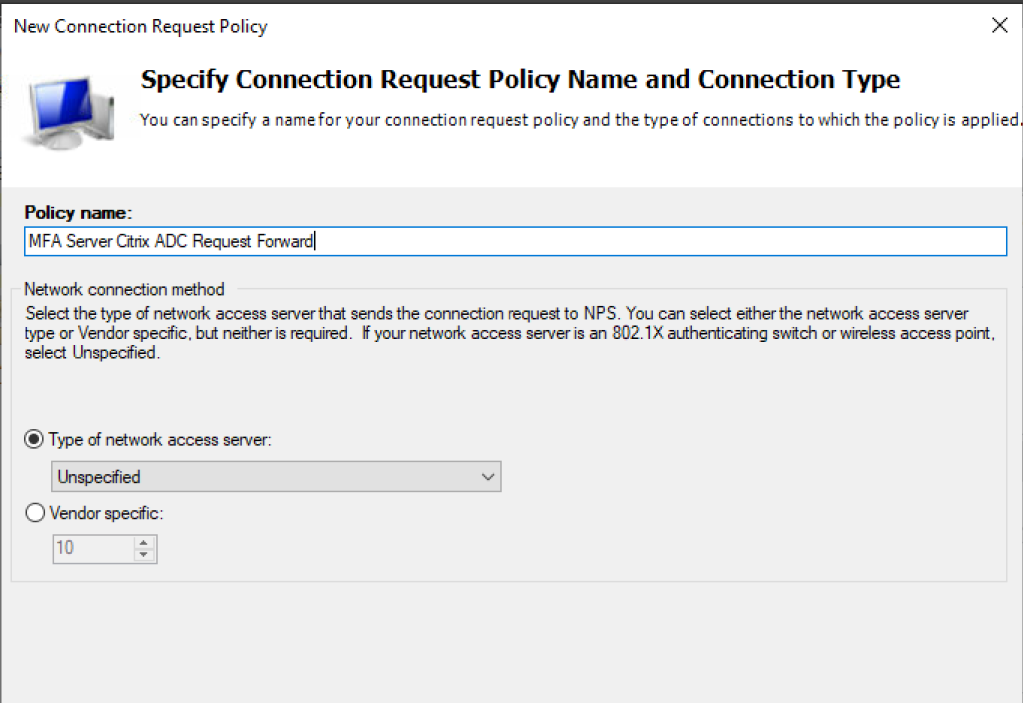
- Click Next
- Click Add
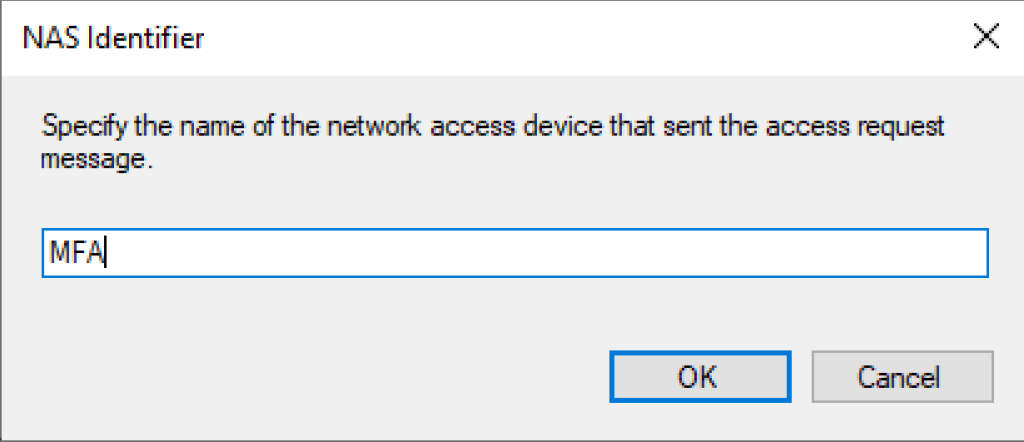
- Select NAS Identifier
- Click Add again

- Enter the name of the NAS Identifier – MFA
- Click OK
- click Next
- Configure the Authentication as below – MS-CHAP-v2

- Click Next
- If you are on the Summary page, click Finish

The two connection request policies should be moved up in the policy priority order and should look like the below.

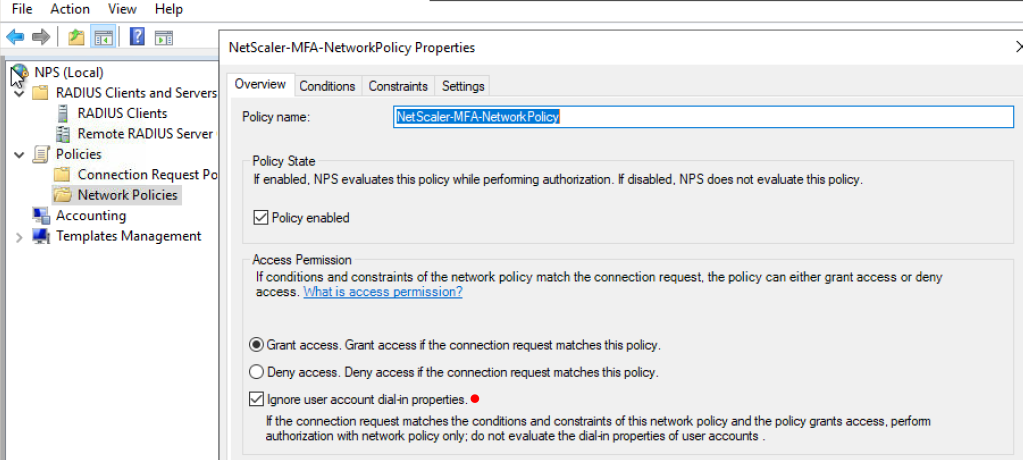
Create the Network Policy
- Go to the Network Policies node
- Right Click and select New
- Give the policy a Name

- Click Next
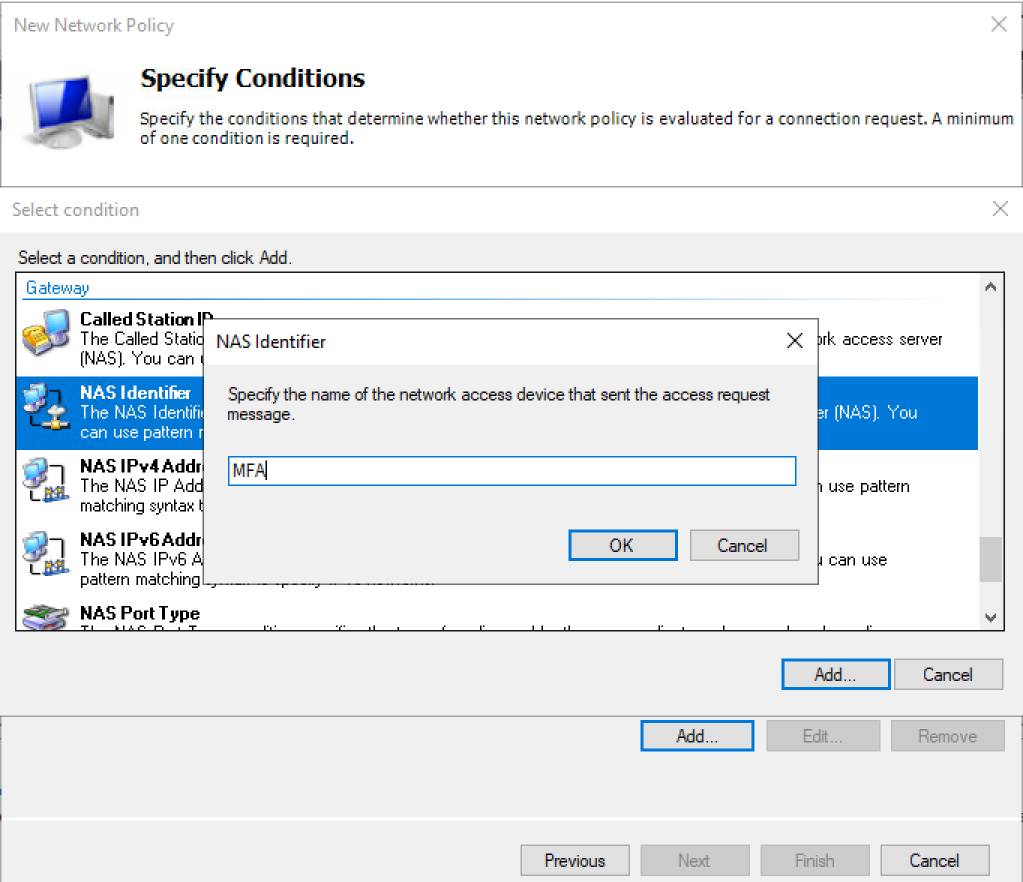
- Click Add
- Select NAS Identifier
- Enter MFA in there
- Click Add again
- Click Next
- Select Access Granted

- Click Next
- Configure the Authentication methods as below

- a few more extra clicks will get you to the Summary page.
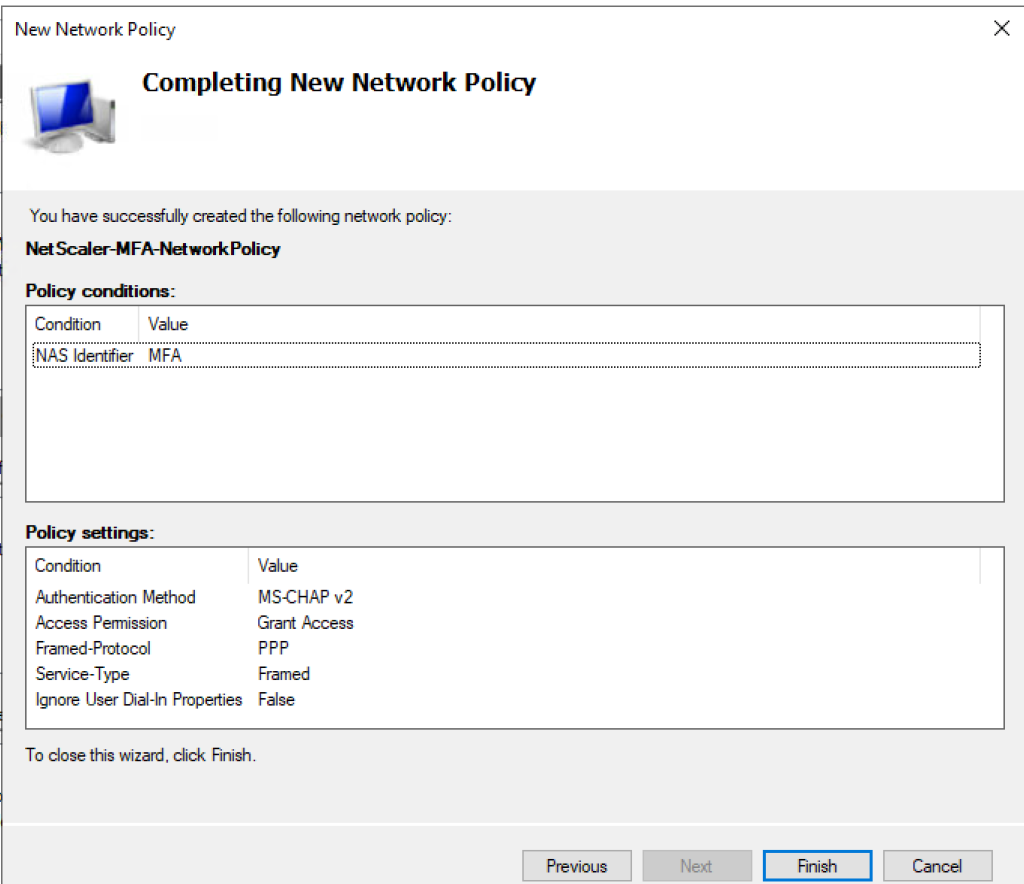
- Click Finish on the Summary page.
- Make the policy that we just created higher up in the order.
- Disable the existing or built-in Network policies.

- Disable the existing Network Policies (Default)
- Move the new Network Policy to the top and assign it priority 1
Repeat the above steps on all the other NPS servers that you have in the deployment.
NetScaler Configuration
You can now proceed to create your vServer in NetScaler. It could be a NetScaler Gateway or a VPN vServer. In this post, i will not be showing how to create a NetScaler vServer. It is fairly straightforward and there are tons of blog posts on it on the internet. You will just need to set eveything up just like how you would setup a single factor Gateway portal in NetScaler.
- You will need to make sure that ports 1812 and 1813 are open from the NetScaler to the backend NPS server (bi-directional)
- If you have multiple subnet IPs on the NetScaler, use a Net profile to isolate traffic to a particular source IP address.
- If you aren’t load balancing NetScaler, NSIPs are the source IP address. Otherwise SNIPs will need to be used. (The client IPv4 address entries that you made in the previous step will change accordingly)
Create RADIUS Policies and Profiles
- Go to NetScaler Gateway node – Policies – Authentication – RADIUS
- Go to Servers tab and click Add
- Give a name to the Server profile
- Enter the IP address of the NPS server
- Port is 1812
- Enter the Shared Secret Key
- Change the time out to 60 seconds if you intend to use phone calls, SMS or phone app auth.
- Test the connection and ensure that you get all green

- Click More

- Enter the NAS ID here – MFA
- Password encoding as mschapv2

- Click Create
- Similarly, create additional RADIUS servers using the same steps above.
Create RADIUS policies now to attach the RADIUS server profiles so that it could be bound to vServers.
- Create a RADIUS policy and attach the profile as below

Once, your vServer is ready, the RADIUS policy could be attached to the vServer as a primary authentication. Doing this will still perform Active Directory LDAP authentication after which the NPS extension will check the second factor authentication.

OR you can create an Authentication profile which is attached it to a non-addressable Auth vServer. Only advanced policies are supposed from NS 13.1 onwards so it is a better idea to go with the Authentication Profile method to future proof the solution.

Click Add
Give the Authentication Virtual Server a Name
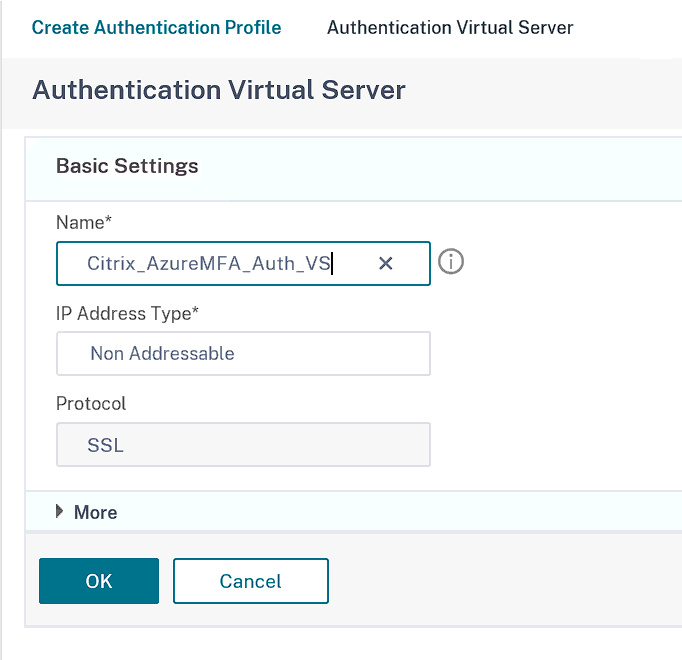
Click Ok

Click on No Authentication Policy
Click Add and specify the details below

Click Create
Click Bind
Click Continue
Click Done
The Auth vServer will be marked as Down. Don’t worry about that. If you are using a Standard edition licenses, there is no way you can attach a certificate to the Auth vServer via the GUI.
For Enterprise editions and above you can go to Security – AAA Traffic node and attach a certificate to the vServer if you don’t like the idea of vServer being down or you don’t want SNMP traps to trigger unwanted alerts.
Bind the authentication profile to the Gateway vServer

You can now test with an account that is MFA enabled. If everything is setup correctly, MFA will work fine and prompt with a second factor.
Troubleshooting
- Always check the Authentication server status of RADIUS server in NetScaler. It should be green when the traffic is allowed. if it is not, check why? Work with your NW team to figure out why the traffic doesn’t reach the NPS backend or being returned back. I have also seen instances where the Dashboard shows red but things work just fine. Citrix GUI based RADIUS testing is flawed in my opinion and should be never be solely relied upon. Use other methods such as setting up a RADIUS monitor to test RADIUS reachability.

- RADIUS Monitor config.
Create a domain account for the username used for probing the services. you don’t need to enable MFA for this account. Also, make sure that you follow the steps in the Microsoft article here to avoid creating hundreds of reject requests caused because of the probe. NPS servers supports fake Ping User-Names https://docs.microsoft.com/en-us/previous-versions/windows/it-pro/windows-server-2008-R2-and-2008/dd197614(v=ws.10)

- Add a DNS A record entry for the Remote URL for Citrix access
- If the NetScaler IPs (NSIP) don’t work, try the Subnet IP as RADIUS clients. If you make a change, ensure that the change is reflected in the Network Policies too. SNIPs are used when you load-balance RADIUS services, otherwise use the NSIPs as RADIUS clients.

- On NetScalers where multiple subnet IPs are used, isolate the traffic using NET Profiles.
- Check aaad.debug logs on NetScaler.
- if you get the below, it is mosty likely an issue with the RADIUS client IPs. It is just that the wrong IP is being used.
No valid RADIUS responses received.
Rejecting with error code 4004
- Look out for Routing issues. If your NPS servers are sitting in a different subnet as compared to NetScaler IPs, looking at the Route table could shed some light. If routes are missing, add them. But please remember not to break existing traffic. If unsure, ask the network guy for assistance.
- Check the Dial-In tab in AD properties for the user. Ensure that the user is allowed access. Or You can configure NPS to override the AD settings by setting the below (look for the red dot below)
- Use the Health Check tool for Azure MFA
- Event Logging – Ensure that NPS logs are turned ON. Log files will be found at C:\Windows\System32\LogFiles. Make sure that the logs are set to DTS compliant. Event Viewer is also a reliable source.


- If you don’t want to limit non-MFA users from accessing the portal, you can add the below registry keys to the NPS servers. This will allow users who aren’t registered in Azure MFA to continue to authenticate using LDAP authentication. This is vital during migration phase. However, this setting must be removed before you move into production.
HKEY_LOCAL_MACHINE\SOFTWARE\Microsoft\AzureMfa
REG_SZ=REQUIRE_USER_MATCH
Value=FALSE
- Some useful reference links – How to setup MPS extension with Azure MFAIntegrate your existing NPS infrastructure with Azure Multi-Factor Authentication and here https://docs.microsoft.com/en-us/azure/active-directory/authentication/howto-mfa-nps-extension-advanced
- Microsoft documentation on MFA error codes and what it means – https://docs.microsoft.com/en-us/azure/active-directory/authentication/howto-mfa-nps-extension-errors
- Another good troubleshooting video here – https://www.youtube.com/watch?v=EHvqMEjorJk
- Commands that can be used to see the configuration and shared secret key
netsh nps show config
netsh nps show client - Fix for the error message
“NPS Extension for Azure MFA: CID: e9fef35b-b365-4dde-b347-357c008b38e6 : Request Discard for user [email protected] with Azure MFA response: BecAccessDenied and message: MSODS Bec call returned access denied,BecAccessDenied,SAS.Shared.Exceptions.BecWebServiceException: The BEC web service failed to successfully respond to a call after 0 retries —> System.ServiceModel.FaultException`1[Microsoft.Online.Administration.WebService.AccessDeniedException]: Access is denied for the specified domain.”
Verify that the user logon name in on-prem AD is the same as the Azure AD login. if email addresses are used to login to Azure AD, then modify a registry key on the NPS servers to specify an alternate logon attribute as below
HKEY_LOCAL_MACHINE\SOFTWARE\Microsoft\AzureMfa
Reg_SZ=LDAP_ALTERNATE_LOGINID_ATTRIBUTE
value=mail

- More troubleshooting links https://martinsblog.dk/azure-mfa-nps-extension-the-request-was-discarded-by-a-third-party-extension-dll-file/ and https://s4erka.wordpress.com/2019/01/25/azuremfa-nps-troubleshooting/
Hope this helps! Please feel free to comment or provide feedback.

Leave a reply to Ehtisham Cancel reply