Citrix Machine Creation Services (MCS) is a compelling technology these days for provisioning virtual machines quickly and easily in Citrix environments. The whole technology is built around simplicity and requires just a supported hypervisor that utilizes snapshots to create additional VMs on the fly. There isn’t much required from a supporting infrastructure point of view as well. If you have a robust hypervisor with enough space in the storage array, MCS will work just fine. All that you would require is a service account with defined permissions for the whole thing to function.
If anyone wants to know what permissions are required for the MCS service account to function correctly, that could be found in the following Citrix official links.
I will even argue that MCS is just as good as another provisioning technology from Citrix, named Citrix Provisioning (formerly Citrix Provisioning Services or PVS) with the recent advancements it has made. There are scenarios when Citrix PVS is the better choice but that is a topic for another blog post.
While we are in the midst of Coronavirus pandemic and everyone is staying at home safe and sound, I have had some pleasant experiences working with MCS spinning up extra virtual machines for my customers here in Auckland, as they needed to ramp up their farm capacity to cater to the extra load. I could literally spin up machines in seconds(I am not exaggerating even a bit…) and just be ready for the incoming wave of Citrix users.
In this blog, let’s discuss how Citrix MCS works in general and what happens under the hood when MCS creates virtual machines. Let’s also discuss and compare Citrix MCS in an On-Prem setup versus MCS in Azure. I also have to say that most of the diagrams that you see below are shameless copies of Citrix’s own diagrams used in one of their webinars. I don’t mind accepting that 🙂 Now, that’s out of the way, let’s dive right in.
Citrix MCS – On Prem
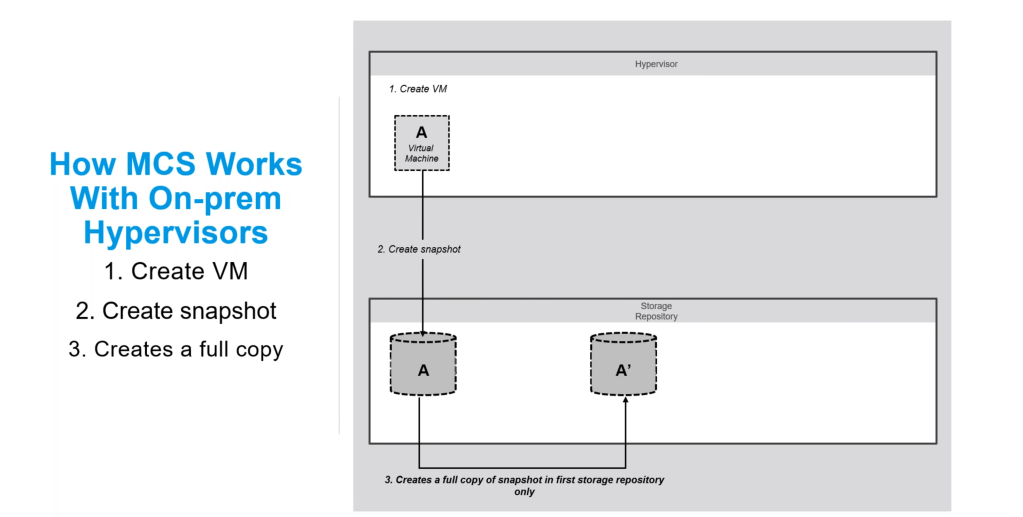
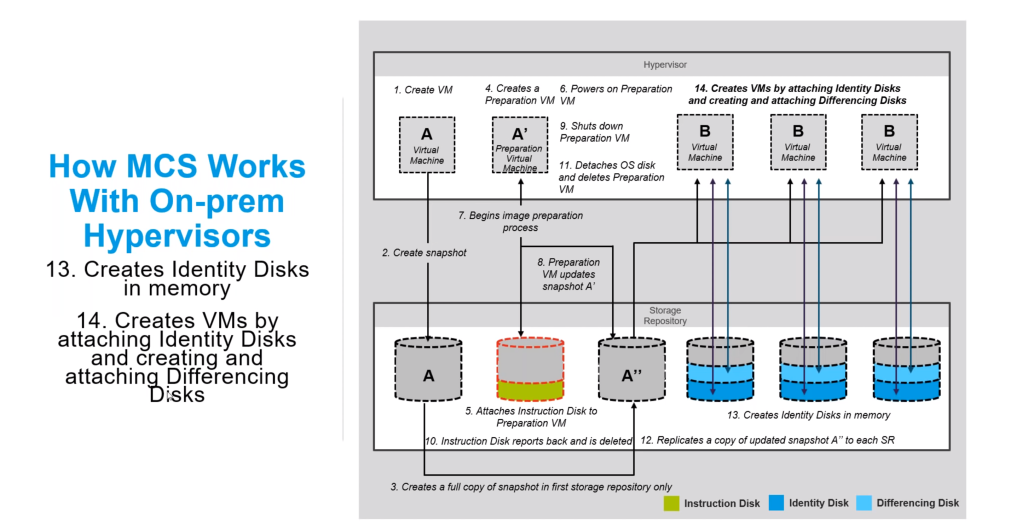
So how does Citrix MCS works with your On-Prem hypervisor?
- You create a master template or gold template and make all the changes that you want to it.
- Once you are happy with the changes to the VM, go to your hypervisor console and take a snapshot of the VM.
- After that you go to the Studio console and either add a new Machine catalog or add machines to an existing catalog. At that time, a full copy of the VM’s base image disk is taken and copied to the first storage repository (Datastore for VMware folks!).
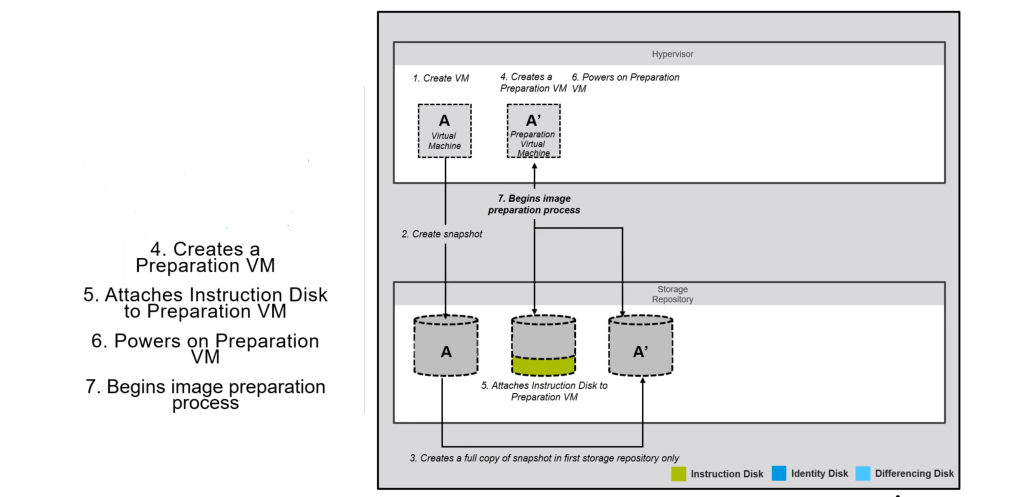
- Now it creates a Preparation VM and it is going to get interesting from now on.
- To the Preparation VM, an Instruction Disk is attached. This will strip out all the previous identity information from the prep VM. In other words, it de-personalize the VM so that a fresh identity could be assigned to it at a later stage.
- Now its time to power ON the Preparation VM.
- The Image preparation process begins in step 7.
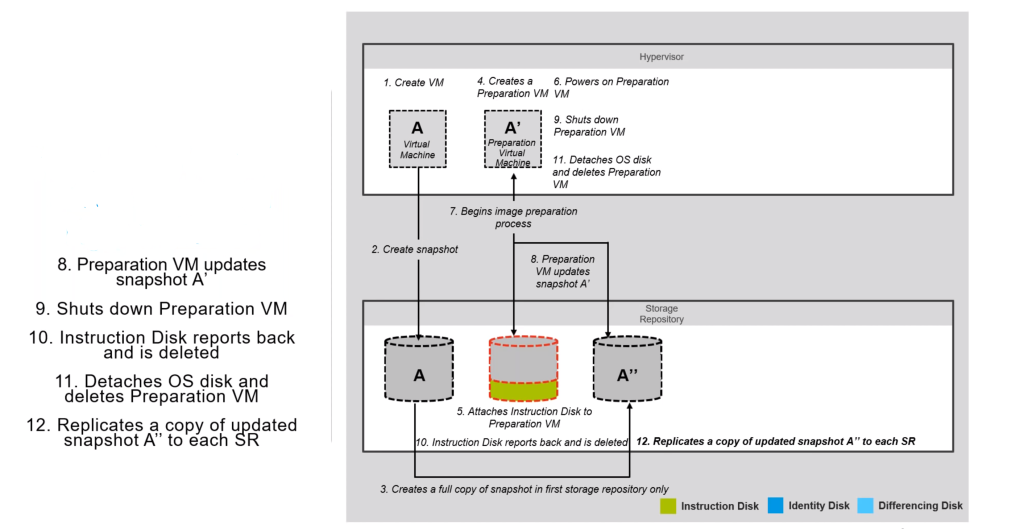
- The Preparation VM now updates the snapshot A’ along with the original snapshot.
- The Preparation VM is shutdown after this stage.
- The Instruction Disk is deleted.
- The OS disk is detached and the preparation VM is also deleted.
- The update snapshot A” is now replicated to each storage repository(or Datastores in VMware). The image is now ready to deploy.
- MCS now creates copies of that image and in that process creates Identity Disks that differentiates the VM from others. If you create more than one VM in the Machine catalog, more Identity Disks are created and will assigned to each image.
- Next step is creating the required number of VMs by attaching the Identity Disks and Differencing Disk. Since all the VMs are sharing a single snapshot, the snapshot is read-only. Any changes, additions or runtime area is added to the Differencing Disk. The on-prem hypervisor is now leveraged to merge the disks to produce the virtual machines.
Identity Disks are 16 MB in size and are read-write capable. This makes them reusable for future VM creation. Delivery Controllers are responsible for creating Identity Disks.
Citrix MCS – Azure
Now let’s look at how MCS works in Azure. It’s mostly the same steps except for a few key differences. In the on-prem version, depending on the hypervisor used, the file formats could vary as in VMDK for VMware vSphere and VHD for Hyper-V or Citrix Hypervisor. With MCS in Azure, the disk file format is VHD as it is based on Azure Hypervisor which is a customized version of Hyper-V.
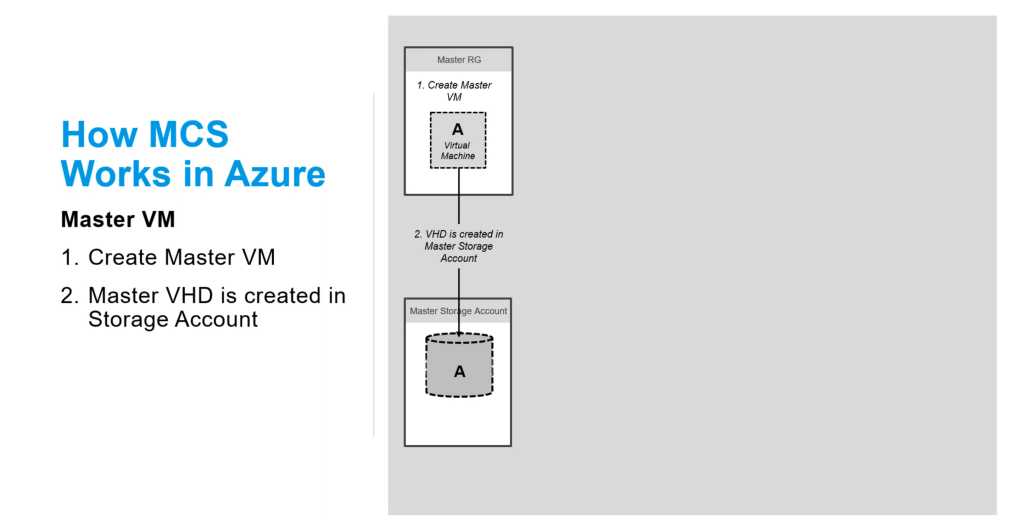
- You create a Master VM to make further copies of it just as in traditional MCS setup.
- The Master VHD is created in a Storage Account. This is the master storage account.
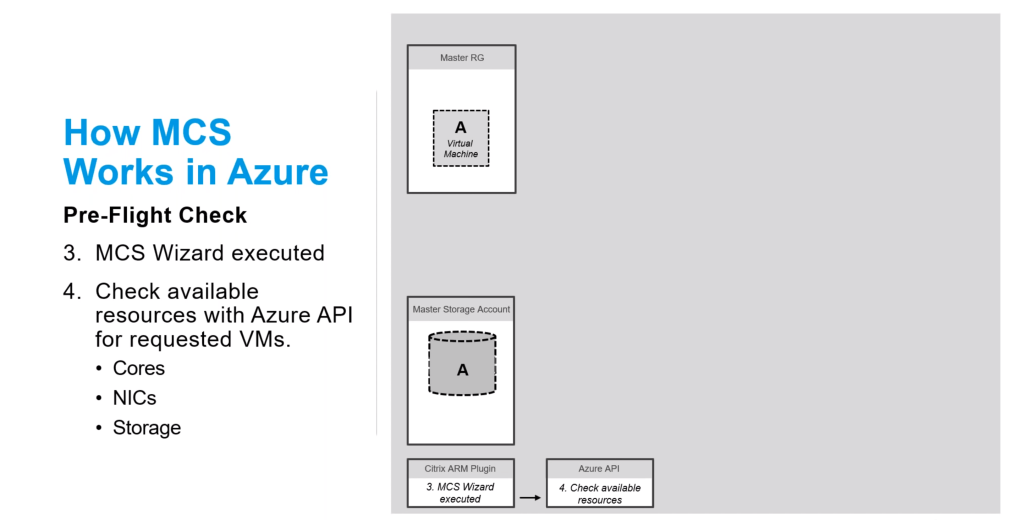
- We then run the MCS Wizard via the Studio if you use the Citrix Cloud service or from Azure Portal if you are subscribed to Citrix Virtual Apps and Desktops Essentials.
- The MCS Wizard checks for the availability of the resources using the Azure API.
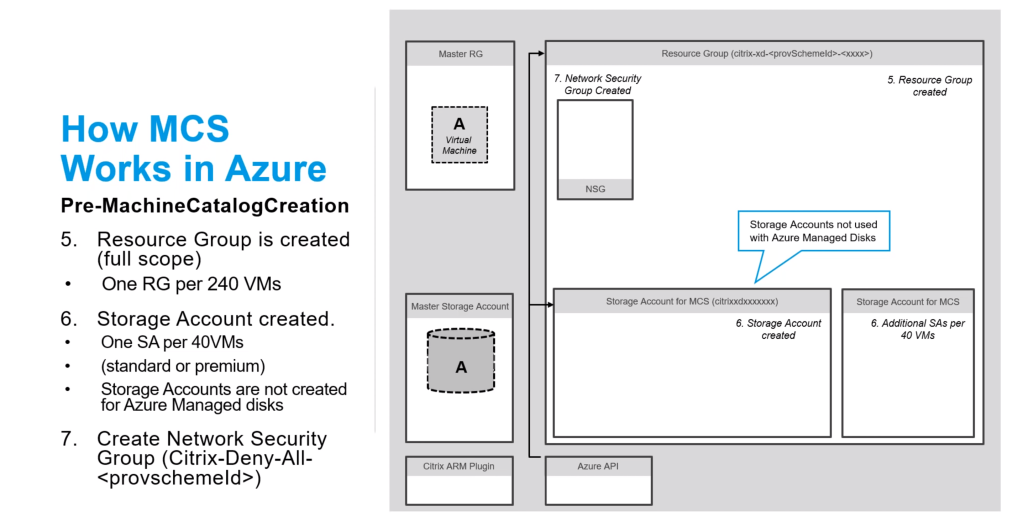
- We will now create a Resource Group (RG) to host all the additional VMs that MCS will create in Azure. One RG could host upto 240 VMs.
- Storage Accounts are created within the Resource Group to host the disks for the virtual machines. One storage account can host up to 40 VMs. Additional storage accounts are created depending on how many VMs we need.
- Network security Groups (NSG) are created next and they will isolate the prepped VM from the rest of the network. If we need 400 VMs, two RGs will be created to host all the VMs.
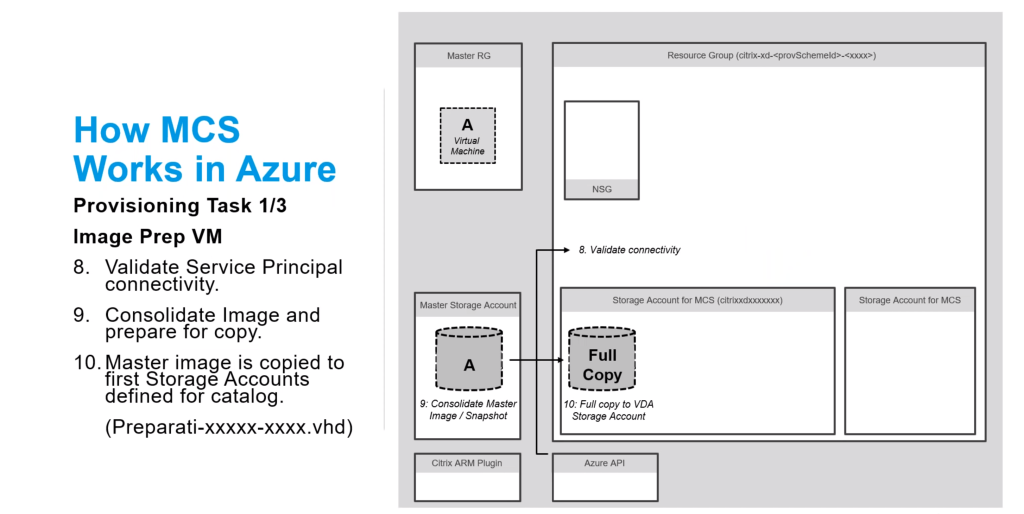
- Next step is validate the connections. The Service principal connectivity will be validated to access the Azure resources.
- The image is consolidated and is prepared for copy. Remember the image is located in the Master storage account in the steps above.
- The Master Image is copied to the other Storage accounts defined for the machine catalogs. Unlike other hypervisor approaches, we don’t need to create snapshots ourselves in this occasion. Azure based Citrix MCS will use the provisioning APIs in Azure to set this all up for us.
- The Identity disk for the Preparation VM is created but not attached yet.
- Preparation VM (A’) is created after that.
- Once the Prep VM is ready, it is stopped to attach the Identity Disk.
- At this stage, the Identity Disk is attached to the Preparation VM.

- The Preparation VM is started again for further steps.
- Once the preparation steps are completed, the VM is stopped.
- Preparation VM disk is now copied to the new Storage Account that is defined for MCS. This is the Base Image.
- The base image is replicated to other storage accounts within MCS.
- The Preparation VM and its’ Identity Disk is now deleted.
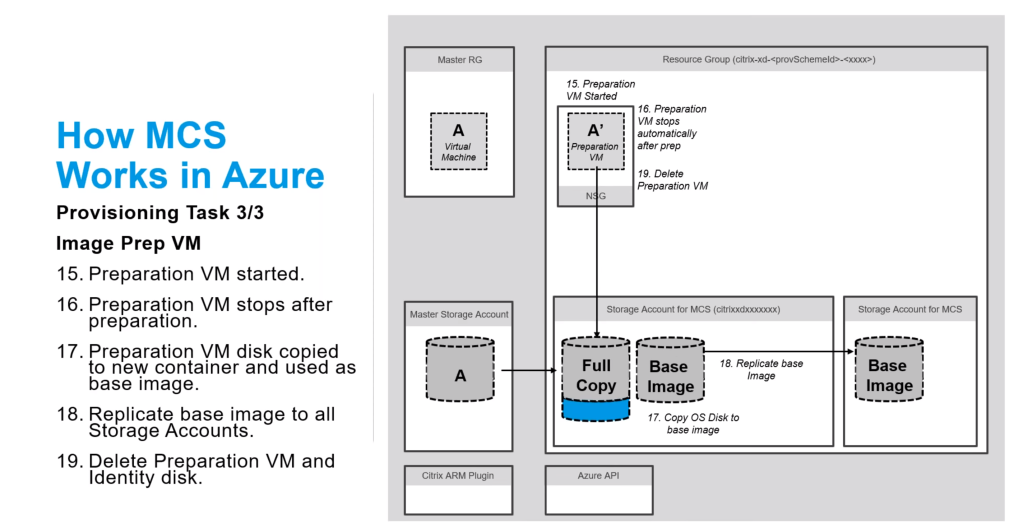
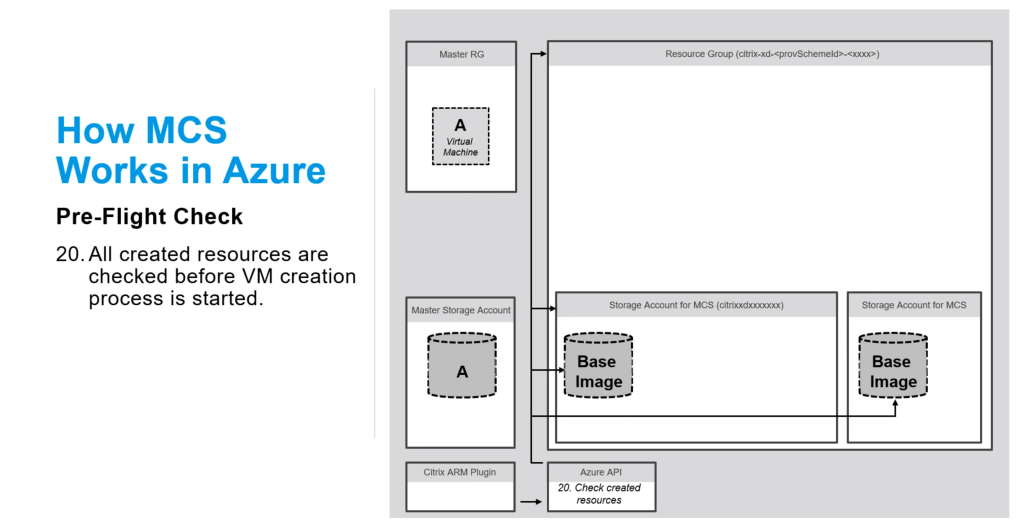
- Then we have a Pre-Flight check where all the created resources are checked for its integrity by MCS. Now the Base Image ready to be cloned to make more VMs.
Storage Accounts – Legacy Approach
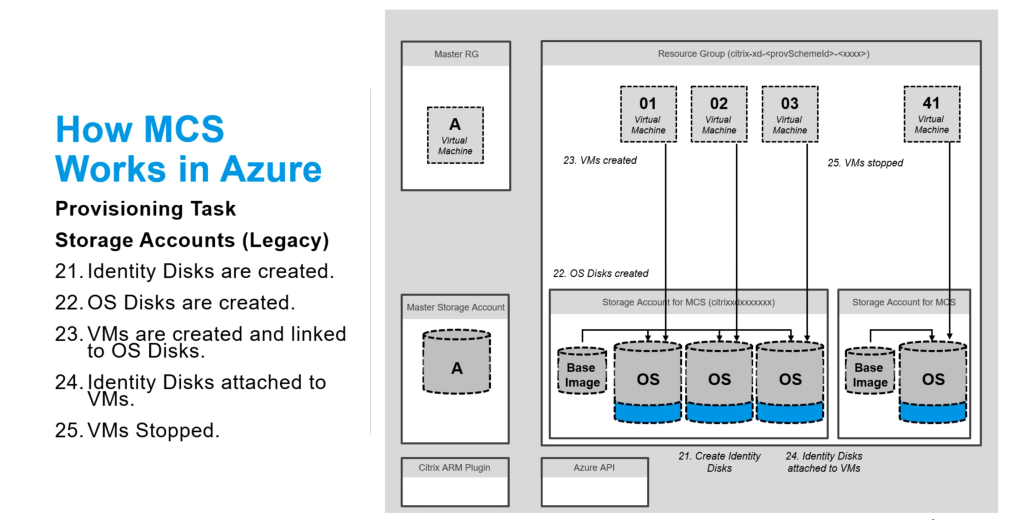
Now, there are two approaches here – Storage Accounts (Legacy ) and On-Demand Provisioning. Let’s discuss Legacy approach until steps 21 to 25.
- Identity Disks are created for the required number of VMs that will be created by MCS.
- OS Disks (from Base Image) are also created followed by Identity Disks.
- VM are provisioned and linked to the OS Disks.
- Identity Disks are attached to the VMs.
- VMs are stopped to avoid extra costs during billing. (This is the case of VDI machines). When users connect, the machines are started on-demand and VMs are fired up ready for action.
On-Demand Provisioning
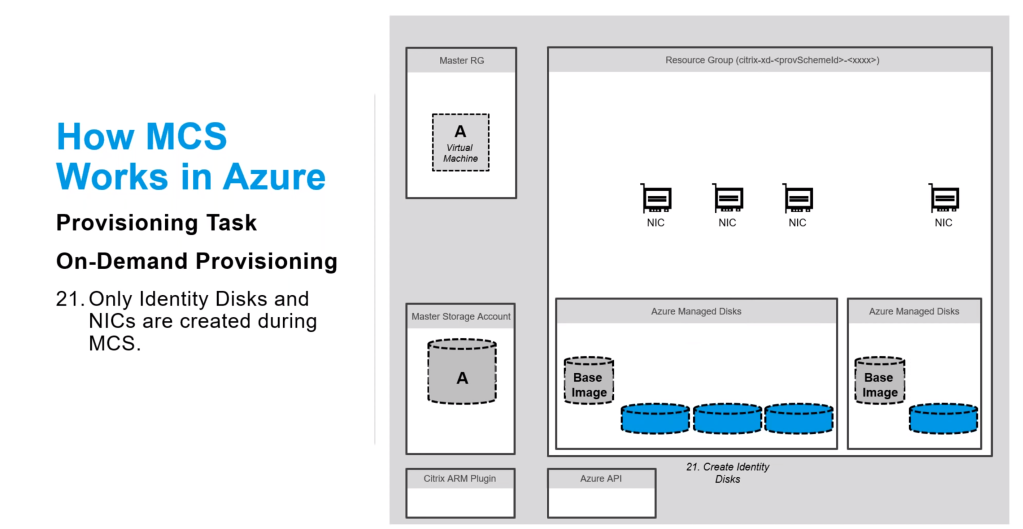
In On-Demand provisioning method, MCS will keep all the required settings within the database and will create VMs only when it is required in an on-demand fashion and not pre-created as in traditional MCS.
- Only identity Disks and NICs are created during MCS in this approach.
You would have noticed by now, instead of Storage Accounts, Azure Managed Disks are being used here.
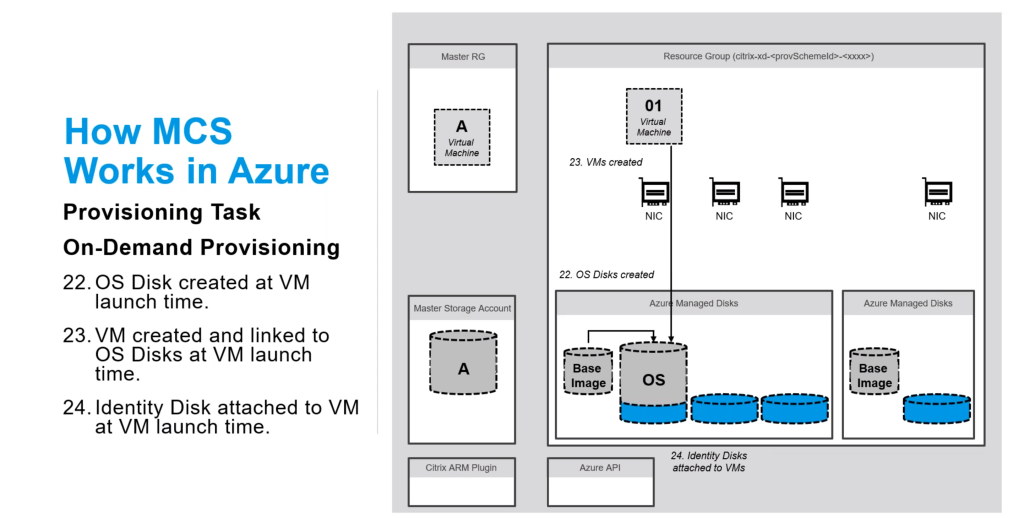
- When there is user traffic in the farm, Citrix VDAs are created on-demand. As a part of that step, OS Disk is created at VM launch time.
- VMs are created and linked to the OS Disks at VM launch time.
- As a final step, Identity Disks are attached to the VM at launch time before the VM is ready to serve the users.
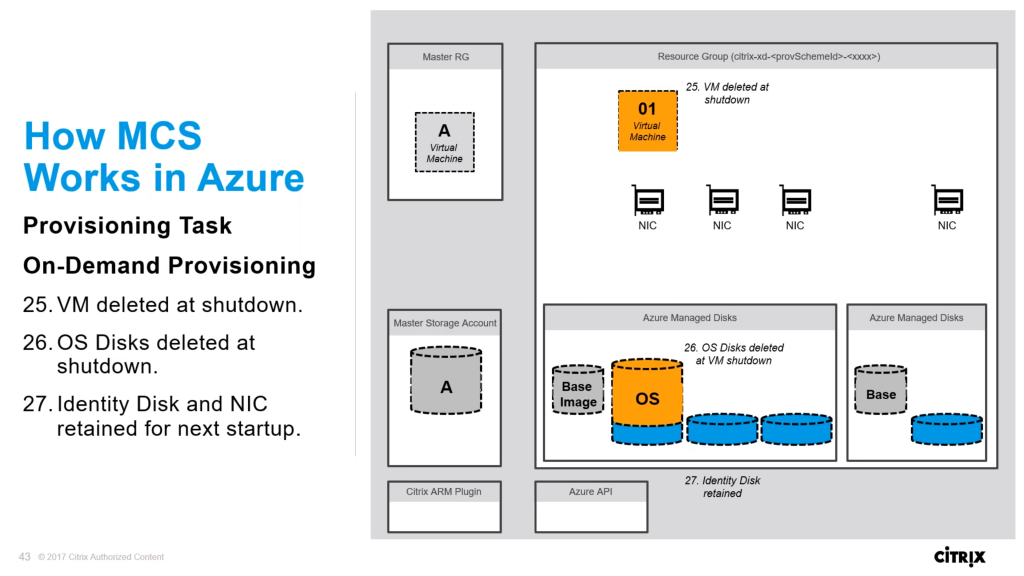
- Once the VM is no longer needed, the VM is shutdown and deleted.
- OS Disks are also deleted post shutdown.
- However, the Identity Disks and NICs are retained for future use. When the VMs are required again, the OS Disk will be attached, merged with the Identity Disk before it is available to be used again.
That’s about it peeps. Happy MCSing in the cloud!!

Leave a Reply to JBE Cancel reply