There are times you would want to create a SAN (Subject Alternative Name) certificate for your deployments in the organization. This is a much more secure approach as compared to using a wildcard as it allows only a limited number of servers to send and receive traffic. Unless you specifically compromise one of the machines specified in the certificate, it’s too hard to impersonate and do any real harm.
In this blog post, I will show you how to create a CSR (Certificate Signing Request) using any Windows machine in the organization that’s domain joined and subsequently, use the request file to issue a certificate using the internal Certification Authority (CA) server.
Create a Certificate Signing Request (CSR)
The first step is to create a CSR file and you can use any domain joined Windows server in the organization. I have used the Citrix Storefront server in this example.
Open the MMC console and add the Certificate snap-in to it as Local Computer. Right Click Personal node on the left and Select All Tasks –> Advanced Operations –> Create Custom Request

Choose Proceed without enrollment policy and Click Next. Choose No Template Legacy Key for compatibility reasons. Use PKCS#10
Click Next and click Properties

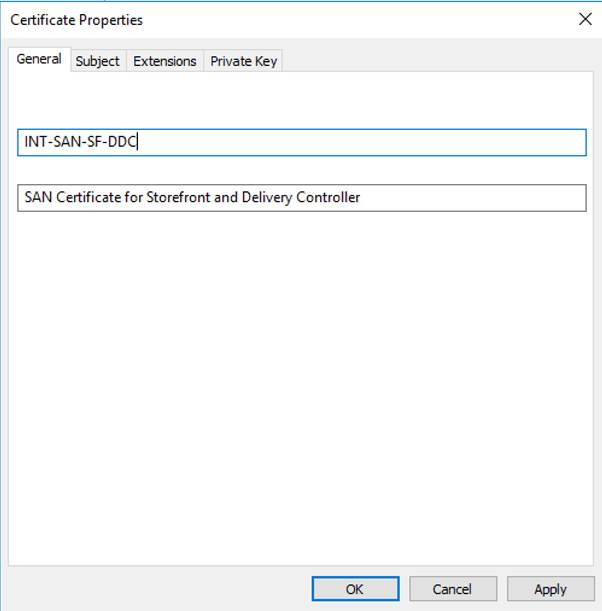
Give a friendly name for the certificate and a description. Ensure that you hit Apply as soon as you are done with the tab.
Click on Subject tab and add all the hostnames under “Alternative Name“
Under Subject Name, enter the Common Name (CN), Organizational Unit (OU), Organization (O), State (S) and Country (C) values. Click Apply

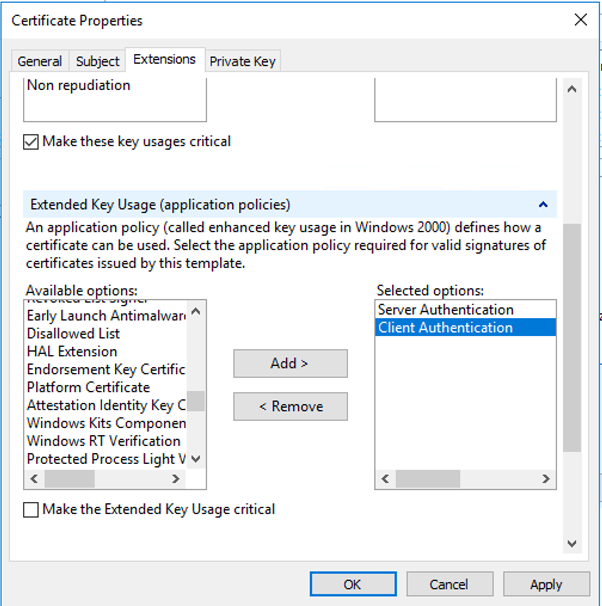
Under the Extensions tab, expand Extended Key Usage (application policies) and select Server Authentication and Client Authentication
Click Apply
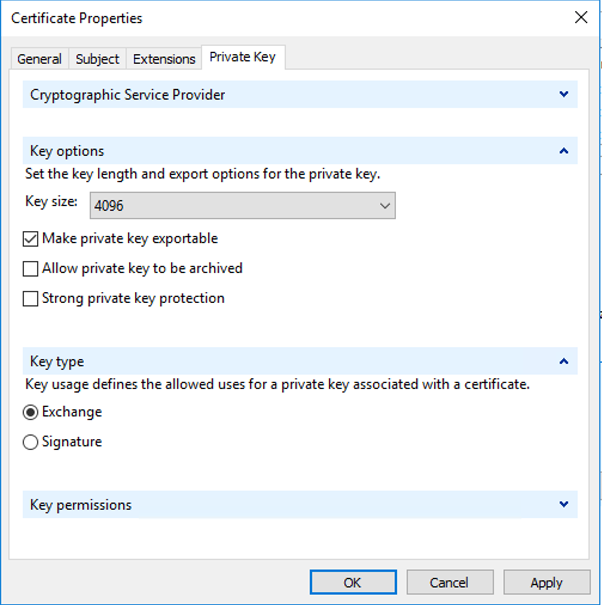
Under the Private Key tab, set the Key size to 2048 under Key options
P.S – Using a key size of 4096 or above will cause issues with NetScaler monitors failing if VPXs are used. MPXs don’t have this issue.
Tick Make Private Key exportable
Select Exchange as the Key type
Click Apply. Click OK
Select a location to save the file. Choose the file format as Base 64
Click Finish

Send the Certificate Request
Now navigate to the URL of the internal Certificate Authority (CA) server. Replace your CA server name for the <certauthority> value.
https://certauthority/certsrv
- Click the Request a Certificate link.
- Click the Advanced certificate request link.
- Click Submit a certificate.
- Paste the contents of your CSR file into the Saved Request text box. (Open the CSR file (with a .req extension) in Notepad and copy the contents without any leading or trailing spaces.)
- For the Certificate Template drop-down list, select Web Server.
- Click Submit.
You get the below once you click submit.

Issue the Certificate

- Connect to the server where the Certification Authority is installed, if necessary.
- Select Start > Control Panel > Administrative Tools > Certification Authority.
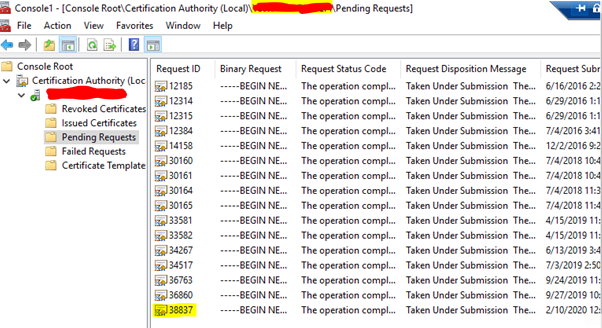
- In the Certification Authority (Local) tree, select Your Domain Name > Pending Requests.
- Select the CSR in the right navigation pane.
- In the Action menu, select the ID number of the request > Issue.
- Close the Certification Authority window.
Download the Certificate
- In your web browser address bar, type the IP address of the server where the Certification Authority is installed, followed by certsrv.
- Click the View the status of a pending certificate request link.
- Select the certificate request with the time and date you submitted.
- Select the encoding format for the downloaded certificate, such as Base 64 for a PEM certificate.
- Click Download CA certificate to save the certificate. The certificate will have .CER extension
Install the Certificate
- Navigate to the server where the certificate needs to be installed.
- Open a MMC console as Administrator and add Certificate snap-in under Local Computer
- Expand Personal node and right click the Certificates node.
- Select All Tasks –> Import
- Click Next
- Locate the downloaded certificate file
- Click Next
- Place it under Personal node
- Click Next
- Click Finish

Note – The installed certificate in Certificate MMC shows a little key symbol and a badge. You gotta see these 2 things for the certificate to work or show up in IIS Manager in later steps.

Export the certificate as a .PFX file
Now, you need to export the certificate as a PFX file so that this could be installed on all the other servers which doesn’t have any clue of the privaty key used while requesting the CSR. If you recall, we did the CSR from one of the Storefront servers. The PFX certificate files contains the private key which is paramount for SSL deployments.
- Navigate to the server where the certificate has been already installed.
- Open a MMC console as Administrator and add Certificate snap-in under Local Computer
- Expand Personal node and right click the Certificates node.
- Select All Tasks –> Export
- Click Next
- Export the private key
- Click Next
- Under the Personal Interchange Format, PKCS#12, Tick all except for “delete the private key after successful export”
- Click Next
- Give it a password of your choice (make sure that you remember this; This is required for installing the certs on other servers)
- Specify a file name to save it in a location
- Click Next
- Click Finish

Bind the website in IIS
- Open IIS Manager and expand the Server name and choose the Default Web Site
- Under Actions, select Bindings
- Add the https and select the newly installed certificate
- Click OK

Install the exported PFX certificate on the other servers and change the binding to https following the steps above. That’s all to it folks.
If there is anything that’s unclear, please feel free to comment or provide feedback in the comment section below.


Leave a comment