The RDP Proxy functionality is provided as part of the Citrix Gateway and currently is available to all NetScaler Enterprise and Platinum customers.
The following RDP Proxy features provide access to a remote desktop farm or an RDSH session host server through Citrix Gateway:
- Secure RDP traffic through CVPN or ICAProxy mode (without Full Tunnel).
- Single sign-on (SSO) to RDP servers through Citrix Gateway. Also provides an option to disable SSO if needed).
- Enforcement (SmartAccess) feature, where Citrix ADC administrators can disable certain RDP capabilities through Citrix Gateway configuration.
- Single/Stateless(Dual) Gateway solution for all needs (VPN/ICA/RDP/Citrix Endpoint Management).
- Compatibility with native Windows MSTSC client for RDP without the need for any custom clients.
- Use of existing Microsoft-provided RDP client on MACOSX, iOS, and Android.
Firewall Ports
RDP proxy requires port 3389 to be opened from the internet. You could also choose to use other port numbers if you don’t want to use the 3389 port. In a nutshell, just opening 443 port isn’t enough to get this to work.
Initial Configuration
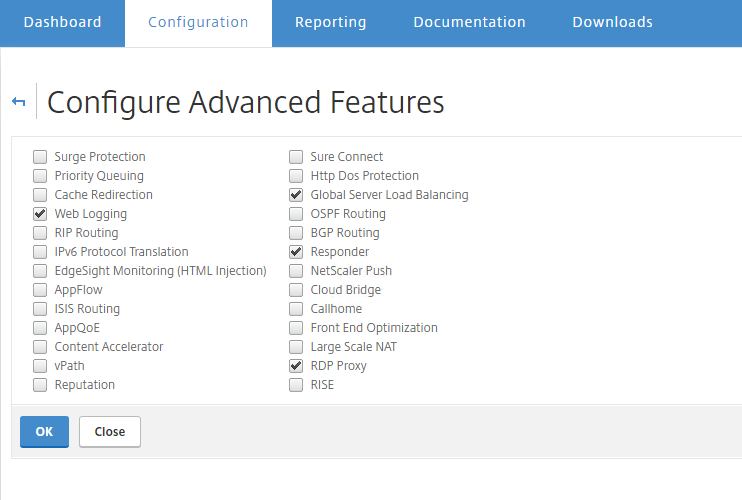
Now to get started, we will need to enable RDP proxy feature if it isn’t turned ON. For that, navigate to System – Settings – Configure Advanced Features and ensure that RDP proxy is turned ON. if not, tick the box to Turn ON RDP proxy feature. You will need NetScaler Enterprise and above for this feature to work.
Create LDAP Profile and Policy
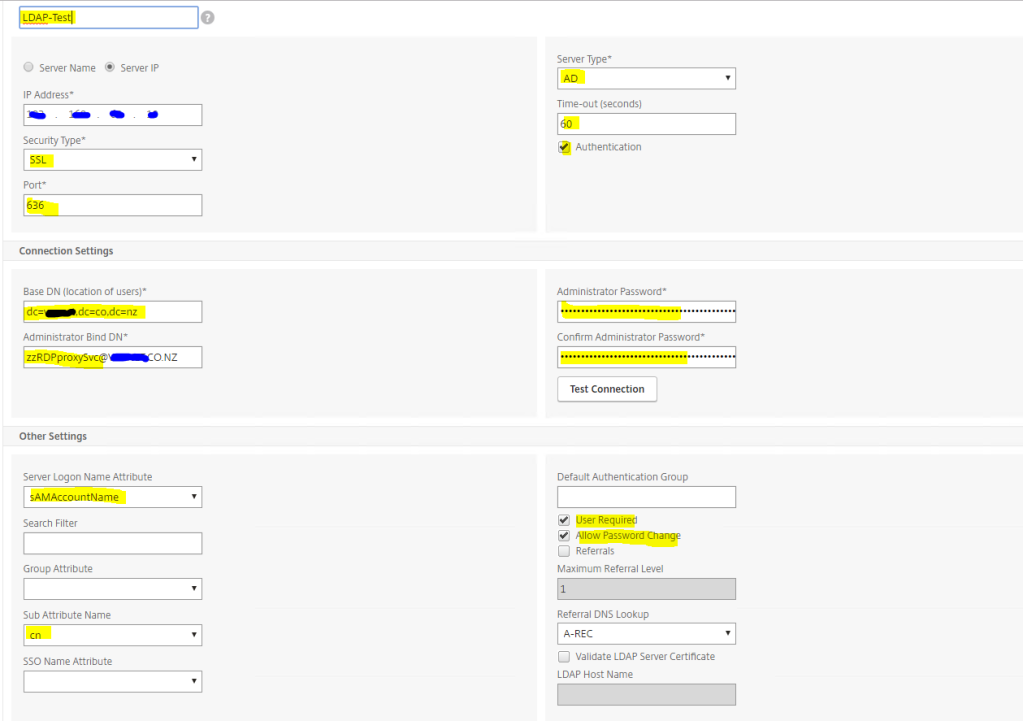
Create an LDAP profile for authentication. Navigate to NetScaler Gateway – Policies – Authentication – LDAP
Click on the Servers tab and click Add. Enter the required details such as AD server IP address, port details and a service account. For those who haven’t done this before, here is a helpful link from Citrix. It’s dead easy to set this up. https://docs.citrix.com/en-us/citrix-gateway/12-1/authentication-authorization/configure-ldap/ng-ldap-authen-configure-tsk.html If you have any questions, just pop it in the comments window and I will respond when I see them.
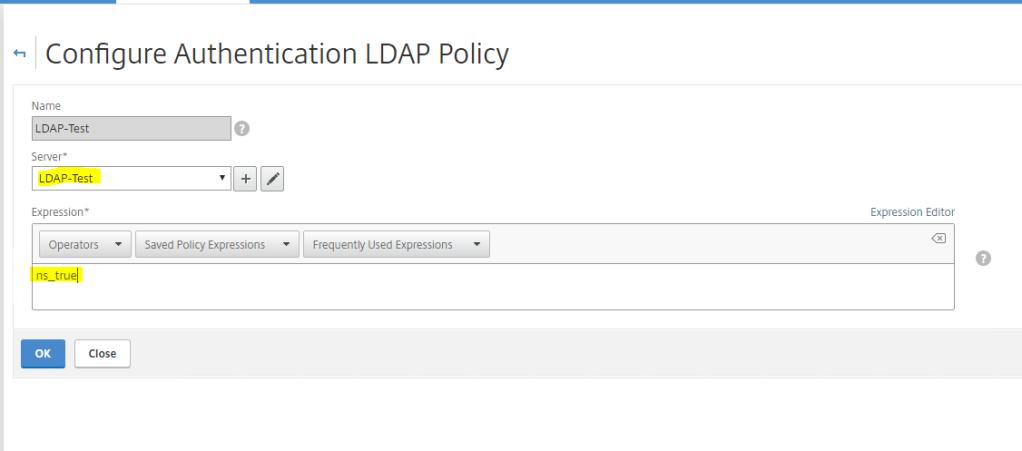
Now create the LDAP policy. Click on the Policies tab, click Add. Enter the entries as shown in the picture below. Ensure that the correct LDAP profile is selected.
Create the RDP Client Profile
Navigate to NetScaler Gateway – Policies – RDP Profiles and Connections – Client Profiles
Click Add
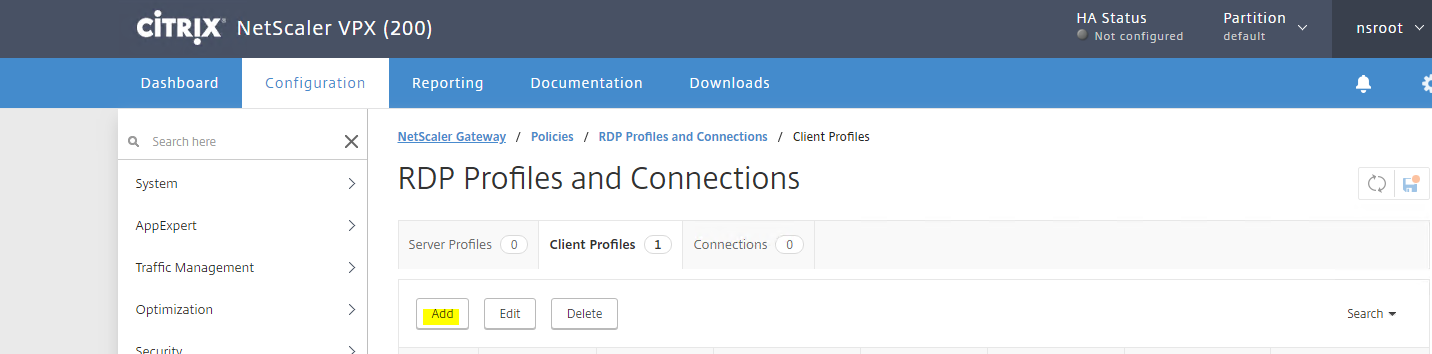
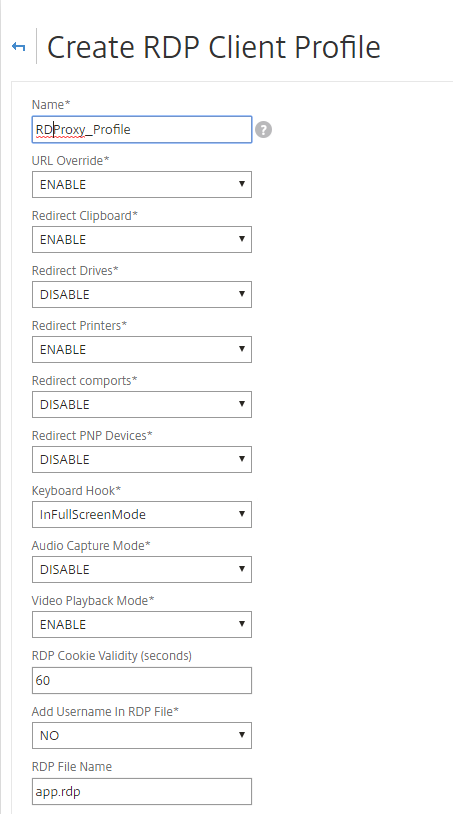
Give it a name such as RDProxy_Profile and leave the rest of the values default if you would like. I changed the RDP Cookie Validity from 60 sec to 120 seconds
Click OK
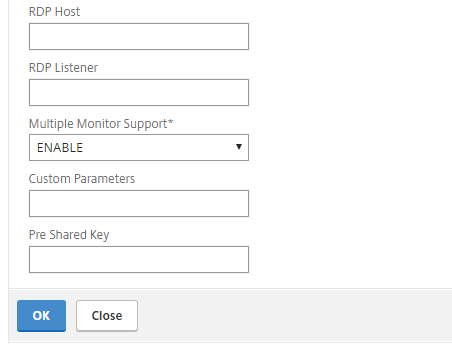
Create an RDP Server Profile
Create an RDP Server Profile. Click on the first tab that says Server Profile
Click Add and enter a name for the server profile. Enter the IP address (this is the IP address of the RDP Proxy Virtual Server that you will configure under the NetScaler Gateway). Enter the port number – You can choose to go with the default RDP port if you wish to or choose another one
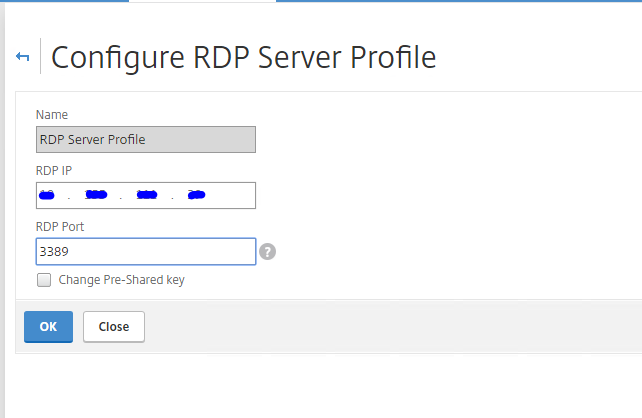
Click OK
Create a Session Profile
Now, go to NetScaler Gateway – Policies – Session – Session Profiles. Click Add
Give the profile a Name
No changes under the Network Configuration tab. Leave everything as default there
Under Client Experience tab, change Clientless Access to ON and tick Single Sign-on to Web Applications and Credential Index to Primary. the last setting is turning ON Single Sign-on with Windows
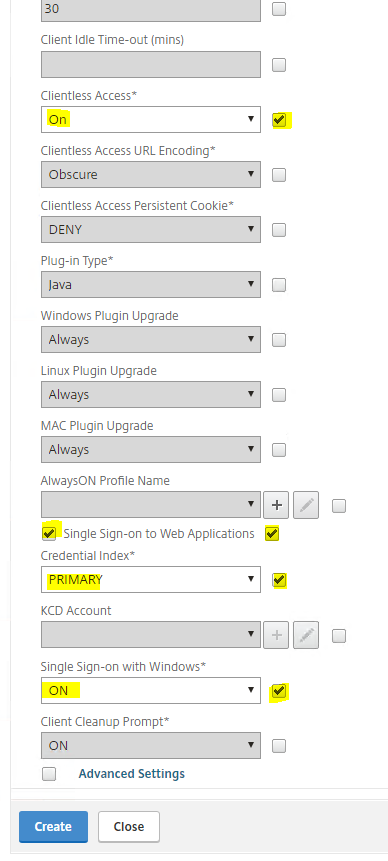
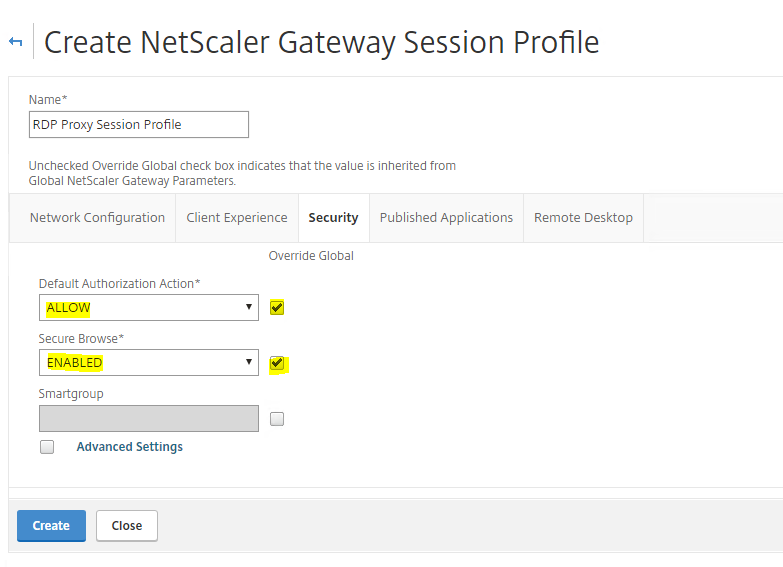
Under the Security Tab, select Default Authorization to ALLOW and Secure Browse to ENABLED
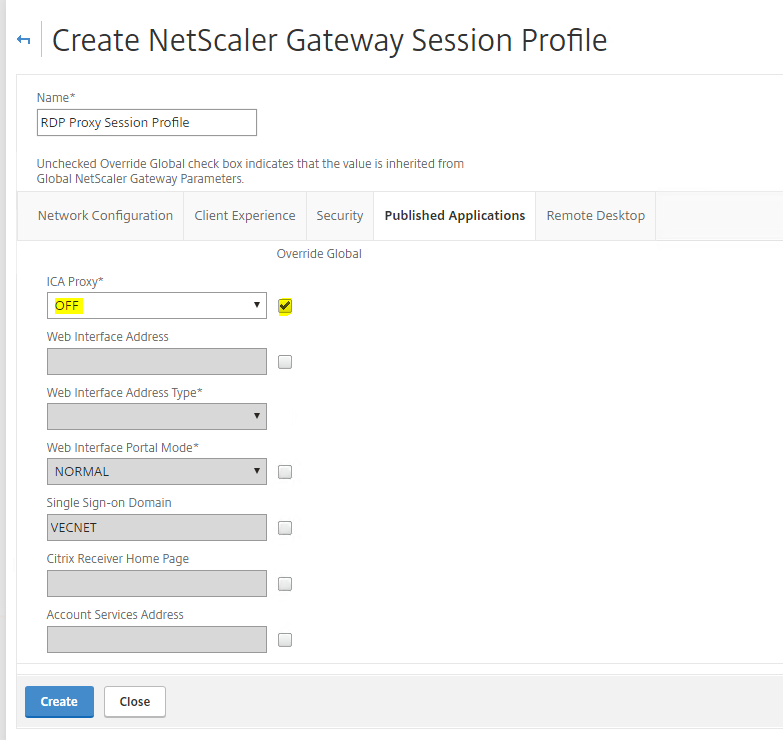
Under Published Applications, set ICA PROXY to OFF
Under the Remote Desktop tab, pick the RDP Client profile that was created in the previous step
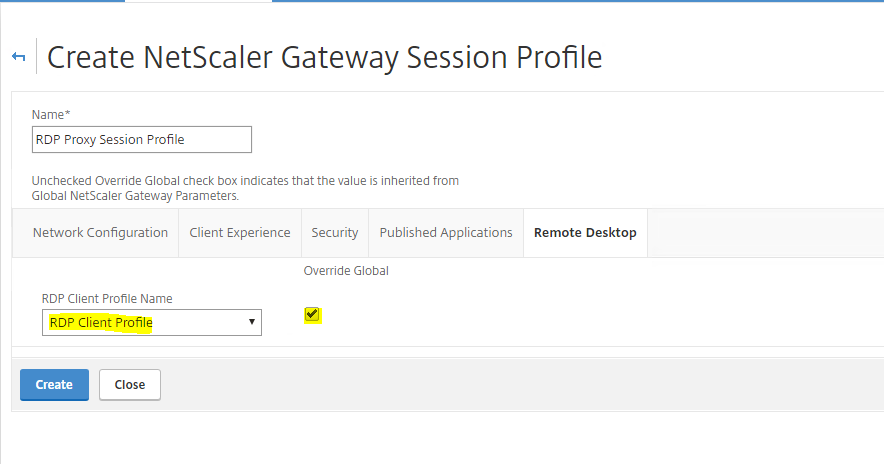
Click Create
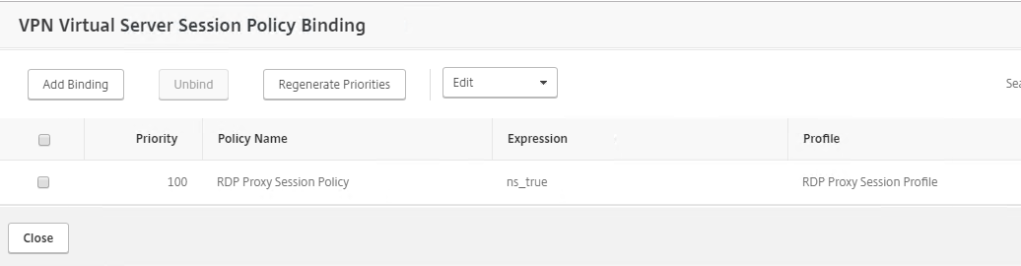
Create a Session Policy
Now create a Session Policy that will be bound to the NetScaler Virtual Server. Remember that we haven’t created the virtual server yet.
Switch to Session Policies tab and click Add. Give the session policy a Name and pick the session profile that we just created in the previous step.

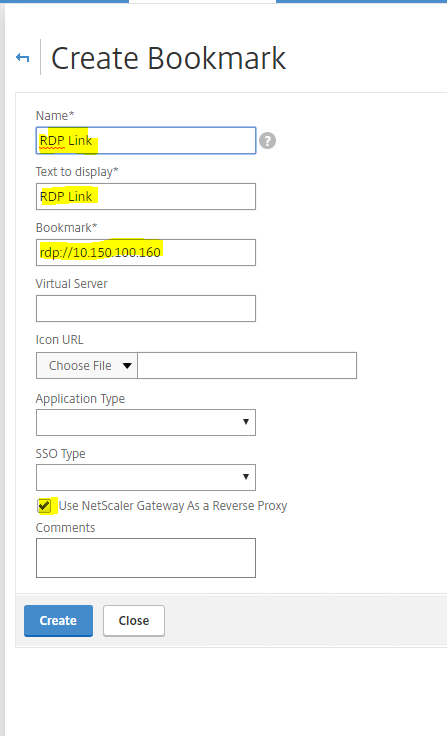
Create a Bookmark
Now create a Bookmark and this is what will appear to the users in the form of an application icon to click on.
Give a Name to the bookmark and enter the name of the string that you want to be displayed in the portal. Enter the Bookmark link in the format rdp://IPaddressOfTheBackendRDSServer
Click Create
Create the Gateway Virtual Server
Let’s create the Gateway Virtual server next. Navigate to NetScaler Gateway node, expand that and under Virtual Servers, click Add
Under Basic Settings, configure the below items
- Name – RDPProxy_rdpproxy.fqdn.co.nz
- IP Address type – IP Address
- IP Address – X.X.X.X
- Port – 443
- Pick the RDP Server Profile – RDP Server Profile
- Ensure that Enable Authentication, AppFlow Logging and State is turned ON
- Disable ICA Only

Click OK
Attach a Server Certificate. The certificate can be a wild card cert or you could choose to get a named certificate that matches the external RDP proxy FQDN
Now bind the Primary authentication policy. We are going to use LDAP and hence I will use LDAP policy that we created in the steps above.
Under SSL Parameters, ensure that only TLS1.2 is turned ON for enhancing the security of client connections.
You can choose to go with the default SSL ciphers or modify the ciphers according to the company requirements.
Under Portal theme, I went with RfWebUI which I think is one of the cleanest UIs. You could choose to create a custom one and use that instead.
Under Published Applications, choose the URL Name and select RDP Link (this is the bookmark link that was created)
Under Policies, attach the Session Policy named RDP Session Policy
Click Create
Testing the Setup
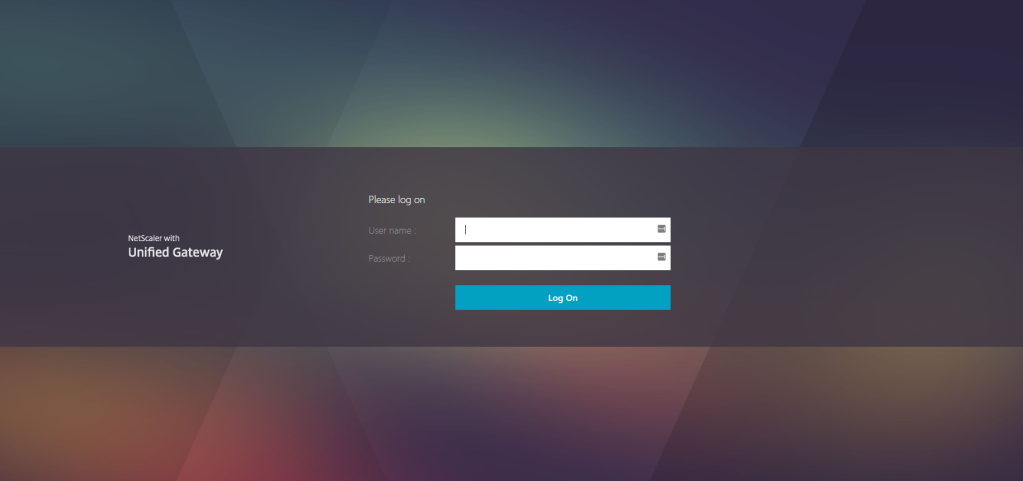
Selecting the RfWebUI gives the below logon page and users could simply use their domain user name and password to log in. They don’t need to enter the domain name.
Upon login, you will be shown the Favorites page where you could add links for quick access. This is very similar to the subscriptions in Storefront.
Click on the Desktops tab and you will be able to see all the published Bookmarks there. I have one in there, you can choose to have any number of bookmarks.
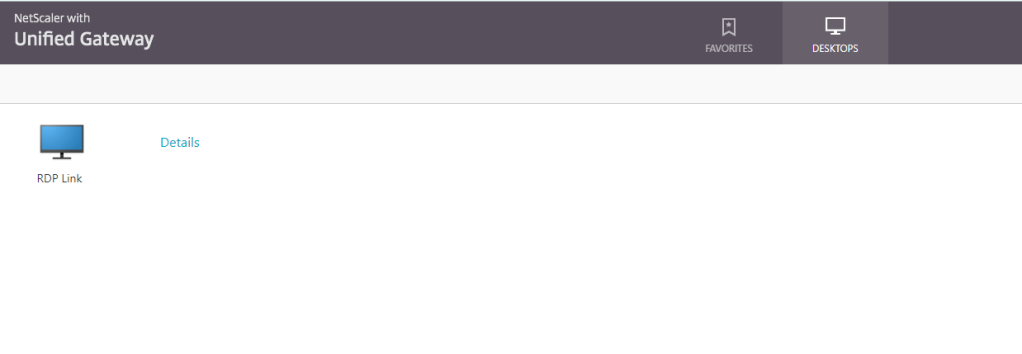
Click on the RDP link to launch the application. It will first download the app.rdp file which could be used to launch the application. You will just need to give the users access to the servers locally by adding them to the Remote Desktop Users group or you could choose to do this via AD domain groups to manage it centrally.

Leave a comment